
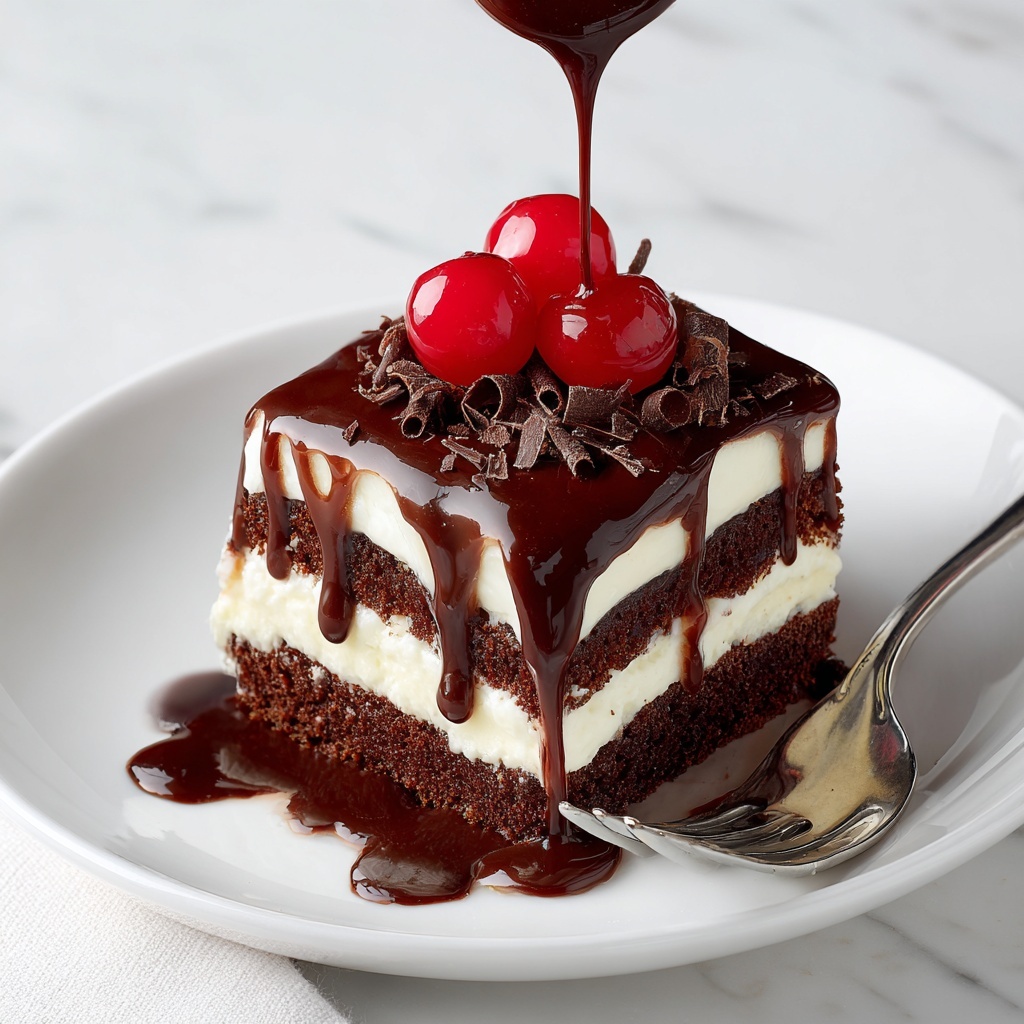
If you’re anything like me and adore the perfect blend of creamy, crunchy, and chocolaty, then this Hot Fudge Ice Cream Cake – Decadent, Rich & Easy Recipe is about to become your new best friend. Imagine biting into layers of smooth vanilla ice cream that melt on your tongue, a crunchy Oreo crust that surprises with every bite, and warm, velvety hot fudge that ties everything together beautifully. It’s a no-bake wonder that dazzles guests effortlessly and satisfies any chocolate craving with style and simplicity. Trust me, once you try this dessert, it’ll quickly earn a permanent spot in your recipe collection.
Ingredients You’ll Need
This recipe keeps things straightforward with a handful of essential ingredients that each play a key role in delivering unforgettable flavor and texture. Every component, from the crunchy cookie crust to the luscious hot fudge and creamy ice cream, comes together to create an unforgettable taste experience.
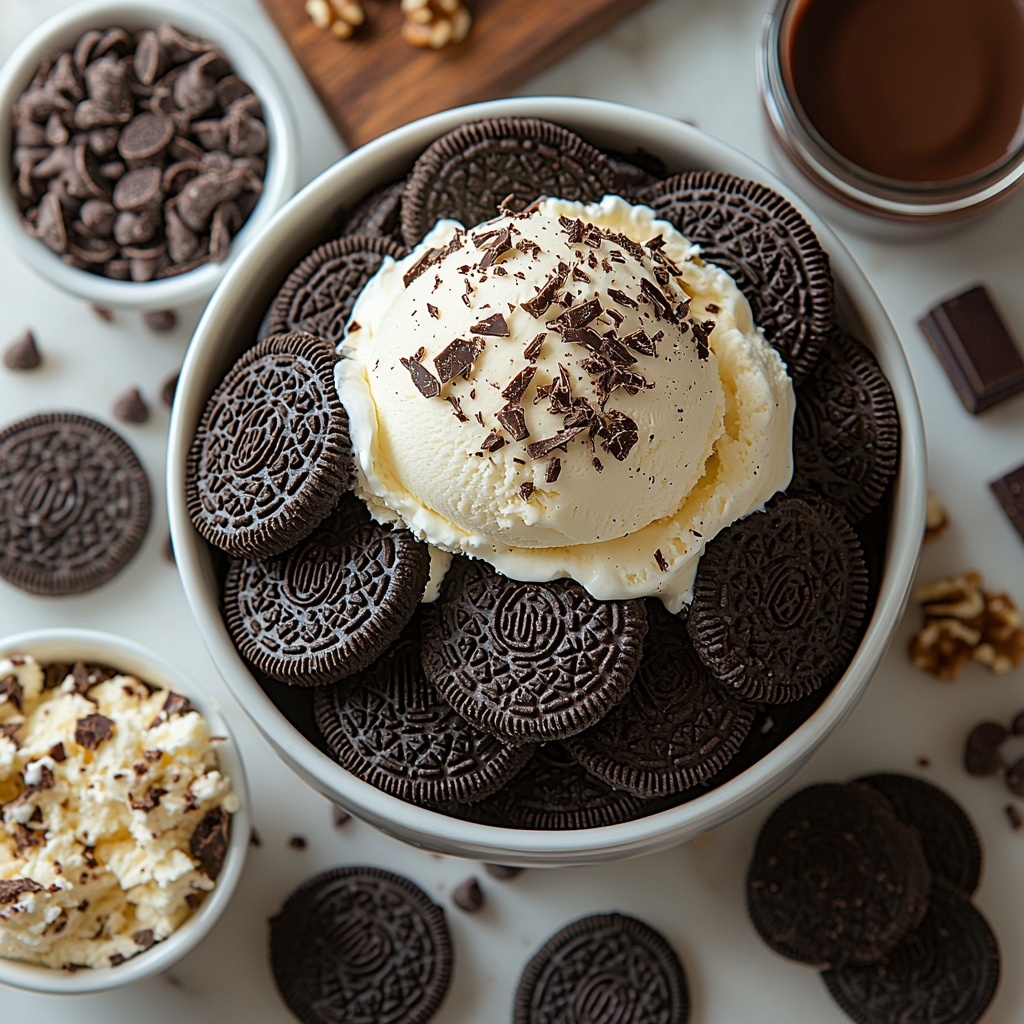
- Oreo cookies (24): The foundation for the crunchy, chocolatey crust that adds wonderful texture and flavor contrast.
- Melted butter (4 tbsp): Binds the cookie crumbs to form a firm, sliceable base.
- Vanilla ice cream (1.5 quarts, slightly softened): Provides a creamy, cold layer that balances the richness of the hot fudge.
- Hot fudge sauce (1 to 1½ cups): Adds warm, gooey decadence—store-bought or homemade, both work like a charm.
- Crushed chocolate cookies or chocolate crunchies (1½ cups): Sprinkled between layers for that surprise crunch in every bite.
- Whipped cream or whipped topping: For a light and fluffy finish that elevates the cake’s appearance and flavor.
- Chocolate shavings or mini chocolate chips: Adds extra chocolate texture and visual appeal.
- Optional toppings: Chopped nuts, caramel drizzle, or sprinkles for fun, personalized touches.
How to Make Hot Fudge Ice Cream Cake – Decadent, Rich & Easy Recipe
Step 1: Make the Crust
Crush your Oreo cookies until they are finely ground and then mix them thoroughly with the melted butter to create a buttery, chocolatey crust. Firmly press this mixture into the bottom of a 9-inch springform pan—the key is to get it packed well so the crust holds together beautifully. Pop it into the freezer for 10 minutes to set.
Step 2: Add the First Ice Cream Layer
After the crust has firmed up, spread half of your slightly softened vanilla ice cream evenly over the top. This layer will firm up in the freezer and create that creamy texture we love. Freeze again for about 15 minutes to let it set just right.
Step 3: Spread the Hot Fudge Layer and Crushed Cookies
Warm your hot fudge sauce gently until it’s easily pourable—this helps it spread smoothly without melting the ice cream beneath. Pour the hot fudge over the first ice cream layer, then immediately sprinkle crushed chocolate cookies or chocolate crunchies over the fudge for that irresistible crunch. Pop the cake back in the freezer for another 10 minutes to keep everything intact.
Step 4: Add the Final Ice Cream Layer
Now, spread the remaining softened ice cream evenly on top, smoothing it out gently. This final layer seals the cake and adds that luscious outer layer of creamy goodness. Freeze the assembled cake for at least 4 hours or, for best results, overnight, making sure it is completely firm before serving.
Step 5: Decorate and Serve
When you’re ready to impress your guests, take the cake out and top it with a generous layer of whipped cream or whipped topping. Sprinkle on chocolate shavings, mini chocolate chips, or any other toppings of your choice like chopped nuts or a drizzle of caramel. Let it sit for about 5 minutes at room temperature—this makes slicing so much easier and the cake more enjoyable.
How to Serve Hot Fudge Ice Cream Cake – Decadent, Rich & Easy Recipe
Garnishes
Beyond the classic whipped cream and chocolate shavings, try adding a few creative garnishes to elevate your presentation. Toasted nuts bring a lovely crunch, fresh berries can add a pop of colour and a hint of tartness, and a drizzle of caramel or raspberry sauce adds an extra layer of indulgence. These little touches make each slice feel like a special occasion.
Side Dishes
This ice cream cake shines as the star dessert, so keep your sides simple and complementary. Fresh fruit salad or a light mint tea make excellent palate cleansers, balancing the richness of the hot fudge and ice cream while refreshing your taste buds for every delicious bite.
Creative Ways to Present
If you’re hosting a party, consider serving this cake in individual mini springform pans or clear dessert cups layered with crushed cookie crumbs and fudge for a personal twist. Alternatively, placing the cake on a chilled marble slab or decorative cake stand can add an effortless elegance that wows guests visually and makes serving easier.
Make Ahead and Storage
Storing Leftovers
Wrap any leftover Hot Fudge Ice Cream Cake tightly with plastic wrap or aluminum foil to keep it from absorbing other freezer odors. Store it in the freezer, and it will maintain its delicious texture and flavor for up to one week after assembly.
Freezing
This cake is a dream when it comes to make-ahead desserts. Assemble it ahead of time and freeze it completely for up to one week. Make sure it’s well wrapped and stored in an airtight container to prevent freezer burn. When you’re ready to serve, let it thaw for about 5 to 10 minutes so it slices cleanly and tastes perfectly creamy.
Reheating
Since this is an ice cream cake, reheating isn’t necessary, but if the cake becomes too hard to slice, leave it at room temperature for a few minutes before cutting. Avoid microwaving it as this can melt the ice cream unevenly and ruin the cake’s texture.
FAQs
Can I use different ice cream flavors for this cake?
Absolutely! While vanilla is classic, swapping in chocolate, cookies and cream, or peanut butter ice cream can add a whole new dimension of flavor. Just make sure the ice cream you choose is good quality and slightly softened for easier spreading.
Is there a way to make homemade hot fudge sauce for this recipe?
Yes! You can easily whip up homemade hot fudge by melting together heavy cream, cocoa powder, sugar, and butter with a pinch of salt. It tastes decadent and fresh, adding an extra layer of indulgence to your ice cream cake.
How do I get clean slices when serving?
The secret to perfect slices is warming your knife. Dip it in hot water and wipe it dry before each cut. This gently melts through the ice cream and fudge layers, giving you smooth, tidy slices every time.
Can I make this cake in advance for a party?
Yes! This Hot Fudge Ice Cream Cake – Decadent, Rich & Easy Recipe is ideal for parties because you can prepare it up to a week ahead. Just keep it frozen until right before serving and add the fresh whipped cream and toppings last minute for the best presentation.
What if I don’t have a springform pan?
If you don’t have a springform pan, a regular 9-inch cake pan can work too. Just line it carefully with parchment paper for easy removal or serve the cake directly from the pan as a scoopable dessert.
Final Thoughts
Whether you’re a dessert newbie or a seasoned sweet tooth, this Hot Fudge Ice Cream Cake – Decadent, Rich & Easy Recipe is guaranteed to impress without any fuss. Easy to assemble, endlessly customizable, and utterly delicious, it’s the kind of treat that brings smiles and requests for seconds every single time. So go ahead, give it a try, and make your next celebration unforgettable with this luscious frozen delight.
Print
Hot Fudge Ice Cream Cake – Decadent, Rich & Easy Recipe
- Prep Time: 20 minutes
- Cook Time: 0 minutes
- Total Time: 4 hours 20 minutes (including freezing time)
- Yield: 10-12 servings
- Category: Dessert
- Method: No-Cook
- Cuisine: American
Description
This Hot Fudge Ice Cream Cake is a decadent and rich dessert featuring layers of crunchy Oreo cookie crust, creamy vanilla ice cream, and warm, gooey hot fudge. Easy to assemble with no baking required, it’s perfect for parties and guaranteed to impress with its perfect balance of cold and warm textures.
Ingredients
Crust
- 24 Oreo cookies (or chocolate sandwich cookies)
- 4 tbsp melted butter
Layers
- 1.5 quarts vanilla ice cream (slightly softened)
- 1 to 1½ cups hot fudge sauce (store-bought or homemade)
- 1½ cups crushed chocolate cookies or chocolate crunchies
Topping
- Whipped cream or whipped topping
- Chocolate shavings or mini chocolate chips
- Optional: chopped nuts, caramel drizzle, sprinkles
Instructions
- Make the crust: Crush the Oreo cookies finely and mix them with melted butter. Press this mixture firmly into the bottom of a 9-inch springform pan. Freeze for 10 minutes to set the crust.
- Add first ice cream layer: Spread half of the slightly softened vanilla ice cream evenly over the chilled crust. Place back in the freezer for 15 minutes to firm up this layer.
- Hot fudge layer: Warm the hot fudge sauce until it is pourable but not too hot. Spread the warm fudge evenly over the ice cream layer. Sprinkle crushed chocolate cookies or crunchies on top for extra texture. Freeze again for 10 minutes.
- Final ice cream layer: Evenly spread the remaining softened ice cream over the fudge layer. Smooth the surface evenly. Freeze the cake for at least 4 hours or ideally overnight until completely firm.
- Decorate & serve: Just before serving, top the cake with whipped cream or whipped topping, chocolate shavings, and any optional extras like chopped nuts, caramel drizzle, or sprinkles. Let the cake sit at room temperature for 5 minutes for easier slicing. Slice and enjoy!
Notes
- Flavor swaps: Substitute vanilla ice cream with chocolate, cookies & cream, or peanut butter flavors.
- Add extra crunch by mixing in chopped peanuts or toffee bits with the cookie crumble layer.
- For clean slices, dip your knife in hot water and wipe it between cuts to prevent sticking.
- This cake can be made ahead and frozen up to 1 week if covered tightly to maintain freshness.


