
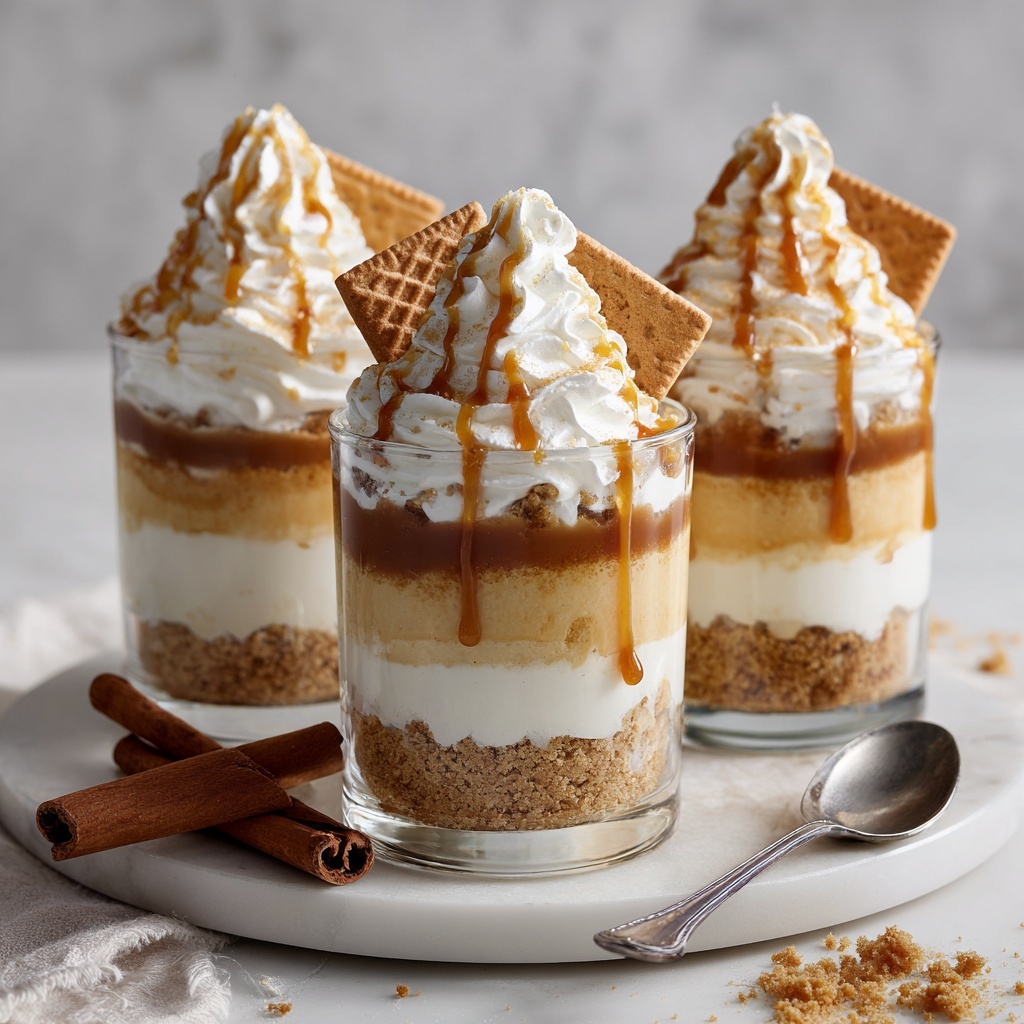
If you are craving something creamy, dreamy, and utterly irresistible, then the No-Bake Biscoff Cheesecake Cups Recipe is about to become your new best friend in the kitchen. This recipe combines the iconic caramelized flavor of Lotus Biscoff biscuits with a luscious, fluffy cheesecake filling, all layered beautifully in convenient individual cups. The best part? You don’t even need to turn on the oven. Imagine smooth, velvety cream cheese filling paired with crunchy biscuit crumbs and that signature spiced caramel taste—each bite is pure bliss made simple.
Ingredients You’ll Need
Don’t let the simplicity fool you—every ingredient in this recipe is essential for achieving that perfect balance of flavor, texture, and visual appeal. From the buttery biscuit base to the silky cream cheese filling and the unmistakable Lotus Biscoff spread, these components come together effortlessly to create something spectacular.
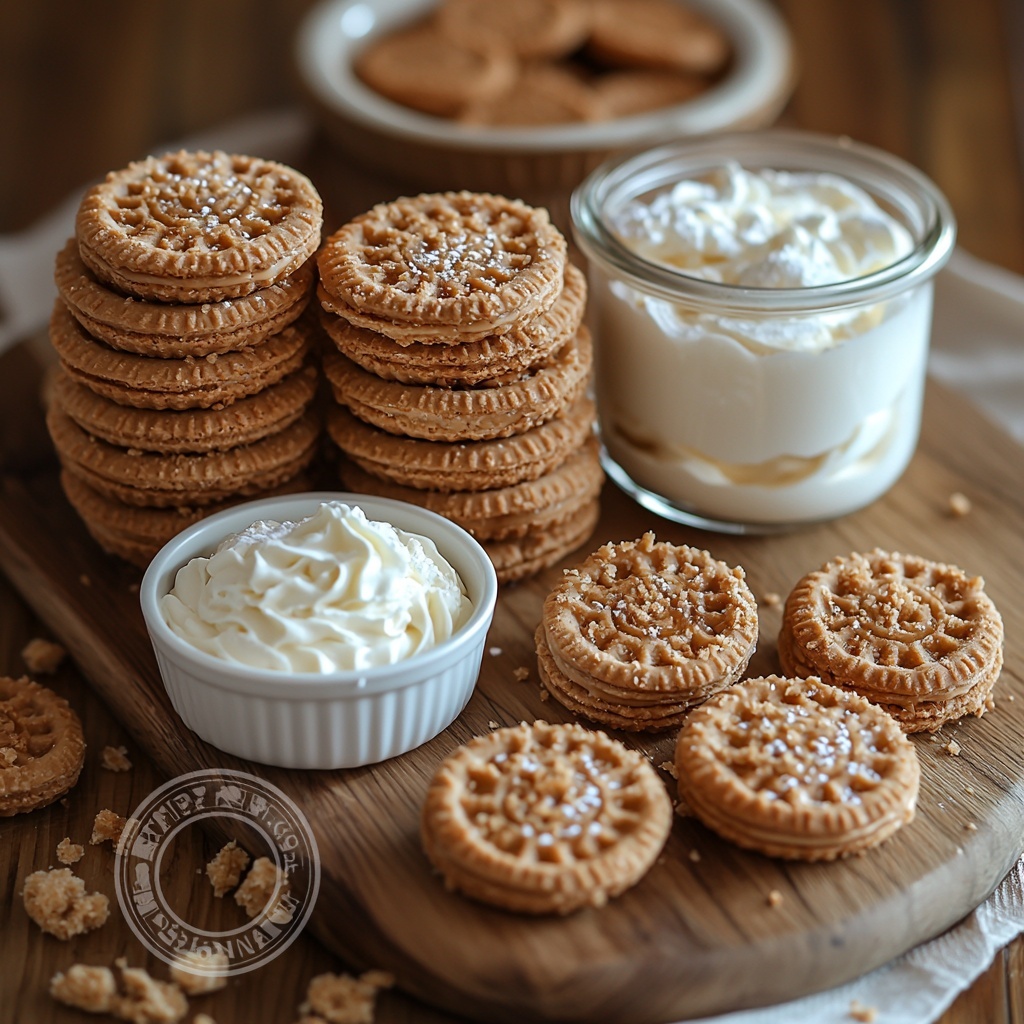
- 30 Lotus Biscoff biscuits: These provide the perfect crunchy, spiced base with their distinct caramelized flavor.
- 2 tablespoons unsalted butter (melted): Binds the biscuit crumbs into a firm, buttery crust.
- 16 oz heavy cream (2 cups): Whipped to fluffy perfection, this adds lightness to the cheesecake filling.
- 8 oz cream cheese (at room temperature): The creamy backbone of the filling, smooth and tangy.
- ½ cup powdered sugar: Sweetens the filling just right without overpowering.
- ½ cup Biscoff spread: Intensifies the signature cookie flavor within the cheesecake mixture.
- 1 teaspoon vanilla extract: Adds a subtle warmth and depth of flavor.
- ½ cup Biscoff spread (for topping): Melted for a luscious finishing drizzle on top.
- 8 Biscoff cookies (cut in half): Decorative garnish that adds texture and style.
How to Make No-Bake Biscoff Cheesecake Cups Recipe
Step 1: Make the Base
Start by crushing the 30 Lotus Biscoff biscuits into fine crumbs. You can do this quickly using a food processor, or place them in a ziplock bag and crush with a rolling pin for a bit of hands-on fun. Combine the crumbs with 2 tablespoons of melted unsalted butter in a medium bowl, mixing until the crumbs are evenly coated. Remember to set aside a few tablespoons of this crumb mixture for later decoration—it adds a lovely texture contrast on top.
Step 2: Form the Crust in Cups
Divide the crumb mixture evenly among your serving cups. This recipe yields about 8 standard-sized cups, or 16 shot-sized cups if you’re aiming for smaller portions. Press 2 to 3 tablespoons of the crumb mixture firmly into the bottom of each cup to create a compact, buttery base that will hold the cheesecake filling beautifully.
Step 3: Whip the Heavy Cream
In a large bowl, whisk the heavy cream until stiff peaks form. This step is crucial because the whipped cream will give your cheesecake that delightfully airy texture. Make sure not to overwhip, or it could turn grainy—aim for smooth, firm peaks that hold their shape.
Step 4: Prepare the Cheesecake Filling
In a separate bowl, whisk together the cream cheese, powdered sugar, ½ cup of Biscoff spread, and vanilla extract until the mixture is silky and smooth. Gently fold the whipped heavy cream into this cream cheese mixture, combining them slowly and carefully to maintain the light, fluffy texture. This filling is where the magic of the No-Bake Biscoff Cheesecake Cups Recipe truly shines.
Step 5: Assemble the Cups
Fill a large piping bag with the cheesecake mixture for an easy and elegant way to layer your dessert. Pipe the creamy filling evenly into each cup over the biscuit base. Next, melt the remaining ½ cup of Biscoff spread in the microwave for about 20 seconds or until it reaches a pourable consistency. Drizzle a thin layer of this molten spread atop each cheesecake cup. Finish each one by pressing a halved Biscoff cookie into the topping and sprinkling a pinch of the reserved biscuit crumbs for that perfect crunchy garnish.
Step 6: Chill Until Set
Place your assembled cups in the refrigerator and let them chill for at least 4 hours. This step is essential because it allows the cheesecake to firm up properly, transforming into a rich, creamy treat that’s ready to serve chilled. Patience here means reward in every luscious bite.
How to Serve No-Bake Biscoff Cheesecake Cups Recipe
Garnishes
Presentation is half the fun, and this recipe lends itself beautifully to creative garnishing. Adding extra Biscoff cookie crumbs or a sprinkle of crushed nuts can ramp up texture. Small dollops of whipped cream and a dusting of cinnamon or nutmeg add a cozy, inviting touch. Fresh berries could also add a burst of freshness that contrasts wonderfully with the caramel notes.
Side Dishes
Since these cups pack a flavorful punch on their own, pairing them with light, complementary sides is ideal. A simple cup of black coffee or chai tea elevates the experience, enhancing the warm spice of the Biscoff biscuits. For a bit more indulgence, fresh fruit salad or a scoop of vanilla bean ice cream makes a delightful accompaniment.
Creative Ways to Present
Think beyond the typical serving cup by layering the cheesecake mixture in mini mason jars or clear glass tumblers to showcase the layers beautifully. You can even create a dessert platter with shot-sized cups for parties, making it easy for guests to grab and enjoy. Using edible flowers or gold leaf on top can add a sophisticated flourish that turns these simple cups into a show-stopping centerpiece.
Make Ahead and Storage
Storing Leftovers
Any leftover No-Bake Biscoff Cheesecake Cups Recipe should be stored in an airtight container in the refrigerator. They will stay fresh and delicious for up to 3 days, making this a fantastic make-ahead dessert for a busy week or unexpected guests. Just ensure the cups are well-sealed to prevent them from absorbing other fridge odors.
Freezing
Freezing is an option if you want to prepare these cheesecake cups well ahead of time. Cover them tightly with plastic wrap and place them in a freezer-safe container. They can be frozen for up to 1 month. When ready to enjoy, thaw in the refrigerator overnight to preserve the creamy texture without any risk of the crust becoming soggy.
Reheating
Since this is a no-bake, chilled cheesecake dessert, it’s best served cold and not reheated. If you prefer a slightly softer texture, allow the cups to sit at room temperature for 10-15 minutes before serving. This subtle warming will enhance the flavors without losing the cheesecake’s signature creamy consistency.
FAQs
Can I substitute the Biscoff biscuits with another cookie?
While Biscoff biscuits provide their unique caramelized spice profile, you can substitute with graham crackers or ginger snaps, though the flavor will differ slightly. The key is to choose a cookie that crisps well and complements the cinnamon and caramel notes.
Is it necessary to use heavy cream? Can I use something lighter?
Heavy cream is important here because it whips up into stiff peaks, giving the cheesecake its light texture. Using lighter creams or substitutes may result in a denser filling that doesn’t set properly.
Can I make this recipe dairy-free or vegan?
With some careful ingredient swaps like vegan cream cheese and coconut-based whipped cream, you can experiment with a dairy-free version. However, achieving the exact same creamy texture and flavor might require some trial and error.
How long does it take for the cheesecake cups to set?
The cheesecake cups need at least 4 hours in the fridge to firm up completely. For best results, overnight chilling is recommended, especially if made ahead of time.
Can I make the crumb base ahead of time?
Yes! You can prepare the crumb base and store it in an airtight container for up to 2 days before assembling the cups. This allows you to save some prep time and have the crumbs ready whenever you want to make the full dessert.
Final Thoughts
This No-Bake Biscoff Cheesecake Cups Recipe is a stunning combination of ease and elegance, perfect for impressing without the hassle of baking. Its irresistible flavor, simple prep, and beautiful presentation make it a go-to dessert for any occasion. I can’t wait for you to try it and experience how these creamy, crunchy little cups can brighten up your dessert rotation with minimal effort and maximum delight!
Print
No-Bake Biscoff Cheesecake Cups Recipe
- Prep Time: 20 minutes
- Cook Time: 0 minutes
- Total Time: 4 hours 20 minutes
- Yield: 8 cups
- Category: Dessert
- Method: No-Cook
- Cuisine: American
Description
No-Bake Biscoff Cheesecake Cups are a delightful, creamy dessert featuring a crunchy Biscoff biscuit crust and luscious cheesecake filling infused with the iconic caramelized flavors of Lotus Biscoff spread and cookies. These individual portions are perfect for entertaining or a simple indulgent treat, requiring no oven and minimal prep time.
Ingredients
Crust Ingredients
- 30 Lotus Biscoff biscuits
- 2 tablespoons unsalted butter, melted
Cheesecake Filling Ingredients
- 16 oz heavy cream (2 cups)
- 8 oz cream cheese, at room temperature
- ½ cup powdered sugar
- ½ cup Lotus Biscoff spread
- 1 teaspoon vanilla extract
Topping
- ½ cup Lotus Biscoff spread (for melting)
- 8 Lotus Biscoff cookies, cut in half
- Reserved Biscoff biscuit crumbs for garnish
Instructions
- Make the Base: Crush the 30 Lotus Biscoff biscuits into fine crumbs using a food processor or rolling pin. In a medium bowl, combine the biscuit crumbs with 2 tablespoons of melted unsalted butter. Reserve a small amount of this crumb mixture for decoration later.
- Form the Crust: Divide the crumb mixture evenly among 8 cups, adding about 2-3 tablespoons to each. Press the crumbs down firmly to create an even, compact base layer. Set the assembled cups aside.
- Whip the Cream: In a large bowl, whip 16 oz (2 cups) heavy cream using a whisk or electric mixer until stiff peaks form, indicating the cream is fully aerated and holds shape.
- Prepare the Cheesecake Filling: In a separate bowl, whisk together 8 oz room temperature cream cheese, ½ cup powdered sugar, ½ cup Lotus Biscoff spread, and 1 teaspoon vanilla extract until smooth and creamy. Gradually fold the whipped cream into the cream cheese mixture, mixing carefully until fully combined and fluffy.
- Assemble the Cheesecake Cups: Transfer the cheesecake mixture into a large piping bag for neat filling. Pipe the creamy filling into each prepared cup over the biscuit crust, filling them evenly.
- Add Toppings: Melt ½ cup Lotus Biscoff spread in the microwave for about 20 seconds or until liquid. Spoon or drizzle a thin layer of the melted spread on top of each filled cup. Decorate with halves of 8 Biscoff cookies and sprinkle with the reserved biscuit crumbs for a crunchy garnish.
- Chill: Refrigerate the assembled cheesecake cups for at least 4 hours, or until firm and set. Serve chilled for a rich and satisfying dessert experience.
Notes
- Ensure the cream cheese is at room temperature for easier mixing and a smoother filling.
- Press the biscuit crumbs firmly to help create a sturdy crust that holds the cheesecake filling well.
- Use a piping bag to fill the cups neatly and avoid mess.
- These cheesecake cups should be kept refrigerated and consumed within 3 days for the best taste and texture.
- For a lighter version, substitute heavy cream with whipped topping, but it may affect texture.
- You can make mini versions by using smaller cups, which yield about 16 servings.


