

If you love the delightful combination of creamy coconut and rich chocolate, you’re going to absolutely adore this Homemade Coconut Mounds Bars Recipe. It takes all the charm of classic coconut chocolate candy bars and turns it into a homemade treat that’s not only incredibly simple to make but also highly customizable to your taste. Imagine tender, sweet coconut filling perfectly enveloped in a glossy, satisfying chocolate coating—each bite melts in your mouth and fills you with joy. Whether you’re making this for a special occasion or just treating yourself, these bars are a little piece of tropical heaven you can create right in your kitchen.
Ingredients You’ll Need
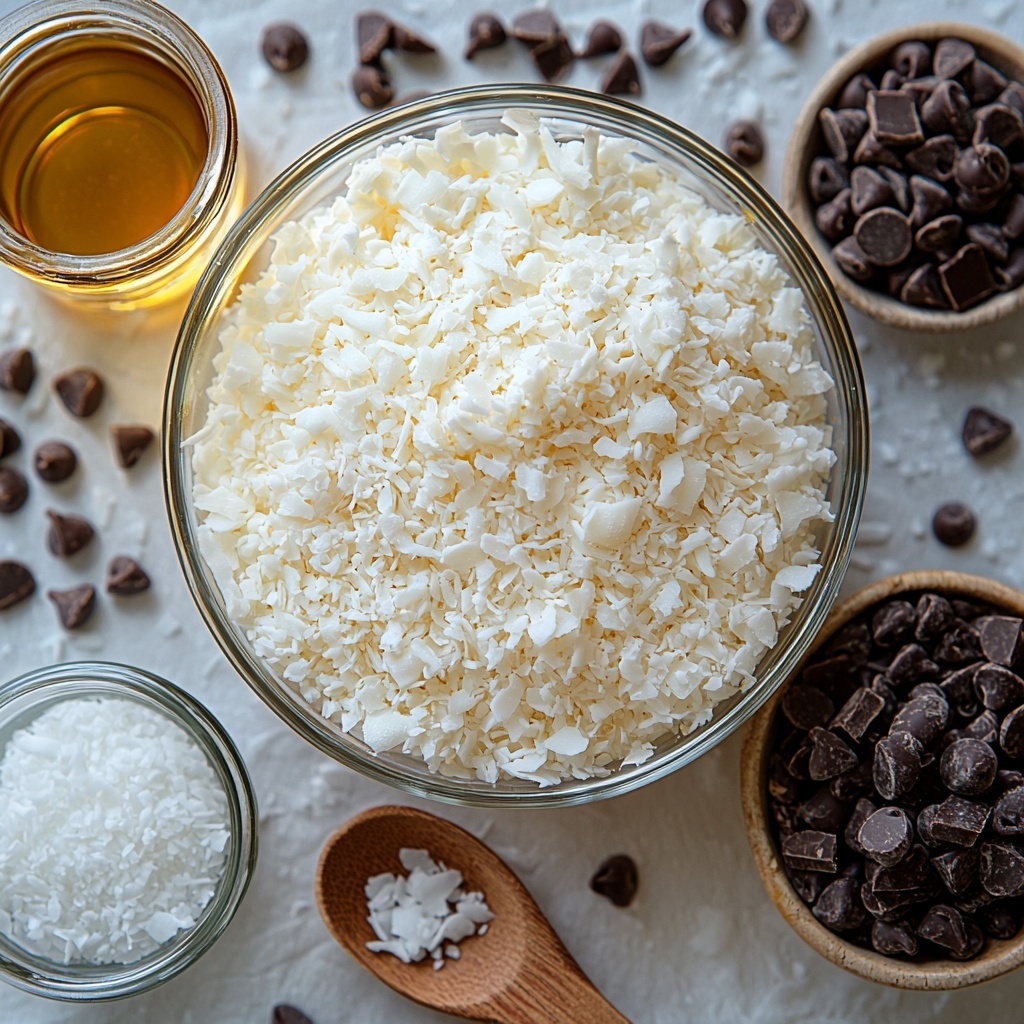
These ingredients are straightforward, pantry-friendly staples that come together to create the magic of this dessert. Each one plays a vital role in delivering the perfect balance of sweetness, texture, and flavor.
- 3 cups sweetened shredded coconut: This is the star ingredient providing that chewy, luscious coconut base that every bite is built on.
- 1 can (14 oz) sweetened condensed milk: Acts as the perfect binder and adds creamy sweetness—no need for additional sugar!
- 1/2 teaspoon pure vanilla extract: A splash of warmth and depth that elevates the coconut filling.
- Pinch of salt: Balances the sweetness and enhances all the flavors.
- 2 1/2 cups semi-sweet or dark chocolate chips: The luscious chocolate coating that brings it all together; vegan chips can be used for a plant-based version.
- 1 tablespoon coconut oil (optional): Helps achieve a silky smooth, glossy chocolate coating that sets beautifully.
How to Make Homemade Coconut Mounds Bars Recipe
Step 1: Prepare the Coconut Filling
Start by combining shredded coconut, sweetened condensed milk, vanilla extract, and a pinch of salt in a large mixing bowl. Stir everything together until the mixture is thick, sticky, and well blended—that texture is key to a perfectly moist filling. Press this mixture evenly into an 8×8-inch baking pan lined with parchment paper, using a spatula or your hands to smooth the surface. Pop it in the freezer for about 30 minutes so it firms up and becomes easier to handle for the next steps.
Step 2: Slice Into Bars
Once your coconut filling is nice and firm, lift it out of the pan using the edges of the parchment paper—it should come out in one solid piece. Use a sharp knife to cut the slab into 12 to 16 evenly sized bars, depending on your preferred size. These bars will hold their shape perfectly, especially with that firm coconut center. Keep the bars in the freezer while you melt the chocolate for coating.
Step 3: Melt the Chocolate
Now to the fun part: chocolate! Combine your chocolate chips with the optional coconut oil in a microwave-safe bowl. Heat in 30-second intervals, stirring well after each, until the mixture is fully melted and glossy. The coconut oil is a little trick that helps the chocolate stay smooth and shiny, making your bars look like they came straight from a candy shop.
Step 4: Dip the Bars
Line a baking sheet with parchment paper to catch drips and keep everything tidy. Remove your coconut bars from the freezer one by one and dip them into the melted chocolate using a fork or a dipping tool to ensure full coverage. Gently tap off any excess chocolate and place each coated bar onto the parchment-lined tray. This step requires a bit of patience but seeing those bars transform is so rewarding.
Step 5: Set the Chocolate
Once all bars are coated, place the baking sheet in the refrigerator for 20 to 30 minutes so the chocolate coating can fully set and harden. After they’re firm, transfer your homemade coconut Mounds bars to an airtight container. You can store them in the fridge for up to a week, or freeze them if you want a longer-lasting stash.
How to Serve Homemade Coconut Mounds Bars Recipe
Garnishes
A sprinkle of toasted coconut flakes or a light dusting of cocoa powder can elevate the presentation and add an extra layer of texture. You could even drizzle some white chocolate on top for a beautiful contrast—this adds an elegant flair without overwhelming the classic flavors.
Side Dishes
These bars are excellent all on their own, but they also pair wonderfully with a cup of fresh coffee or a creamy latte to balance the sweetness. For a fun dessert plate, serve them alongside fresh berries or a scoop of coconut or vanilla ice cream for a tropical-inspired treat.
Creative Ways to Present
For parties or gifts, wrap individual bars in wax paper or cellophane tied with colorful ribbon. You could also arrange them nicely on a wooden board alongside other tropical treats for a visually appealing dessert spread. Turning this into bite-sized pieces on toothpicks is a crowd-pleaser at casual gatherings!
Make Ahead and Storage
Storing Leftovers
Leftover Homemade Coconut Mounds Bars hold up beautifully when stored in an airtight container in the refrigerator for up to one week. Keeping them chilled maintains that perfect chocolate snap and prevents the coconut layer from getting too soft.
Freezing
If you want to make a batch ahead or keep extras on hand, these bars freeze wonderfully. Place them in a single layer on a tray until firm, then stack with parchment paper between layers in an airtight container or freezer bag. They’ll keep for up to three months and can be thawed in the fridge overnight when you’re ready to indulge.
Reheating
No need to reheat these bars before serving—straight from the fridge or freezer they retain their best texture and flavor. If frozen, just let them defrost in the refrigerator for a few hours. Avoid microwaving as the coconut filling is best enjoyed cool and the chocolate coating can get melty.
FAQs
Can I use unsweetened coconut for this recipe?
While you can use unsweetened shredded coconut, the bars will be less sweet and might alter the classic flavor you expect from Mounds bars. If using unsweetened, consider adding a bit of honey or maple syrup to balance the sweetness.
What type of chocolate is best for coating?
Semi-sweet or dark chocolate chips work beautifully as they contrast nicely with the sweet coconut filling. You can also use vegan or dairy-free chocolate chips if you prefer a plant-based option.
Is the coconut oil necessary?
The coconut oil is optional but highly recommended because it helps produce a shiny, smooth chocolate coating and makes dipping easier. Without it, the chocolate might be thicker and harder to coat evenly.
Can I make these bars nut-free?
Yes! This Homemade Coconut Mounds Bars Recipe is naturally nut-free, making it a safe and tasty option for those with nut allergies, provided you use nut-free chocolate chips.
How do I prevent the chocolate from cracking when I bite into the bars?
Using coconut oil in the chocolate coating helps keep it more pliable and less prone to cracking. Also, make sure the bars are fully chilled before serving, so the chocolate stays firm but not brittle.
Final Thoughts
There is something truly joyful about making your own treats from scratch, and this Homemade Coconut Mounds Bars Recipe offers a fantastic way to do just that. It’s simple, rewarding, and delivers that perfect bite of coconut-chocolate bliss every single time. I encourage you to give this recipe a try—whether for a weekend project, a party dessert, or just because you deserve a little indulgence. Trust me, once you try these bars, they might just become your new favorite homemade sweet treat.
Print
Homemade Coconut Mounds Bars Recipe
- Prep Time: 15 minutes
- Cook Time: 0 minutes
- Total Time: 45 minutes
- Yield: 12 bars
- Category: Dessert
- Method: No-Cook
- Cuisine: American
- Diet: Vegetarian
Description
Delicious homemade coconut Mounds bars with a rich, sweet coconut filling coated in smooth semi-sweet chocolate. This no-bake treat is perfect for satisfying your chocolate and coconut cravings with simple ingredients and easy preparation.
Ingredients
For the Coconut Filling
- 3 cups sweetened shredded coconut
- 1 can (14 oz) sweetened condensed milk
- 1/2 teaspoon pure vanilla extract
- Pinch of salt
For the Chocolate Coating
- 2 1/2 cups semi-sweet or dark chocolate chips (use vegan if desired)
- 1 tablespoon coconut oil (optional, for smoother chocolate coating)
Instructions
- Prepare the Coconut Filling: In a large mixing bowl, combine the shredded coconut, sweetened condensed milk, vanilla extract, and salt. Stir the mixture until thick, sticky, and fully blended. Line an 8×8-inch baking pan with parchment paper, then press the mixture evenly into the pan, smoothing the top with a spatula or clean hands. Freeze for 30 minutes until firm.
- Slice into Bars: Once the coconut filling has set, lift it out of the pan using the parchment paper. Cut it into 12 to 16 evenly sized bars using a sharp knife. Return the bars to the freezer to keep firm while preparing the chocolate coating.
- Melt the Chocolate: Place the chocolate chips and optional coconut oil in a microwave-safe bowl. Microwave in 30-second intervals, stirring between each, until the chocolate is completely melted and smooth.
- Dip the Bars: Line a baking sheet with parchment paper. Remove the frozen bars and dip each bar into the melted chocolate using a fork or dipping tool. Ensure all sides are coated, then gently tap to remove excess chocolate. Place each coated bar on the prepared baking sheet.
- Set the Chocolate: Refrigerate the dipped bars for 20 to 30 minutes or until the chocolate coating is fully set. Store the finished bars in an airtight container in the refrigerator for up to 1 week or in the freezer for longer storage.
Notes
- For a vegan version, use vegan chocolate chips and a dairy-free sweetened condensed milk alternative.
- Freezing the coconut bars before dipping helps the chocolate harden quickly and prevents melting.
- You can vary the chocolate type to milk chocolate or dark chocolate depending on preference.
- Add a pinch of sea salt on top of the chocolate coating for a salty-sweet contrast.
- Store bars in an airtight container to maintain freshness and prevent the chocolate from blooming.


