
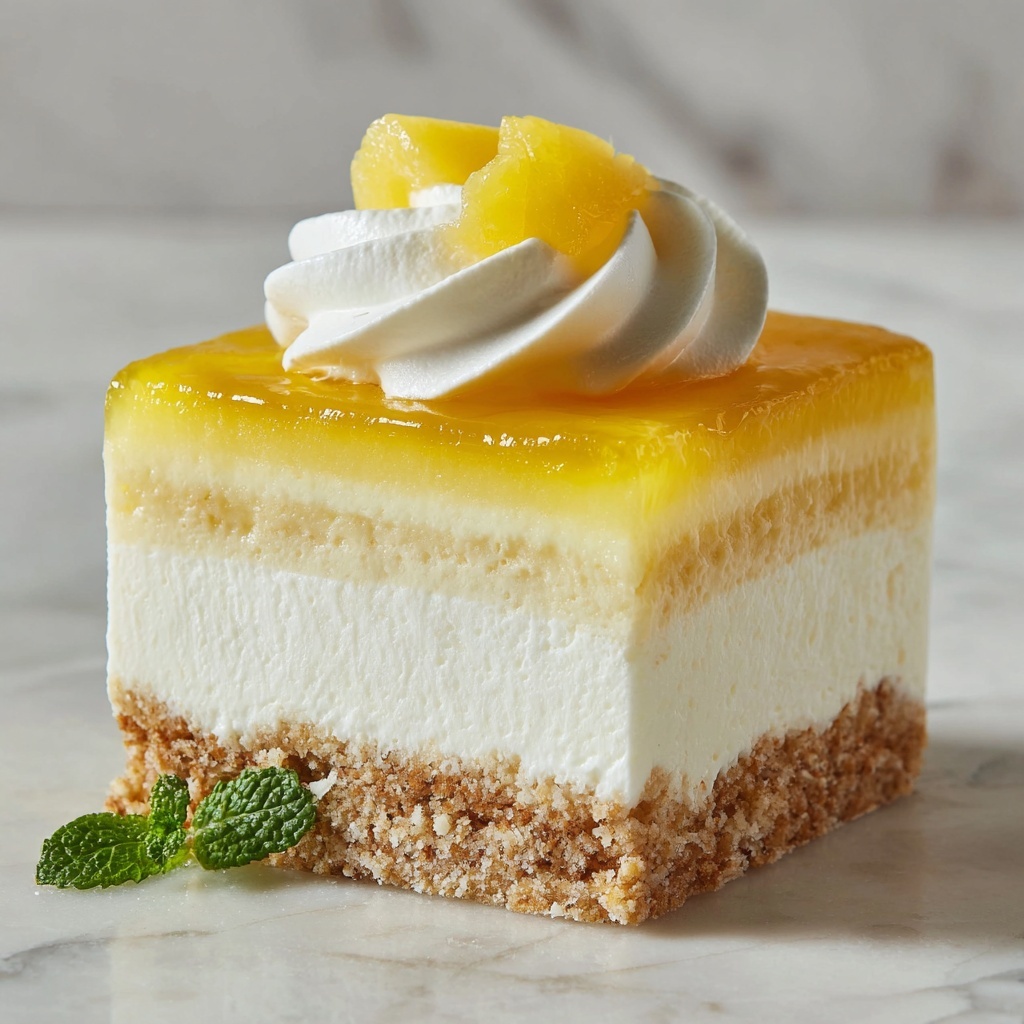
If you adore tangy, creamy desserts that don’t require heating up the kitchen, you’ve got to try this No-Bake Lemon Cheesecake Bars Recipe. It’s a bright and luscious treat where zesty lemon flavor meets velvety cheesecake cream, all resting on a buttery graham cracker crust. These bars are perfect for warm days, last-minute celebrations, or whenever you crave something sweet with a refreshing twist. Plus, they come together with simple ingredients and no oven fuss, making them an absolute favorite to have on hand.

Ingredients You’ll Need
Every ingredient in this No-Bake Lemon Cheesecake Bars Recipe plays an essential role in creating its signature taste and texture. From the crunchy base to the creamy filling and tangy topping, each component is straightforward but crucial for that perfect balance.
- Graham cracker crumbs: Provide a crunchy and slightly sweet foundation for the crust.
- Unsalted butter, melted: Binds the crust crumbs together and adds richness.
- Cream cheese, softened: The creamy heart of the cheesecake filling, lending smoothness.
- Powdered sugar: Sweetens the filling without any graininess.
- Vanilla extract: Adds a warm, aromatic depth to brighten the lemon.
- Lemon zest: Packs intense lemon flavor and freshness in both filling and topping.
- Lemon juice: The essential tartness that awakens the taste buds.
- Heavy whipping cream, whipped: Creates a light, airy texture for the cheesecake layer.
- Granulated sugar: Sweetens the lemon topping for perfect balance.
- Cornstarch: Thickens the lemon topping for a glossy finish.
- Water: Helps cook the topping into a luscious gel-like layer.
- Whipped cream, lemon slices, and additional lemon zest (for garnish): Add an elegant finishing touch and extra bursts of flavor.
How to Make No-Bake Lemon Cheesecake Bars Recipe
Step 1: Prepare the Graham Cracker Crust
Start by combining the graham cracker crumbs with melted unsalted butter in a medium bowl. Mix everything thoroughly so that every crumb is coated in butter, helping the crust to hold together beautifully. Then, press this mixture firmly into the bottom of a 9×9-inch baking pan. This step sets the stage, giving your cheesecake bars that irresistible crispy base. Pop the pan in the refrigerator to chill and firm up while you move on to the filling.
Step 2: Make the Creamy Lemon Cheesecake Filling
In a large bowl, beat the softened cream cheese until it turns silky smooth—this is key for a luscious texture. Slowly stir in the powdered sugar, making sure it’s fully incorporated to avoid any gritty spots. The magic starts when you add vanilla extract, lemon zest, and fresh lemon juice, transforming the filling into a bright, flavorful treat. Finally, gently fold in the whipped heavy cream, lifting the mixture to keep it light and fluffy. Spread this delightful filling evenly over your chilled crust and smooth out the top with a spatula.
Step 3: Cook the Zesty Lemon Topping
This topping is what truly elevates your bars to a flavor showstopper. In a medium saucepan, whisk together lemon juice, water, granulated sugar, cornstarch, and lemon zest. Cook over medium heat, stirring constantly, until the mixture thickens and becomes translucent—a glossy, thick lemon sauce that’s bursting with freshness. Let it cool slightly before gently pouring it over your cheesecake layer, creating a stunning look and an extra layer of tartness.
Step 4: Chill Until Set
Once assembled, refrigerate your No-Bake Lemon Cheesecake Bars for at least four hours. This chilling time is essential to let the layers firm up and the flavors meld beautifully. The result is a perfectly sliceable, creamy, and refreshingly tangy dessert that’s ready to impress.
How to Serve No-Bake Lemon Cheesecake Bars Recipe
Garnishes
Before serving, amplify the visual appeal and flavor by topping each bar with a dollop of whipped cream, thin slices of fresh lemon, and a sprinkle of lemon zest. These simple additions catch the eye and offer boosts of creaminess and brightness that complement each bite.
Side Dishes
Pair these bars with a cup of herbal tea, a refreshing glass of sparkling water with mint, or even a scoop of vanilla ice cream for a delightful contrast of temperatures and textures. They also make a brilliant finish to a light brunch or a summer picnic.
Creative Ways to Present
Try serving these bars in individual mason jars topped with a sprig of fresh mint, or arrange them on a decorative platter lined with edible flowers and citrus slices. For an extra fun twist, drizzle some raspberry coulis or honey over each bar to play with complementary flavors and add a pop of color.
Make Ahead and Storage
Storing Leftovers
Your No-Bake Lemon Cheesecake Bars will keep wonderfully covered in the refrigerator for up to 4 days. Be sure to use an airtight container to maintain moisture and freshness, and keep them away from strong odors that could alter their delicate lemon flavor.
Freezing
If you want to save them for later, freeze the bars tightly wrapped in plastic wrap and then foil for up to 1 month. When you’re ready to enjoy, thaw them overnight in the refrigerator to preserve their creamy texture without condensation sogginess.
Reheating
Since these are no-bake, cold bars, reheating is not recommended. They are at their best served chilled, ensuring that creamy, refreshing zing that makes this dessert irresistible.
FAQs
Can I use a different crust instead of graham crackers?
Absolutely! You can swap graham cracker crumbs for crushed digestive biscuits, vanilla wafers, or even a nut-based crust for a twist. Just make sure to adjust the butter quantity if needed to keep the crust firm.
Is it okay to use low-fat cream cheese for this recipe?
While low-fat options can work, full-fat cream cheese delivers the best creamy texture and flavor. Using low-fat might make the filling less smooth and rich.
Can I make these bars vegan or dairy-free?
Yes! Use dairy-free cream cheese and coconut whipped cream instead of regular cream cheese and heavy cream. Also, select a vegan graham cracker brand. The lemon topping stays the same.
How long should I chill the bars before serving?
At minimum, 4 hours of refrigeration is recommended, but overnight chilling helps the flavors merge and makes slicing easier.
Can I prepare the bars in advance for a party?
Definitely! These bars are perfect make-ahead desserts. Prepare them a day or two in advance and keep refrigerated until you’re ready to impress your guests.
Final Thoughts
You really can’t go wrong with this No-Bake Lemon Cheesecake Bars Recipe. It’s bright, creamy, and refreshingly easy, perfect for any occasion where you want a touch of elegance without the hassle. Once you try it, it’s sure to become one of your favorite go-to desserts that you’ll want to make again and again. So go ahead, dig in, and let this little slice of lemony heaven brighten your day!
Print
No-Bake Lemon Cheesecake Bars Recipe
- Prep Time: 20 minutes
- Cook Time: 10 minutes
- Total Time: 4 hours 30 minutes
- Yield: 16 bars
- Category: Dessert
- Method: No-Cook
- Cuisine: American
Description
These No-Bake Lemon Cheesecake Bars are a refreshing and creamy dessert perfect for warm weather or when you want a simple yet elegant treat. Featuring a buttery graham cracker crust, a smooth lemon-infused cheesecake filling, and a tangy lemon topping, these bars combine bright citrus flavors with rich creaminess. No oven needed—just a bit of chilling time for a delightful chilled dessert that’s easy to make and sure to impress.
Ingredients
For the Crust:
- 2 cups graham cracker crumbs
- 1/2 cup unsalted butter, melted
For the Cheesecake Filling:
- 16 oz (2 packages) cream cheese, softened
- 1 cup powdered sugar
- 1 teaspoon vanilla extract
- 1 tablespoon lemon zest
- 1/4 cup lemon juice
- 1 cup heavy whipping cream, whipped to stiff peaks
For the Lemon Topping:
- 1/2 cup lemon juice
- 1/2 cup water
- 1/2 cup granulated sugar
- 2 tablespoons cornstarch
- 1 tablespoon lemon zest
For Garnish:
- Whipped cream
- Lemon slices
- Additional lemon zest
Instructions
- Prepare the crust: In a medium bowl, combine the graham cracker crumbs and melted butter. Mix thoroughly until the mixture is well combined with a sandy texture. Firmly press this mixture into the bottom of a 9×9-inch baking pan to form an even crust layer. Place the pan in the refrigerator to chill while you prepare the filling.
- Make the cheesecake filling: In a large bowl, beat the softened cream cheese until completely smooth and creamy, ensuring no lumps remain. Gradually add the powdered sugar, mixing continuously until fully incorporated and smooth. Stir in the vanilla extract, lemon zest, and lemon juice, blending well for consistent flavor. Carefully fold in the whipped heavy cream, using a gentle folding motion to maintain the light and airy texture without deflating the cream. Spread this cheesecake filling evenly over the chilled graham cracker crust, smoothing the surface with a spatula.
- Prepare the lemon topping: In a medium saucepan, combine the lemon juice, water, granulated sugar, cornstarch, and lemon zest. Cook over medium heat while stirring constantly to prevent lumps and burning. Continue cooking until the mixture thickens and turns translucent, indicating the cornstarch has cooked and the topping is set. Remove the pan from heat and allow the lemon topping to cool slightly before use.
- Assemble the cheesecake bars: Once the lemon topping has cooled slightly, gently pour it over the cheesecake filling layer in the baking pan, spreading it evenly. Place the entire assembly back into the refrigerator and chill for at least 4 hours or until fully set and firm enough to cut into bars.
- Serve: Before serving, garnish the cheesecake bars with dollops of whipped cream, fresh lemon slices, and a sprinkle of additional lemon zest for extra color and freshness. Cut into bars and serve chilled for a refreshing dessert.
Notes
- Make sure the cream cheese is fully softened to avoid lumps in the filling.
- Whip the heavy cream to stiff peaks to ensure a light and fluffy texture in the filling.
- The lemon topping must be cooked until thickened to provide the right consistency and tangy flavor.
- Chilling time is important; do not skip or shorten the 4-hour refrigeration step for best texture and firmness.
- This dessert is best served cold and consumed within 2-3 days when stored properly in the refrigerator.


