

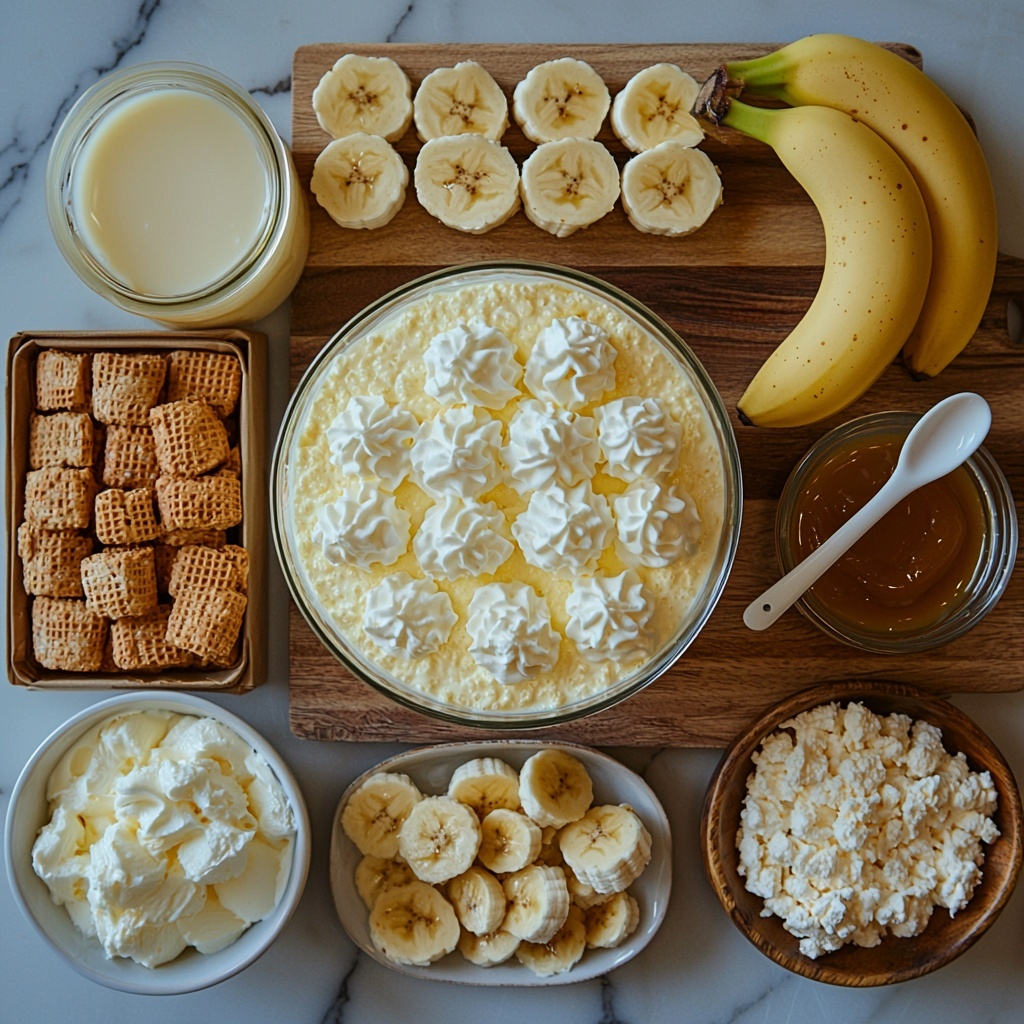
If you are dreaming of a luscious, crowd-pleasing dessert that is incredibly easy to whip up, this No-Bake Banana Pudding Cups Recipe is exactly what you need. It’s a delightful layering of creamy vanilla pudding, smooth cheesecake mixture, ripe banana slices, and crunchy vanilla wafers—all coming together in charming individual cups without ever turning on your oven. Whether you want a simple treat for your family or a quick dessert to impress friends, this recipe is a guaranteed hit that brings wholesome flavors and a creamy, dreamy texture in every bite.
Ingredients You’ll Need
These ingredients are straightforward but work harmoniously to create the perfect balance of creamy, sweet, and crunchy in your no-bake dessert. Each element plays a vital role, from the smooth vanilla pudding that builds the base to the ripeness of the bananas that add fresh, natural sweetness and texture.
- Instant vanilla pudding mix: This gives the dessert a silky, flavorful base that sets quickly and easily.
- Cold whole milk: Essential for whipping up the pudding to the perfect consistency and richness.
- Pure vanilla extract (optional): A splash enhances the vanilla flavor for an extra layer of warmth.
- Cream cheese, softened: Adds a rich, cheesecake-like tang and creaminess to the layers.
- Sweetened condensed milk: Sweetens and blends seamlessly with the cream cheese for a luscious taste.
- Whipped topping, thawed: Keeps the dessert light, airy, and irresistible.
- Ripe bananas: The star ingredient bringing natural sweetness and smooth texture.
- Vanilla wafers: Provide a satisfying crunch and classic flavor contrast in every layer.
- Extra whipped cream or topping for garnish: For that picture-perfect finish and extra creaminess.
- Crushed vanilla wafers for garnish: Adds texture and charm to the presentation.
- Banana slices for garnish: Brings a fresh and colorful touch to each serving.
- Caramel drizzle (optional): A sweet finishing touch for those who love a hint of indulgence.
How to Make No-Bake Banana Pudding Cups Recipe
Step 1: Prepare the Vanilla Pudding
Start by whisking the instant vanilla pudding mix with cold whole milk for a few minutes until you notice it thickening slightly. The fun here is in watching the transformation from liquid to a creamy base. Adding a teaspoon of pure vanilla extract is optional but highly recommended—it deepens the vanilla notes and makes the pudding even more delicious. Once ready, let it chill in the refrigerator to firm up while you move on.
Step 2: Make the Cheesecake Mixture
In another bowl, beat the softened cream cheese until completely smooth to avoid lumps because nothing kills the texture faster. Then, mix in the sweetened condensed milk—this ingredient’s magic lies in its creamy sweetness, creating a rich and dreamy layer. Gently fold in half the whipped topping to keep the mixture light as a cloud, and set this aside for filling your cups shortly.
Step 3: Slice the Bananas
Grab those ripe bananas and slice them into neat ¼-inch rounds. Bananas have a tendency to brown quickly, so if you want them looking fresh and vibrant, toss the slices gently with a little lemon juice. This simple trick can make a big difference in presentation without affecting flavor.
Step 4: Assemble the Layers
Layering is where the magic happens! Start with a base of vanilla wafers at the bottom of your cups or jars—this sets a crunchy foundation. Then add a layer of banana slices for sweetness, followed by a luscious spread of the cheesecake mixture. Next, spoon over some of the chilled pudding. Repeat these layers thoughtfully until you reach the top, finishing with the remaining whipped topping to make it look as delightful as it tastes.
Step 5: Chill and Set
Refrigerate your beautifully assembled cups for at least 2 to 3 hours to let the flavors marry and the textures meld together. This resting time is key for the vanilla wafers to soften just enough and for the entire dessert to become refreshingly chilled. When you’re ready to serve, don’t hesitate to pile on extra whipped cream, a sprinkle of crushed wafers, fresh banana slices, or even a drizzle of caramel for that extra wow factor!
How to Serve No-Bake Banana Pudding Cups Recipe
Garnishes
Simple garnishes can elevate your no-bake banana pudding cups into a showstopper. A generous dollop of whipped cream adds fluffy lightness, while crushed vanilla wafers introduce a delightful crunch that contrasts perfectly with the creamy pudding. Fresh banana slices bring both color and a fresh burst of flavor. For a little extra indulgence, drizzle caramel on top and watch your guests’ eyes light up with delight.
Side Dishes
This dessert is substantial enough to stand on its own but pairs wonderfully with light, refreshing sides. Consider fresh berry salads, crisp mint leaves, or even a small scoop of lemon sorbet to cut through the sweetness. These simple sides balance the richness of the pudding cups and create a beautiful dessert spread.
Creative Ways to Present
Presentation is half the fun with this No-Bake Banana Pudding Cups Recipe. Serve them in clear glass jars to show off the gorgeous layers, or use fancy dessert cups for a special occasion. For a party, creating a mini dessert bar with various toppings like nuts, berries, or chocolate shavings allows guests to customize their cups. You could even spoon some pudding into waffle cones or hollowed-out fruit for a fun twist!
Make Ahead and Storage
Storing Leftovers
Once assembled, these pudding cups keep beautifully in the fridge for up to 3 days. Cover them tightly with plastic wrap or lids to prevent the bananas from browning too much and to keep the whipped topping fresh. They’re perfect for preparing in advance when you want to save time before entertaining.
Freezing
Freezing is not highly recommended for this dessert because the bananas and pudding can change texture and become watery once thawed. If you want to try, freeze the cups without banana slices and assemble those fresh when ready to serve for best results.
Reheating
This luscious treat is best enjoyed cold, so reheating is not necessary. Just take the cups out of the refrigerator a few minutes before serving if you want them slightly less chilled, but always serve this No-Bake Banana Pudding Cups Recipe nice and cool for maximum enjoyment.
FAQs
Can I use a different type of pudding mix for this recipe?
Absolutely! While vanilla pudding is classic, you can experiment with banana or butterscotch pudding mixes for a fun twist. Just keep in mind that the flavor will change accordingly, so choose what excites you most.
How ripe should the bananas be?
The bananas should be ripe but still firm enough to hold their shape when sliced. Overly ripe, mushy bananas might make the layers soggy, while under-ripe bananas won’t have the sweetness or creaminess we want.
Can I make these pudding cups vegan or dairy-free?
Yes, with a few swaps! Use dairy-free pudding mix, plant-based milk, and vegan cream cheese alternatives. Just be sure your whipped topping is also dairy-free. The texture might vary slightly, but the flavors will still be delightful.
Why is it important to chill the pudding before assembling?
Chilling the pudding allows it to set and thicken properly, making layering easier and preventing ingredients from mixing together too much. It helps maintain clean, distinct layers that look beautiful and taste great.
Can I prepare these for a large party?
Definitely! This recipe scales up easily. Prepare multiple batches and serve in individual cups or a large trifle bowl for a stunning presentation. Just increase refrigeration time accordingly to ensure proper setting.
Final Thoughts
This No-Bake Banana Pudding Cups Recipe is a true keeper—simple to make, irresistibly delicious, and perfect for any occasion. Once you try it, you’ll find it hard to believe such a special dessert could be so effortless. Gather your ingredients, whip up this crowd-pleaser, and share the joy of creamy, fruity goodness with your loved ones. Your sweet tooth is going to thank you!
Print
No-Bake Banana Pudding Cups Recipe
- Prep Time: 30 minutes
- Cook Time: 0 minutes
- Total Time: 2 hours 30 minutes
- Yield: 6-8 servings
- Category: Dessert
- Method: No-Cook
- Cuisine: American
Description
These Delicious No-Bake Banana Pudding Cups are a creamy, delightful treat combining layers of vanilla pudding, cream cheese mixture, ripe bananas, and crunchy vanilla wafers. Perfectly chilled, they are an easy-to-make dessert that requires no baking and is ideal for warm days or quick gatherings.
Ingredients
For the Pudding
- 1 (5.1 oz) box instant vanilla pudding mix
- 3 cups cold whole milk
- 1 teaspoon pure vanilla extract (optional)
For the Cream Cheese Mixture
- 1 (8 oz) package cream cheese, softened
- 1 (14 oz) can sweetened condensed milk
- 1 (12 oz) container whipped topping, thawed (use half in mixture, half for topping)
Fruits & Layers
- 4–5 ripe bananas
- 1 box vanilla wafers (about 11 oz)
Garnish (Optional)
- Extra whipped cream or topping
- Crushed vanilla wafers
- Banana slices
- Caramel drizzle
Instructions
- Prepare the vanilla pudding: In a large mixing bowl, combine the instant vanilla pudding mix with cold whole milk. Whisk vigorously for 2-3 minutes until the mixture thickens slightly. Optionally add vanilla extract to enhance flavor. Chill the pudding in the refrigerator for at least 5 minutes.
- Make the cream cheese mixture: In a separate large bowl, beat the softened cream cheese using an electric mixer until smooth and lump-free. Add the sweetened condensed milk and mix well. Gently fold in half of the thawed whipped topping to keep the mixture light and fluffy.
- Slice the bananas: Peel and cut the bananas into ¼-inch thick rounds. To prevent browning, optionally toss the slices lightly with lemon juice.
- Assemble the pudding cups: In serving cups or jars, layer vanilla wafers at the bottom, followed by a layer of banana slices. Add a layer of the cream cheese mixture, then a layer of the chilled pudding. Repeat these layers until cups are filled, finishing with whipped topping on top.
- Chill and garnish: Refrigerate the assembled cups for 2-3 hours to allow flavors to meld and pudding to set. Before serving, optionally garnish with extra whipped cream, crushed vanilla wafers, fresh banana slices, and a drizzle of caramel.
Notes
- For best texture, use ripe but firm bananas to avoid mushiness.
- Lemon juice on banana slices helps maintain their color and freshness.
- Use chilled milk for the pudding to speed up setting time.
- These cups can be made a day ahead and kept refrigerated.
- To make this dessert lighter, use low-fat milk and reduced-fat cream cheese.


