
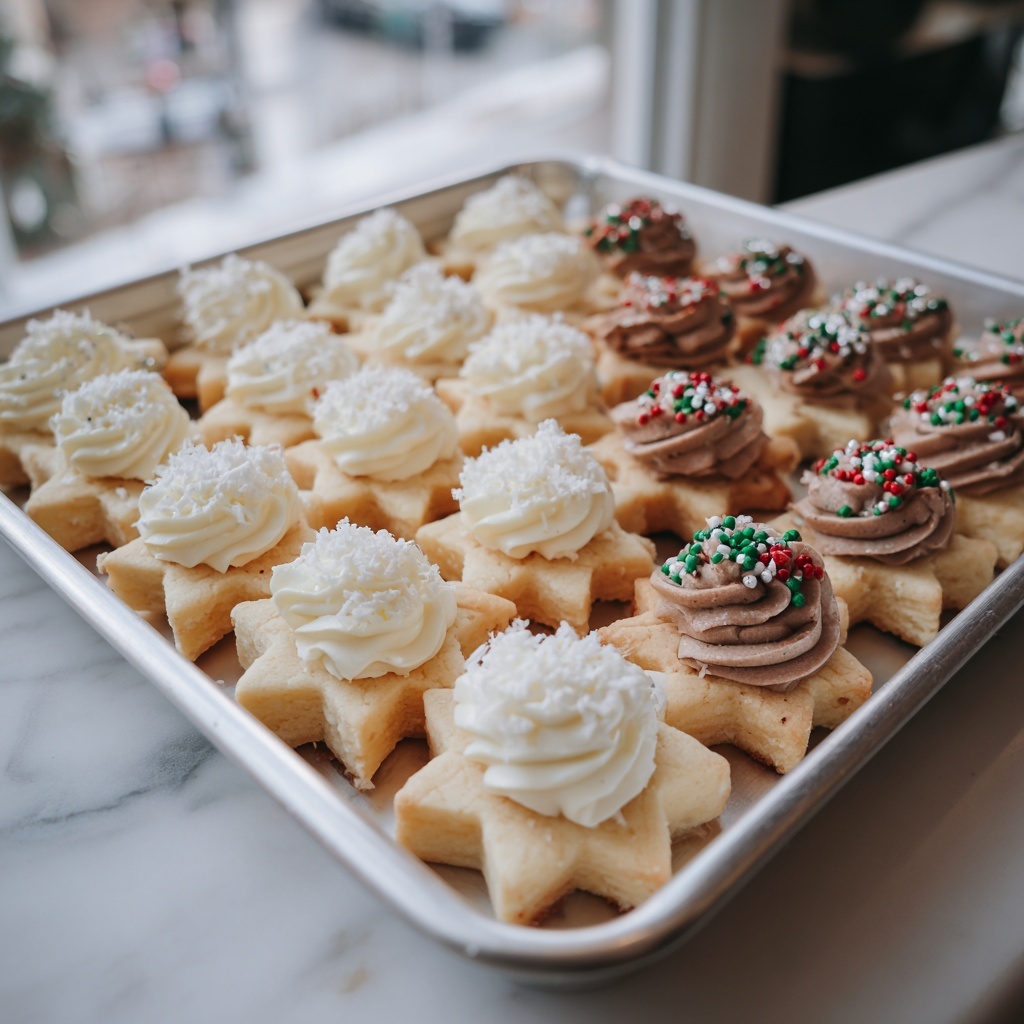
If there’s one cookie that spells elegance and nostalgia in every buttery bite, it’s this Classic Danish Butter Cookies Recipe. Crisp at the edges yet tender inside, these melt-in-your-mouth delights bring together the simplest ingredients that transform into a timeless treat. From the creamy texture to the delicate vanilla aroma and the optional chocolate dip for a little indulgence, this recipe captures everything that makes butter cookies a cherished favorite worldwide. Whether it’s a festive occasion or just a quiet tea time, these cookies add a dash of warmth and joy to any moment.

Ingredients You’ll Need
With just a handful of everyday pantry staples, this Classic Danish Butter Cookies Recipe proves that simplicity wins every time. Each ingredient plays a crucial role, from enriching butter that delivers the signature richness, to cornstarch that brings a tender crumb, ensuring each cookie bakes up beautifully crisp yet soft on the inside.
- 255 g unsalted butter, softened: The star ingredient for that rich, creamy texture and buttery flavor that defines these cookies.
- 30 g powdered sugar: Adds just the right subtle sweetness and helps create a delicate crumb.
- 1 teaspoon vanilla extract: Infuses the dough with a warm, fragrant note that elevates the overall flavor.
- 160 g all-purpose flour: Provides structure to the cookies, balancing tender and crisp perfectly.
- 8 g cornstarch: Key to creating that melt-in-the-mouth softness while keeping the structure intact.
- 1-2 teaspoons heavy cream (as needed): Used sparingly to adjust dough consistency for easy piping without compromising flavor.
- 170 g dark chocolate chips or chocolate almond bark, melted (optional): For dipping and drizzling, adding a decadent contrast to the buttery cookie.
- 170 g white chocolate chips or white almond bark, melted (optional): Creates a lovely visual and taste contrast for those who prefer sweeter toppings.
- Candied sprinkles (optional): A fun, decorative touch that brings a festive and colorful finish.
How to Make Classic Danish Butter Cookies Recipe
Step 1: Prepare Your Workspace
Start by lining a baking sheet with parchment paper to prevent sticking and ensure effortless removal of your delightful cookies after baking. Having a clean, ready surface speeds up baking and keeps things organized.
Step 2: Cream the Butter and Sugar
In a medium bowl, beat the softened butter for a good 2 to 3 minutes until it becomes pale and creamy. This aeration step is essential to getting that light texture. Then add the powdered sugar, continuing to mix for another 2 minutes until the mixture is fluffy and smooth, the perfect base for rich, tender cookies. Stir in the vanilla extract to infuse every bite with its irresistible aroma.
Step 3: Incorporate the Dry Ingredients
Add your all-purpose flour and cornstarch to the creamy butter mixture. Gently mix until the flour is just incorporated, taking care not to overwork the dough. Overmixing can lead to tougher cookies, so a soft, manageable dough is the goal here.
Step 4: Adjust Dough Consistency and Pipe
Transfer your dough into a piping bag fitted with a large open star tip for that signature swirled and ridged butter cookie look. Test the dough’s consistency; if it feels too stiff, mix back in 1 to 2 teaspoons of heavy cream to make piping smooth and easy. Pipe your desired shapes onto the parchment-lined sheet, getting creative with stars, circles, or twists—each shape bakes up with that beautiful golden edge you expect.
Step 5: Chill the Dough
Place your piped cookies in the refrigerator for 30 minutes to chill. This step is essential to help the cookies keep their shape during baking, preventing spreading that can rob them of their classic charm. Meanwhile, preheat your oven to 175°C (350°F).
Step 6: Bake to Perfection
Bake the cookies for about 8 to 10 minutes until the edges turn lightly golden. Resist the urge to brown the tops—they should remain pale to keep that authentic look and delicate texture unique to this recipe. Once baked, transfer the cookies onto a cooling rack and let them come to room temperature.
Step 7: (Optional) Prepare the Chocolate Coating
If you’re going for an extra-special treat, melt your choice of dark or white chocolate in a microwave-safe bowl. Heat in 20-second bursts, stirring well each time to ensure smooth and glossy chocolate without overheating. This silky coating turns simple butter cookies into elegant, crowd-pleasing delights.
Step 8: Dip and Decorate
Dip the cooled cookies halfway into the melted chocolate, allowing excess to drip off. Lay them on a parchment-lined tray, and while the chocolate is still wet, sprinkle with candied decorations if you like. Let the chocolate harden completely before serving or storing for that perfect snap and irresistible look.
How to Serve Classic Danish Butter Cookies Recipe
Garnishes
A delicate dusting of powdered sugar or your favorite candied sprinkles complements the buttery richness beautifully. If you’ve dipped them in chocolate, a sprinkle of crushed nuts, sea salt flakes, or edible gold dust can elevate presentation and flavor simultaneously.
Side Dishes
These cookies pair wonderfully with a warm cup of English breakfast tea, freshly brewed coffee, or even a glass of cold milk. For a special occasion, serve alongside a fruit compote or light vanilla ice cream for a sweet contrast that highlights the cookie’s buttery goodness.
Creative Ways to Present
Arrange your cookies in decorative tins or clear jars to showcase their golden, inviting hue. You can also stack them with ribbons tied around for gifting or place them alongside festive platters for holiday gatherings. For parties, create a cookie platter with various flavors and dips, making these charmers the star of the show.
Make Ahead and Storage
Storing Leftovers
Once cooled completely, store leftovers in an airtight container at room temperature to maintain crispness. Properly stored, these cookies stay fresh and delicious for up to two weeks, perfect for savoring slowly or sharing through the days.
Freezing
If you want to make this Classic Danish Butter Cookies Recipe ahead in larger batches, freeze the baked and cooled cookies in a sealed container with parchment layers between them. They freeze beautifully for up to three months, allowing you to enjoy that fresh-baked feeling anytime.
Reheating
To refresh the crispness of thawed cookies, place them in a preheated oven at 150°C (300°F) for about 5 minutes. This subtle warming brings back the irresistible crunch without drying them out, as long as you watch closely.
FAQs
Can I make these cookies without piping?
Absolutely! If you don’t have a piping bag, you can shape the dough by rolling it into small balls and flattening them gently with a fork or bottom of a glass. They won’t have the same ridged look but will taste just as delicious.
Why do some Danish butter cookies become hard after baking?
Overbaking can cause butter cookies to turn hard, so it’s important to watch baking times carefully and remove them when edges just start to turn golden. Also, using the correct butter temperature and avoiding overmixing helps keep the texture tender.
Can I substitute ingredients in the Classic Danish Butter Cookies Recipe?
While you can experiment with ingredients, sticking to high-quality unsalted butter and cornstarch is key for texture and flavor. Substituting flour types or skipping cornstarch may change the cookie’s delicate crumb and crispness.
How do I prevent the cookies from spreading too much?
Chilling the piped dough before baking is crucial to keeping the iconic shapes intact. Also, make sure your butter is softened but not melting, as overly soft butter causes excessive spreading during baking.
Are these cookies suitable for gifting?
Definitely! The Classic Danish Butter Cookies Recipe yields beautiful, elegant cookies that store well and transport easily. Package them in decorative tins or boxes for a thoughtful, homemade gift anyone will appreciate.
Final Thoughts
There’s something truly special about baking and sharing this Classic Danish Butter Cookies Recipe. Its simple ingredients and straightforward steps produce a cookie that feels luxurious yet comforting. Whether you keep them all to yourself or share with loved ones, these cookies bring a little sprinkle of happiness with every buttery bite. So grab your mixing bowl, preheat your oven, and get ready to fill your kitchen with the irresistible scent of freshly baked Danish butter cookies.
Print
Classic Danish Butter Cookies Recipe
- Prep Time: 20 minutes
- Cook Time: 10 minutes
- Total Time: 60 minutes
- Yield: 24 cookies
- Category: Dessert, Snack
- Method: Baking
- Cuisine: Danish, European
Description
Classic Danish Butter Cookies are rich, buttery treats with a delicate crumb texture, perfect for any occasion. This recipe guides you through making traditional piped cookies that bake to a light golden edge, optionally dipped in luscious dark or white chocolate and sprinkled for extra festive flair.
Ingredients
Cookie Dough
- 255 g unsalted butter, softened
- 30 g powdered sugar
- 1 teaspoon vanilla extract
- 160 g all-purpose flour
- 8 g cornstarch
- 1–2 teaspoons heavy cream, as needed
Optional Decoration
- 170 g dark chocolate chips or chocolate almond bark, melted
- 170 g white chocolate chips or white almond bark, melted
- Candied sprinkles
Instructions
- Prepare Baking Sheet: Line a baking sheet with parchment paper to prevent the cookies from sticking during baking.
- Beat Butter and Sugar: In a medium bowl, beat the softened butter for 2-3 minutes until pale and creamy. Add the powdered sugar and continue beating for another 2 minutes until the mixture is light and fluffy. Add vanilla extract and mix thoroughly to combine the flavors.
- Add Dry Ingredients: Gradually add all-purpose flour and cornstarch to the butter mixture. Mix just until incorporated and a soft dough forms; be careful not to overmix to maintain tenderness.
- Pipe Cookies: Transfer the dough to a piping bag fitted with a large open star tip. Test the consistency of the dough; if too stiff for piping, add 1-2 teaspoons of heavy cream and mix to adjust. Pipe the dough into desired shapes onto the prepared baking sheet.
- Chill Cookies and Preheat Oven: Place the piped cookies in the refrigerator for 30 minutes to firm up. Meanwhile, preheat the oven to 175°C (350°F).
- Bake Cookies: Bake the chilled cookies for 8–10 minutes, or until the edges are just lightly golden. Avoid browning the tops to maintain the classic look. Remove from oven and cool completely on a wire rack.
- Melt Chocolate: If decorating, melt the dark or white chocolate chips or almond bark in a microwave-safe bowl. Heat in 20-second intervals, stirring between intervals until smooth and fully melted. Take care not to overheat to prevent the chocolate from seizing.
- Decorate Cookies: Dip the cooled cookies halfway into the melted chocolate, then place them on a parchment-lined tray. Add candied sprinkles immediately before the chocolate sets for festive decoration. Allow the chocolate to firm up completely before serving.
Notes
- Use softened butter at room temperature for easier creaming and better texture.
- Chilling the piped cookies prevents spreading during baking, preserving shape.
- Heavy cream can be adjusted slightly to achieve perfect piping consistency.
- Keep an eye on baking time to avoid overbrowning which alters the color and texture.
- If you prefer, skip the chocolate dip for a classic plain butter cookie.
