
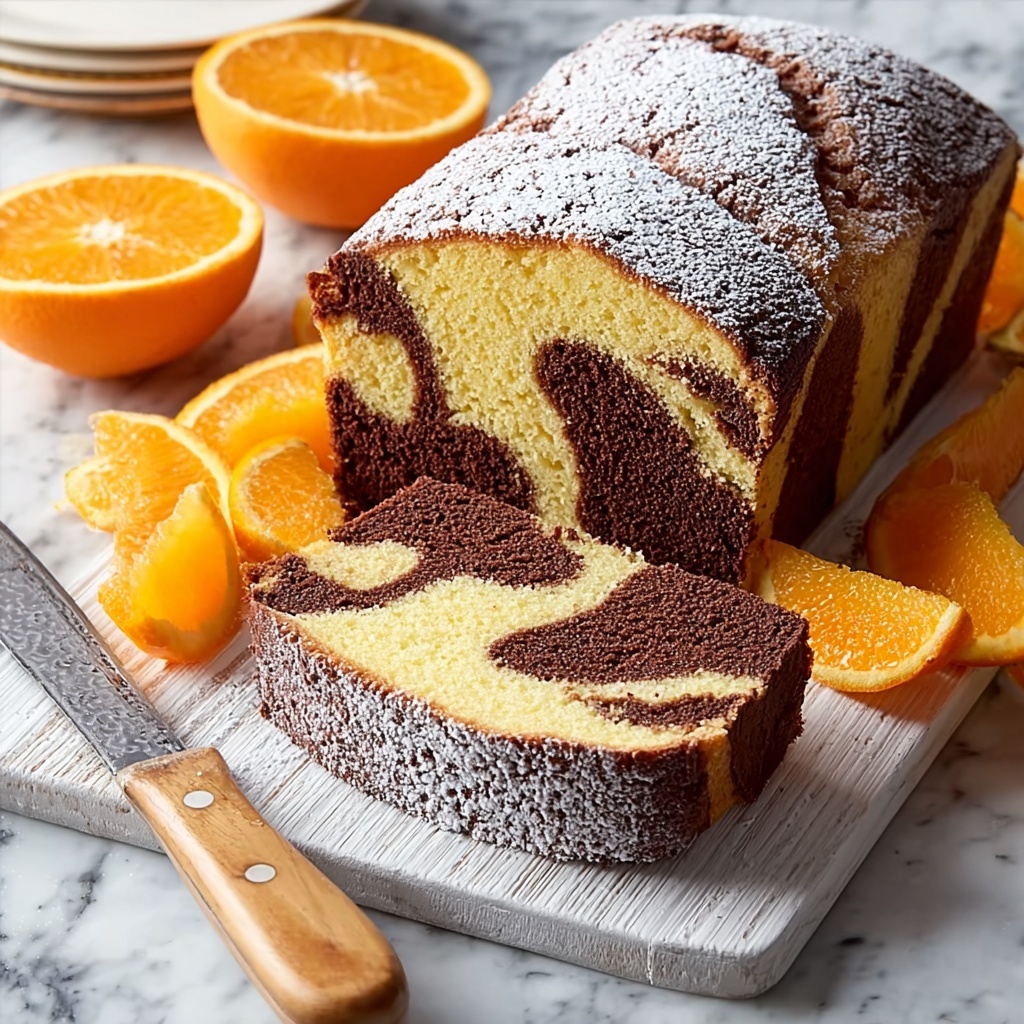
If you adore the zesty brightness of oranges paired with rich, indulgent chocolate, then this Chocolate Orange Marble Cake Recipe is destined to become one of your all-time favorites. It’s a beautifully swirled cake where velvety chocolate meets citrusy orange in each moist, fluffy bite. Whether you’re baking for an afternoon treat, a cozy gathering, or to impress friends and family, this cake offers a wonderful balance of flavors and textures that feels both comforting and delightfully sophisticated.
Ingredients You’ll Need
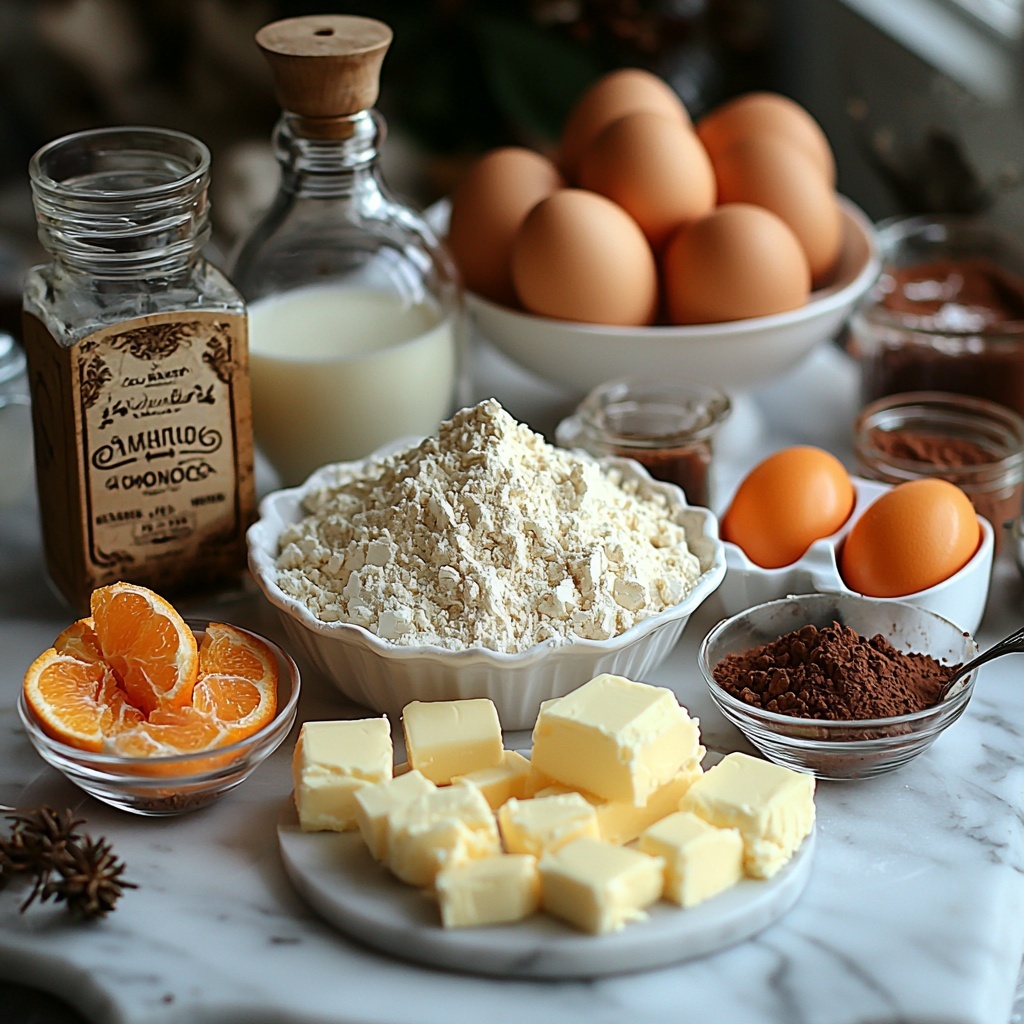
The magic of this Chocolate Orange Marble Cake Recipe really comes alive thanks to a handful of simple but essential ingredients. Each one plays a crucial role—flour and leavening agents ensure a perfect rise, butter and eggs deliver richness and structure, while cocoa powder and orange zest bring that irresistible flavor duo to life.
- All-purpose flour: Provides the cake’s tender yet sturdy base, essential for that moist crumb.
- Baking powder and baking soda: These leavening agents work together to make the cake light and fluffy.
- Salt: Enhances all the flavors, especially bringing out the chocolate and orange notes.
- Unsalted butter: Softened butter adds rich moisture and a creamy texture.
- Granulated sugar: Sweetens the cake to balance the citrus and cocoa.
- Eggs: Act as the strong binder that holds the cake together beautifully.
- Vanilla extract: Adds depth to the flavor profile without overpowering the star ingredients.
- Whole milk: Brings moisture and helps blend the batter smoothly.
- Orange zest: Bursts with bright, fresh citrus oils that lift the whole cake.
- Unsweetened cocoa powder: Delivers that deep chocolate flavor with richness and color.
- Boiling water: Enhances the cocoa flavor and makes the chocolate batter wonderfully smooth.
- Powdered sugar, fresh orange juice, and orange zest (for glaze): The optional glaze wraps everything up with a sweet, tangy finish.
How to Make Chocolate Orange Marble Cake Recipe
Step 1: Preheat and Prepare Your Pan
Start by preheating your oven to 350°F (175°C). This step is crucial because it ensures the oven is at the perfect temperature for an even bake. Grease and flour your loaf or bundt pan well to prevent the cake from sticking later on, making removal effortless and preserving the beautiful marbled pattern.
Step 2: Whisk Together Dry Ingredients
In a medium bowl, whisk the flour, baking powder, baking soda, and salt together. Mixing these dry components first guarantees an even distribution throughout the batter, which helps your cake rise consistently and develop that tender crumb everyone loves.
Step 3: Cream Butter and Sugar Until Fluffy
Beat softened butter with sugar on medium speed until light and fluffy—about 3 to 4 minutes. This step incorporates air into the mix, creating a light texture that will carry through the cake, making each bite delightfully soft and tender.
Step 4: Add Eggs, Vanilla, and Orange Zest
Beat in the eggs, one at a time, to ensure they fully combine and create the right structure. Then stir in vanilla extract and the orange zest, infusing the batter with warm vanilla notes and the invigorating citrus flavor that defines this recipe.
Step 5: Alternate Adding Dry Ingredients and Milk
Gradually mix in the dry ingredients alternated with the milk, just until combined. This careful mixing keeps the batter light while ensuring all elements blend perfectly together without overworking the gluten, which can make cakes tough.
Step 6: Stir Cocoa Powder Into Boiling Water
Combine cocoa powder with boiling water to form a smooth, rich chocolate mixture. The hot water intensifies the chocolate flavor, making the swirled section of the cake irresistibly deep and luscious.
Step 7: Create Two Batters
Divide your batter in half, then fold the chocolate mixture into one half. This divided batter will be the foundation for your beautiful chocolate orange marbling effect.
Step 8: Layer Vanilla and Chocolate Batter
Layer half of the vanilla batter into your prepared pan, then add half of the chocolate batter on top. Repeat the layers and get ready for the fun part—swirling!
Step 9: Swirl the Batters for Marble Effect
Gently use a knife or skewer to swirl through the batter layers just a few times. This step is what creates the beautiful marble pattern, giving every slice a unique and artful appearance. Be careful not to overmix to maintain distinct chocolate and orange sections.
Step 10: Bake to Perfection
Bake the cake for 30 to 35 minutes until a toothpick inserted in the center comes out clean. The perfect bake time ensures moistness in the cake while achieving a tender, slightly springy texture.
Step 11: Cool Before Glazing
Allow the cake to cool in the pan for about 20 minutes; then turn it out onto a wire rack to cool fully. Cooling fully is essential for the glaze to set nicely without melting away.
Step 12: Prepare the Orange Glaze
Whisk together powdered sugar, fresh orange juice, and more orange zest until smooth. This glaze combines sweetness and zing, perfectly complementing the richness of the cake.
Step 13: Drizzle the Glaze
Once the cake is completely cool, generously drizzle the orange glaze over the top. The glaze adds an inviting shine and an extra layer of citrus flavor that’s impossible to resist.
Step 14: Slice and Savor
Cut your Chocolate Orange Marble Cake into thick slices and enjoy each bite of moist, chocolatey goodness with just the right pop of orange. This cake is a treat that’s as fun to make as it is to eat!
How to Serve Chocolate Orange Marble Cake Recipe
Garnishes
Enhance your cake presentation with a few simple garnishes such as extra fresh orange zest, thin orange slices, or a dusting of cocoa powder. These not only look stunning but also boost the cake’s natural flavors, making every serving feel special.
Side Dishes
Serve alongside a dollop of whipped cream or a scoop of vanilla ice cream to balance the zesty and chocolatey flavors with creamy richness. Fresh berries, particularly oranges or raspberries, also bring a fresh, fruity counterpoint that’s irresistible.
Creative Ways to Present
For a festive touch, use the sliced cake as a base for mini trifles layered with orange curd and chocolate mousse. Or, for tea parties, cut into small squares, place on decorative plates, and sprinkle with edible flowers for an elegant look everyone will admire.
Make Ahead and Storage
Storing Leftovers
Store leftover slices in an airtight container at room temperature for up to 2 days. For longer freshness, refrigerate for up to a week, making sure the cake is covered well to prevent it from drying out.
Freezing
You can freeze this cake successfully by wrapping it tightly in plastic wrap and placing it in a freezer-safe container. Freeze for up to 2 months. When ready, thaw slowly in the refrigerator before serving to maintain texture and flavor.
Reheating
Warm slices gently in the microwave for about 15 seconds or briefly in a low oven to bring back that freshly baked warmth, enhancing the chocolate’s richness and the orange’s brightness.
FAQs
Can I use orange juice instead of orange zest in the cake batter?
While orange juice adds nice flavor, orange zest contains essential oils that provide a more intense and aromatic citrus note, which is key for this cake’s flavor. We recommend using at least some zest for the best taste.
Is it necessary to use boiling water with the cocoa powder?
Yes, mixing cocoa powder with boiling water unlocks deeper chocolate flavor and smooths out the mixture, creating a richer, more decadent chocolate layer in your marble cake.
Can I make this cake dairy-free?
Absolutely! Substitute the butter with a non-dairy margarine or coconut oil, and replace whole milk with almond, oat, or soy milk. The texture and taste will still be deliciously satisfying.
How can I ensure distinct marbling rather than full mixing?
Use a gentle swirling motion with a knife or skewer, and avoid over-swishing the batter. The goal is to create beautiful ribbons of chocolate and orange batter without fully blending them together.
Can I skip the orange glaze?
Yes, the cake is wonderful on its own, but the orange glaze adds a glossy finish and accentuates the orange flavor. It’s definitely worth trying for an extra special touch.
Final Thoughts
The Chocolate Orange Marble Cake Recipe is a dazzling way to elevate your baking routine with minimal effort and maximum flavor. It’s that perfect treat to share with friends or enjoy solo with a cup of tea, bringing sunshine and chocolatey comfort to any occasion. Give this recipe a whirl—you’ll be amazed how something so simple creates such a stunning and delicious result!
Print
Chocolate Orange Marble Cake Recipe
- Prep Time: 20 minutes
- Cook Time: 35 minutes
- Total Time: 55 minutes
- Yield: 8-10 servings
- Category: Dessert
- Method: Baking
- Cuisine: American
Description
This Chocolate Orange Marble Cake is a delightful blend of rich chocolate and fresh orange flavors swirled into a moist, tender cake. Enhanced with a zesty orange glaze, this cake offers a perfect balance of sweetness and citrus brightness, making it an irresistible treat for any occasion.
Ingredients
For the Cake:
- 1 3/4 cups all-purpose flour
- 2 teaspoons baking powder
- 1/2 teaspoon baking soda
- 1/4 teaspoon salt
- 1/2 cup unsalted butter, softened
- 1 cup granulated sugar
- 3 large eggs
- 1 teaspoon vanilla extract
- 1/2 cup whole milk
- 1 tablespoon orange zest
- 1/2 cup unsweetened cocoa powder
- 1/4 cup boiling water
For the Orange Glaze (optional):
- 1 cup powdered sugar
- 2–3 tablespoons fresh orange juice
- 1 teaspoon orange zest
Instructions
- Preheat Oven: Preheat your oven to 350°F (175°C). Grease and flour a 9×5-inch loaf pan or a bundt pan to prevent sticking.
- Mix Dry Ingredients: In a medium bowl, whisk together the flour, baking powder, baking soda, and salt. Set this mixture aside to be combined later with wet ingredients.
- Cream Butter and Sugar: In a large mixing bowl, beat the softened butter and granulated sugar on medium speed until the mixture is light and fluffy, about 3 to 4 minutes, which helps create a tender texture.
- Add Eggs and Vanilla: Add the eggs one at a time, beating well after each addition. Then mix in the vanilla extract and orange zest to infuse flavor throughout the batter.
- Combine Wet and Dry Ingredients: Gradually add the dry ingredient mixture to the butter mixture, alternating with the whole milk. Mix gently until just combined to avoid overworking the batter.
- Make Chocolate Mixture: In a small bowl, blend the cocoa powder with boiling water until smooth and well combined to enhance the chocolate flavor.
- Divide the Batter: Separate half of the prepared batter into another bowl and mix it thoroughly with the chocolate mixture to create the chocolate layer.
- Layer the Batter: Spoon half of the vanilla batter into the prepared pan, followed by half of the chocolate batter, then repeat with the remaining batter layers to build the marble effect.
- Create the Marble Effect: Use a knife or skewer to gently swirl the vanilla and chocolate batters together, creating a beautiful marbled pattern without overmixing.
- Bake: Place the pan in the preheated oven and bake for 30 to 35 minutes, or until a toothpick inserted in the center comes out clean, ensuring the cake is fully cooked.
- Cool: Let the cake cool in the pan for about 20 minutes, then transfer it to a wire rack to cool completely, preventing sogginess before glazing.
- Make the Glaze: In a medium bowl, whisk together powdered sugar, fresh orange juice, and orange zest until smooth. Adjust the consistency with extra juice or sugar as needed for drizzle thickness.
- Glaze the Cake: Once cooled, drizzle the orange glaze evenly over the top of the cake to add a zesty sweetness and beautiful finish.
- Slice and Enjoy: Cut the cake into slices and serve to enjoy the harmonious chocolate and orange flavors in each bite.
Notes
- Ensure the butter is softened, not melted, for proper creaming texture.
- Do not overmix the batter once the dry ingredients are added to keep the cake tender.
- Adjust the amount of orange juice in the glaze to achieve the desired consistency.
- You can substitute whole milk with buttermilk for a slightly tangier flavor and moist texture.
- This cake can be stored in an airtight container at room temperature for up to 3 days or refrigerated for up to a week.


