
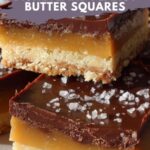
If you’re on the lookout for a sweet treat that’s as quick to whip up as it is delicious, you’ve just struck gold with this Disneyland Peanut Butter Squares: Irresistibly Easy Magic Recipe. Imagine a perfect harmony of buttery graham crackers, velvety peanut butter, and a luscious chocolate topping all packed into one bite-sized square. It’s a nostalgic, crowd-pleasing snack that brings a sprinkle of Disney magic right to your kitchen, making dessert time something to truly celebrate.

Ingredients You’ll Need
Getting ready to make these squares is a breeze because the ingredients list is refreshingly simple yet thoughtfully chosen to create layers of deliciousness. Each element plays a key role, from the comforting creaminess of peanut butter to the melt-in-your-mouth texture the graham crackers provide.
- 14 whole graham cracker sheets: These form the crunchy, crumbly base and give texture contrast to the creamy filling.
- 2 cups creamy peanut butter: Adds rich creaminess and classic nutty flavor that’s the star of the show.
- 8 tablespoons butter, softened: Brings moisture and a touch of indulgence that binds ingredients smoothly.
- 2 teaspoons vanilla: Enhances the overall sweetness with a fragrant warmth.
- ½ teaspoon salt: Balances sweetness and intensifies the flavors.
- 3½ cups powdered sugar: Provides the perfect level of sweetness and helps firm up the peanut butter layer.
- 4 tablespoons shortening: Keeps the chocolate topping shiny and beautifully smooth.
- 4 cups semi-sweet chocolate chips: Creates a luscious, rich chocolate layer that complements the peanut butter beneath perfectly.
How to Make Disneyland Peanut Butter Squares: Irresistibly Easy Magic Recipe
Step 1: Crush the Graham Crackers
Begin by breaking up those graham cracker sheets into fine crumbs. You can place them in a zip-top bag and crush with a rolling pin, or blitz in a food processor until they resemble coarse sand. This will give your squares a crunchy, yet tender texture.
Step 2: Mix the Peanut Butter Base
In a mixing bowl, combine the creamy peanut butter, softened butter, vanilla extract, and salt. Stir until everything is beautifully smooth and well blended—this creates the rich, silky foundation of your dessert.
Step 3: Add Dry Ingredients
Next, fold in the powdered sugar and graham cracker crumbs. The powdered sugar sweetens and thickens the mixture, while the graham crumbs add that sublime texture. Mix until it all comes together into a cohesive dough-like consistency that you can press into your pan.
Step 4: Press the Base into the Pan
Grab a baking dish (an 8×8 inch works great) and firmly press the peanut butter mixture evenly into the bottom. This step is important because a compact base will hold together nicely when you slice into the squares later.
Step 5: Melt Chocolate and Shortening
In a microwave-safe bowl or using a double boiler, melt the semi-sweet chocolate chips along with the shortening. The shortening is a neat trick that keeps the chocolate topping glossy and silky, preventing it from hardening too stiffly.
Step 6: Spread the Chocolate Layer
Once melted, carefully pour and spread the chocolate evenly over the peanut butter base. Make sure it forms a smooth, shiny layer that covers every inch, sealing in all that peanut buttery goodness beneath.
Step 7: Let It Set
Place your pan in the refrigerator and let the squares cool until the chocolate topping hardens completely. This usually takes about 30 minutes. Patience now means perfectly cut squares with a satisfying snap when you bite in!
Step 8: Slice and Serve
Finally, cut the dessert into neat squares — probably 24 pieces based on thickness — and serve. These squares are irresistibly delicious, bringing a little Disneyland-magic sparkle to your day with minimal effort required!
How to Serve Disneyland Peanut Butter Squares: Irresistibly Easy Magic Recipe
Garnishes
While these squares stand perfectly on their own, adding some simple garnishes can elevate the presentation. Try sprinkling a little flaky sea salt on top for a gourmet touch, or add a few chopped peanuts to introduce an extra crunch. A dusting of powdered sugar also adds a pretty snowy effect.
Side Dishes
Serve your Disneyland Peanut Butter Squares alongside a tall glass of cold milk to complement the richness with refreshing creaminess. They also pair wonderfully with fresh berries or a scoop of vanilla ice cream for a more decadent dessert experience.
Creative Ways to Present
For parties or special occasions, consider laying the squares out on a decorative platter with colorful parchment paper beneath. You can even serve them in miniature cupcake liners for easy individual portions, making them perfect finger foods. Another idea is to drizzle extra melted chocolate or caramel sauce on top for added flair.
Make Ahead and Storage
Storing Leftovers
Once prepared, Disneyland Peanut Butter Squares store beautifully in an airtight container at room temperature for up to 3 days. For longer freshness, keep them refrigerated to preserve the chocolate topping’s sheen and firmness.
Freezing
If you want to keep these squares on hand for longer, you can freeze them. Wrap each square tightly in plastic wrap and place them all in a freezer-safe bag or container. They freeze well for up to 3 months, making it easy to enjoy a magical treat anytime you want.
Reheating
These bars are best enjoyed chilled or at room temperature, so reheating is generally unnecessary. If you prefer softer squares, let them sit at room temperature for a bit after removing them from the fridge or freezer—no microwave needed.
FAQs
Can I use crunchy peanut butter instead of creamy?
Absolutely! Using crunchy peanut butter will add an extra texture dimension to your squares. The little peanut bits complement the smooth chocolate and graham cracker layers beautifully, making each bite even more interesting.
Is there a substitute for shortening in the chocolate layer?
Yes, you can use a small amount of coconut oil instead of shortening to achieve that glossy finish on the chocolate. Just be mindful that it might impart a slight coconut flavor, which many find delicious.
Can I make this recipe gluten-free?
Definitely. Just substitute the graham crackers with gluten-free graham cracker crumbs or gluten-free cookies. Make sure to check every ingredient label to keep it fully gluten-free. Your squares will still be just as tasty!
How thick should the peanut butter layer be?
A thickness of about half an inch works best — thick enough to be creamy and satisfying, but not so thick that the chocolate topping overwhelms. Press it firmly to get even layers that hold together well.
Can I use milk chocolate or dark chocolate chips instead?
You sure can! Milk chocolate will make the squares sweeter and creamier, while dark chocolate adds a richer, more intense flavor. Choose based on your personal taste preference or even mix the two for a fun twist.
Final Thoughts
Truly, Disneyland Peanut Butter Squares: Irresistibly Easy Magic Recipe is a delightful treat that brings together simple ingredients for an out-of-this-world flavor combination. This recipe is perfect for when you want an easy, no-fuss dessert that feels like a special occasion. Whether you’re sharing with friends, packing snacks for school, or just indulging yourself, these squares are sure to become a beloved staple. Give it a try and watch your kitchen fill with delicious memories!
Print
Disneyland Peanut Butter Squares: Irresistibly Easy Magic Recipe
- Prep Time: 15 minutes
- Cook Time: 0 minutes
- Total Time: 30 minutes (including chilling time)
- Yield: 24 servings
- Category: Dessert
- Method: No-Cook
- Cuisine: American
Description
Disneyland Peanut Butter Squares are a delightful no-bake treat featuring a crunchy graham cracker and creamy peanut butter base topped with rich, melted chocolate. This irresistibly easy recipe combines simple pantry ingredients for a nostalgic dessert that’s perfect for parties, snacks, or anytime a sweet craving hits.
Ingredients
Base:
- 14 whole graham cracker sheets
- 2 cups creamy peanut butter
- 8 tablespoons butter, softened
- 2 teaspoons vanilla extract
- ½ teaspoon salt
- 3½ cups powdered sugar
Topping:
- 4 tablespoons shortening
- 4 cups semi-sweet chocolate chips
Instructions
- Crush Graham Crackers: Place 14 whole graham cracker sheets in a large resealable plastic bag and crush them into fine crumbs using a rolling pin or a food processor.
- Mix Peanut Butter Layer: In a medium bowl, combine 2 cups creamy peanut butter, 8 tablespoons softened butter, 2 teaspoons vanilla extract, and ½ teaspoon salt. Stir until smooth and well blended.
- Add Dry Ingredients: Gradually add 3½ cups powdered sugar and the crushed graham cracker crumbs to the peanut butter mixture. Mix thoroughly until a thick, stiff dough forms.
- Press Mixture into Pan: Evenly press the peanut butter mixture into a greased or parchment-lined 9×13-inch baking dish, smoothing the top with a spatula to create an even layer.
- Melt Chocolate Topping: In a microwave-safe bowl or double boiler, melt together 4 cups semi-sweet chocolate chips and 4 tablespoons shortening, stirring every 30 seconds until smooth and glossy.
- Spread Chocolate: Pour the melted chocolate over the peanut butter layer, spreading it evenly with a spatula to cover the entire surface.
- Chill Until Set: Refrigerate the pan for at least 1 hour or until the chocolate topping has completely hardened.
- Cut and Serve: Once set, remove from refrigerator and cut into 24 squares. Serve chilled or at room temperature.
Notes
- For easier cutting, warm the knife under hot water and dry it before slicing the squares.
- You can substitute creamy peanut butter with natural or crunchy peanut butter, but texture will vary.
- Store leftovers in an airtight container in the refrigerator for up to one week.
- To make the chocolate topping dairy-free, use vegan chocolate chips and a plant-based shortening alternative.
- The recipe can be doubled or halved easily, just adjust the pan size accordingly.
