

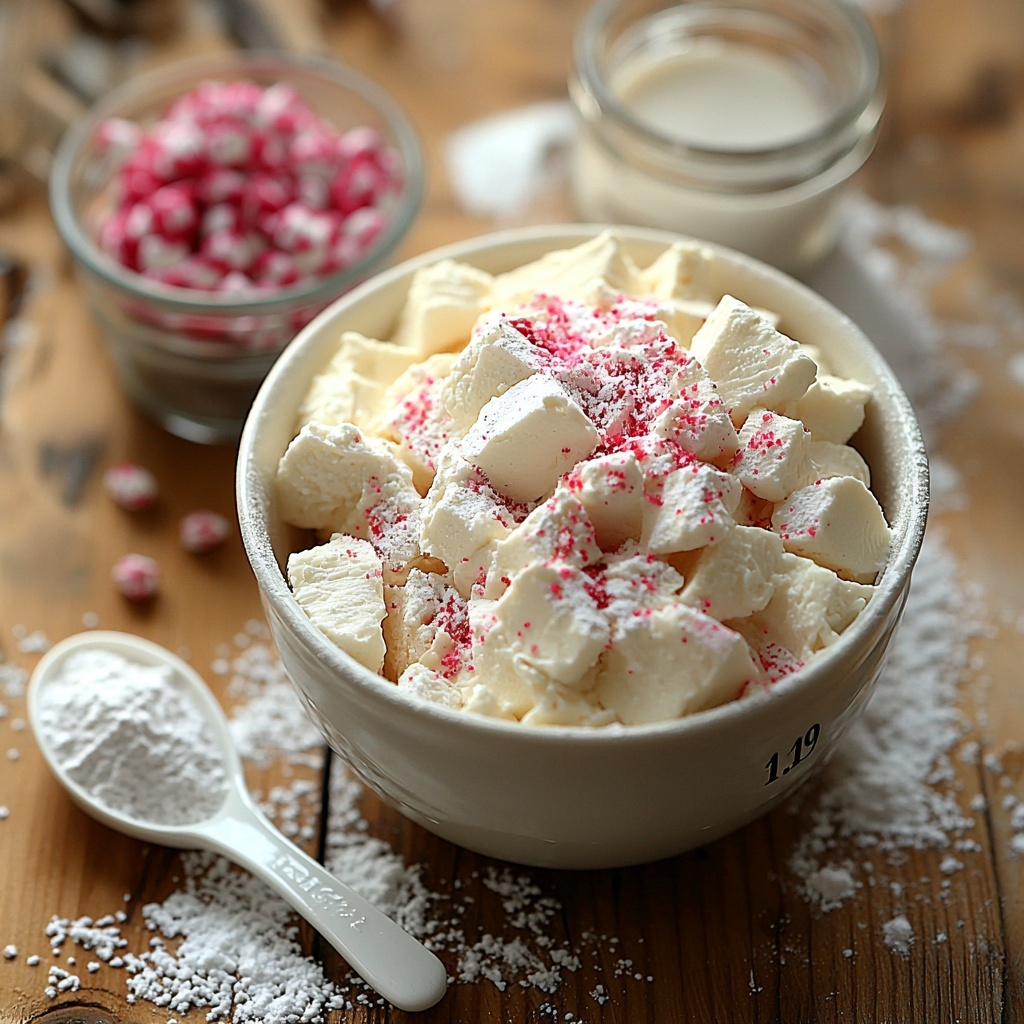
If you’re looking to add a charming, minty touch to your next gathering, there’s nothing quite like the delightful simplicity of Homemade Cream Cheese Mints: Sweeten Your Party Treats! Recipe. These little confections offer a perfect balance of creamy texture and refreshing peppermint flavor, making them a standout sweet that everyone will adore. Soft yet firm, with a melt-in-the-mouth magic, this recipe is as fun to make as it is to share, and it’s sure to become a beloved classic in your party treat lineup.
Ingredients You’ll Need
This recipe calls for just a handful of simple ingredients that come together beautifully to create that signature creamy, minty taste. Each component plays a crucial role in achieving the perfect texture, flavor, and festive look for your mints.
- Cream cheese (8 oz, softened): Provides that smooth, rich base that melts on your tongue and holds the mint mixture together effortlessly.
- Powdered sugar (4 cups): Sweetens the mints uniformly and gives them a soft but firm texture once chilled.
- Peppermint extract (1 tsp): Adds that refreshing, cool mint flavor that defines this recipe.
- Food coloring (optional): Allows you to customize the look of your mints, making them perfectly festive or matching party themes.
How to Make Homemade Cream Cheese Mints: Sweeten Your Party Treats! Recipe
Step 1: Combine Cream Cheese and Peppermint Extract
Start by putting your softened cream cheese into a mixing bowl and stirring in the peppermint extract. This step ensures the mint flavor is evenly infused throughout the creamy base, setting a strong foundation for the rest of your mints.
Step 2: Gradually Mix in Powdered Sugar
Next, slowly add the powdered sugar to your bowl. Mix as you go to avoid lumps and achieve a smooth, pliable dough-like consistency. This step is key for balancing sweetness with texture, giving your mints that sweet yet light bite everyone loves.
Step 3: Add Food Coloring if Desired
If you want to add a splash of color for visual appeal, now’s the time! Drop in a few drops of your chosen food coloring and mix thoroughly until the color is uniform. This little touch instantly makes your mints party-ready and fun.
Step 4: Shape Your Mints
Use your hands to roll the mixture into small balls or press it into molds for charming shapes. The tactile process is fun and satisfying, and molds give you the chance to personalize the look of your sweets with festive designs or simple rounds.
Step 5: Chill to Set
Place your shaped mints on a parchment-lined baking sheet and pop them into the refrigerator for at least one hour. This chilling step firms up the mints, making them easy to bite into and hold their shape beautifully when served.
Step 6: Serve and Enjoy
Once chilled, your creamy, refreshing mints are ready to delight your guests. Arrange them on a pretty plate or a tiered tray for an instant party conversation starter!
How to Serve Homemade Cream Cheese Mints: Sweeten Your Party Treats! Recipe
Garnishes
Consider sprinkling a few crushed peppermint candies or edible glitter on top for a sparkling finish that catches the eye. Fresh mint leaves can also add a lovely aromatic touch for an extra hint of freshness.
Side Dishes
These mints make excellent palate cleansers alongside rich desserts like chocolate cake or pecan pie. They also pair wonderfully with a hot cup of tea or coffee, balancing the bitterness with their cool sweetness.
Creative Ways to Present
Presentation can take these simple mints to another level. Try packaging them in clear jars with colorful ribbons as party favors, or arrange them in a pattern on decorative platters to match your event’s theme. For a whimsical touch, use mini cupcake liners or place them atop cupcake frosting for a layered sweet surprise.
Make Ahead and Storage
Storing Leftovers
Your homemade cream cheese mints keep best stored in an airtight container in the refrigerator. They’ll stay fresh and chewy for about 1 to 2 weeks, making it easy to prepare in advance for any celebration.
Freezing
If you want to store them longer, freezing is an option. Place the mints on a baking sheet to freeze individually before transferring them to a sealed freezer bag. This prevents sticking and preserves their texture for up to 3 months.
Reheating
There is no need to reheat these mints; they are enjoyed best cold or at room temperature. Simply take them out of the fridge about 10 minutes before serving to let their flavors shine.
FAQs
Can I use low-fat cream cheese for this recipe?
Yes, you can substitute with low-fat cream cheese, but keep in mind the texture might be slightly less creamy and the mints may firm up a bit differently after chilling.
What if I don’t have peppermint extract?
While peppermint extract is key for that classic minty flavor, you could try spearmint extract as a mild alternative, or add finely crushed peppermint candies for flavor.
How do I prevent the mints from sticking to my hands?
Dust your hands lightly with powdered sugar or chill the mint mixture briefly before shaping to make handling easier and less sticky.
Can I make these mints sugar-free?
You could experiment with powdered sugar substitutes but keep in mind that the texture and sweetness may be affected, so it might require some trial and error.
How long do these mints keep at room temperature?
Since they contain cream cheese, it’s best not to leave them out at room temperature for more than 2 hours to ensure freshness and food safety.
Final Thoughts
I wholeheartedly encourage you to try the Homemade Cream Cheese Mints: Sweeten Your Party Treats! Recipe for your next celebration or just as a delightful homemade indulgence. It’s a simple yet impressive treat that brings a fresh, sweet note to any occasion, and the joy of making these little bites is truly unmatched. Trust me, once you make them, they’ll quickly become a favorite party essential!
Print
Homemade Cream Cheese Mints: Sweeten Your Party Treats! Recipe
- Prep Time: 15 minutes
- Cook Time: 0 minutes
- Total Time: 1 hour 15 minutes
- Yield: 24 servings
- Category: Dessert
- Method: No-Cook
- Cuisine: American
- Diet: Vegetarian
Description
These Homemade Cream Cheese Mints are a delightful, easy-to-make sweet treat perfect for parties and special occasions. With a creamy texture blended with refreshing peppermint flavor, these mints are customizable with food coloring and require no baking. Simply mix, shape, and chill to create bite-sized confections that are sure to impress your guests.
Ingredients
Ingredients
- 8 oz cream cheese, softened
- 4 cups powdered sugar
- 1 tsp peppermint extract
- Food coloring (optional)
Instructions
- Combine Cream Cheese and Peppermint: In a mixing bowl, thoroughly combine the softened cream cheese with the peppermint extract until smooth and well incorporated.
- Add Powdered Sugar: Gradually add the powdered sugar to the mixture, stirring constantly until the mixture is smooth and fully combined without lumps.
- Add Food Coloring (Optional): If desired, add a few drops of your chosen food coloring and mix until the color is evenly distributed throughout the mixture.
- Shape the Mints: Using clean hands or a mold, shape the mixture into small balls or any preferred shapes for your mints.
- Prepare for Chilling: Place the shaped mints carefully onto a baking sheet lined with parchment paper to prevent sticking.
- Chill to Set: Refrigerate the mints for at least 1 hour to allow them to firm up properly.
- Serve and Enjoy: Once firm, the cream cheese mints are ready to be served and enjoyed as delightful party treats.
Notes
- Make sure the cream cheese is softened to room temperature for easier mixing.
- If the mixture is too sticky, add a bit more powdered sugar to achieve the right consistency.
- Use parchment paper or wax paper to prevent mints from sticking while chilling.
- Store leftovers in an airtight container in the refrigerator for up to one week.
- Customize the mints by experimenting with different extracts like vanilla or almond for varied flavors.


