
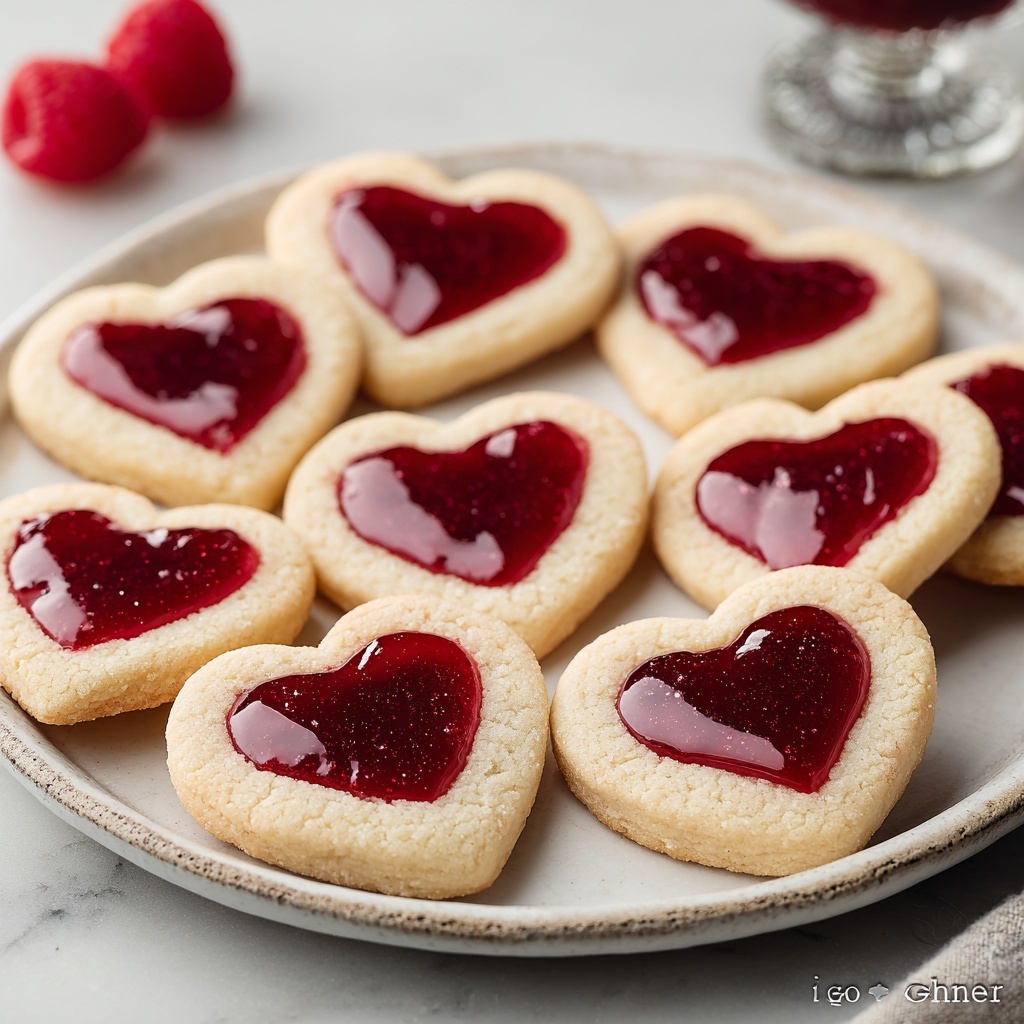
If you are looking for a delightful treat that combines buttery richness with fruity sweetness, the Thumbprint Heart Cookies Recipe is an absolute gem. These charming heart-shaped cookies feature a tender, melt-in-your-mouth texture with a luscious dollop of jam waiting in the center. Perfect for sharing with loved ones or gifting for special occasions, this recipe brings together simple ingredients and straightforward steps that result in an irresistibly beautiful and scrumptious dessert.
Ingredients You’ll Need
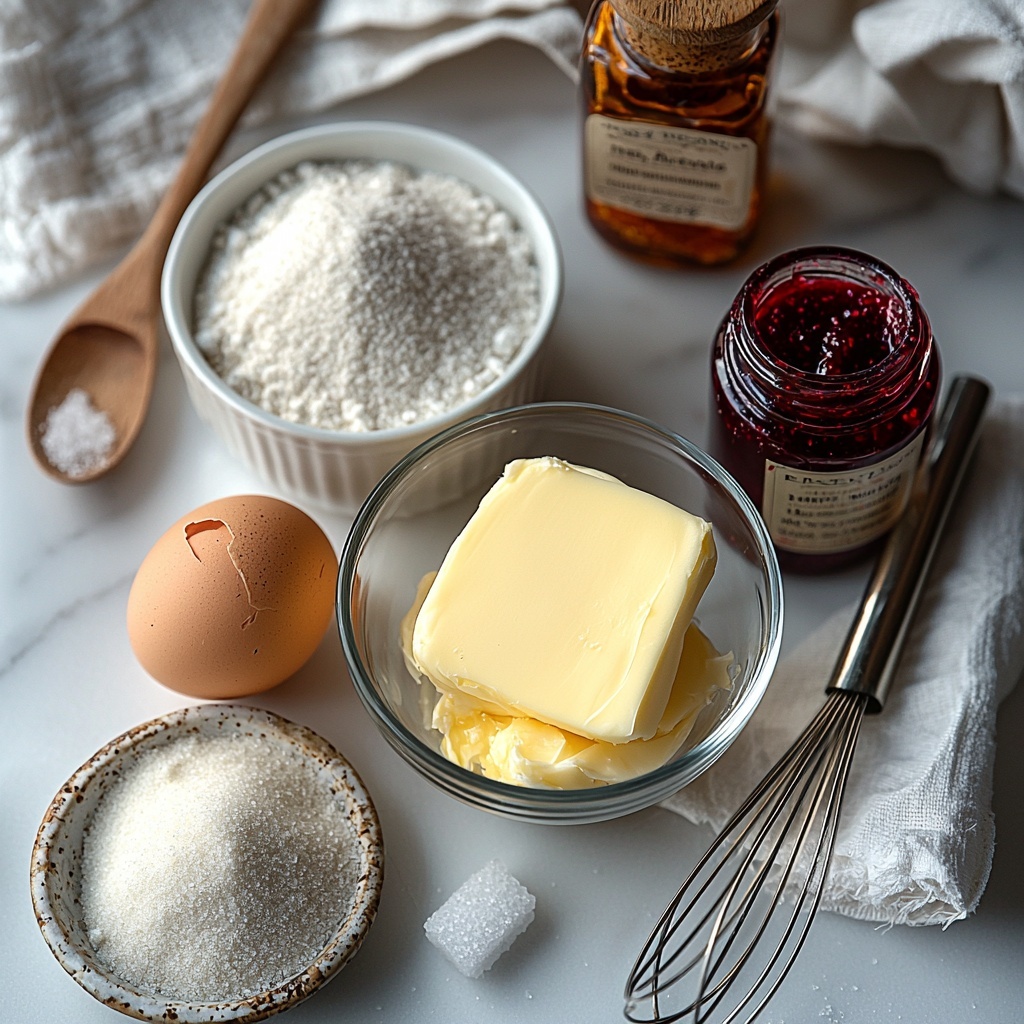
Each ingredient in this Thumbprint Heart Cookies Recipe plays a vital role in creating the perfect balance of flavor, texture, and color. From the creamy butter to the fragrant vanilla and luscious jam, every component is essential for baking these delightful cookies.
- Egg: Binds the dough together and adds richness for a tender crumb.
- Butter (3/4 cup, softened): Provides a rich, creamy base that ensures a melt-in-your-mouth texture.
- Light brown sugar (1/2 cup, lightly packed): Adds moisture and a touch of caramel flavor that complements the butter perfectly.
- All-purpose flour (1 1/2 cups): The sturdy foundation that gives these cookies their structure without toughness.
- Salt (1/4 teaspoon): Balances sweetness and enhances overall flavor.
- Vanilla extract (1/2 teaspoon): Infuses the dough with a warm, aromatic sweetness.
- Jam (around 1/4 cup): Choose raspberry, strawberry, cherry, or your favorite jam to add a bright, fruity burst in the center of each heart.
How to Make Thumbprint Heart Cookies Recipe
Step 1: Prepare Your Oven and Ingredients
Start by preheating your oven to 175 °C (350 °F). This ensures it’s perfectly hot by the time your dough is ready, helping your cookies bake evenly. At the same time, gather all your ingredients so you can move through the steps effortlessly without any interruptions, which is a game-changer for smooth baking.
Step 2: Cream the Butter and Sugar
In a large bowl, cream together the softened butter and light brown sugar using a mixer until the mixture is light and fluffy. This step is essential because incorporating air here creates a tender, soft cookie that’s full of delicious texture.
Step 3: Add Egg and Vanilla
Crack the egg into the bowl and pour in the vanilla extract. Blend them thoroughly into the butter and sugar mixture, making sure the flavors are well mixed for uniform taste in every bite.
Step 4: Combine the Dry Ingredients
In a separate bowl, whisk together the all-purpose flour and salt, then gradually add this dry mix into your wet ingredients. Fold gently with a spatula and be careful not to overwork the dough; this keeps the cookies tender, not chewy or tough.
Step 5: Form the Dough Balls
Use a tablespoon or cookie scoop to portion dough balls of approximately the same size. Place them spaced apart on a lined baking sheet to give them room to spread slightly while baking without merging into one another.
Step 6: Make the Thumbprint Indentations
Using your finger or the back of a spoon, gently press a small indentation in the center of each dough ball. This signature “thumbprint” will hold the jam filling and give these cookies their iconic look.
Step 7: Add the Jam Filling
Carefully spoon a small amount of your chosen jam into each indentation. Be cautious to avoid overfilling because too much jam might bubble over during baking, causing a sticky mess.
Step 8: Bake to Perfection
Bake your cookies in the preheated oven for 10-12 minutes. You’ll want to watch for lightly golden edges—this signals that the cookies are cooked through and ready to come out.
Step 9: Cool and Set
Once baked, allow the cookies to cool for several minutes on the baking sheet before transferring them to a wire rack to cool completely. This step helps the cookies set perfectly, ensuring the jam stays put and the texture remains ideal.
How to Serve Thumbprint Heart Cookies Recipe
Garnishes
A simple dusting of powdered sugar over the cooled Thumbprint Heart Cookies adds an elegant, snowy finish that looks beautiful and adds a subtle extra sweetness. You might also try a light drizzle of white chocolate for a decadent touch.
Side Dishes
These cookies pair wonderfully with a warm cup of tea or a frothy cappuccino. For a festive twist, serve them alongside fresh berries or a scoop of vanilla ice cream to balance the fruity jam and buttery cookie flavors.
Creative Ways to Present
Arrange your Thumbprint Heart Cookies on a rustic wooden board, interspersed with fresh flowers or sprigs of mint for a charming display perfect for entertaining. You could also place them in a pretty tin with parchment paper for a lovely gift presentation.
Make Ahead and Storage
Storing Leftovers
Keep your baked Thumbprint Heart Cookies in an airtight container at room temperature. They’ll stay fresh and soft for up to a week, making them a perfect make-ahead treat for the week.
Freezing
If you want to bake in advance, you can freeze the dough balls before baking by arranging them on a tray and freezing until solid, then transferring them to a freezer bag. Alternatively, freeze baked cookies in an airtight container for up to three months, allowing you to enjoy this Thumbprint Heart Cookies Recipe anytime.
Reheating
To refresh frozen or stored cookies, warm them gently in a preheated oven at 150 °C (300 °F) for about 5 minutes. This brings back that freshly baked texture and aroma, making every bite feel like it just came out of the oven.
FAQs
Can I use different types of jam in this recipe?
Absolutely! The Thumbprint Heart Cookies Recipe is very versatile. Raspberry, strawberry, cherry, or even apricot jam works beautifully. You can even try marmalade or lemon curd for a citrus twist.
What if I don’t have a mixer? Can I make the dough by hand?
Yes, you can! Use a sturdy wooden spoon or whisk and take your time creaming the butter and sugar by hand. It will be a bit of a workout, but the result will be just as delicious.
How do I prevent the jam from overflow during baking?
Use only a small amount of jam in each indentation – about a teaspoon. Too much filling will bubble over as the cookies bake, so less is more to keep things tidy.
Can this dough be made gluten-free?
You can substitute the all-purpose flour with a gluten-free flour blend designed for baking. Just make sure it includes xanthan gum or a similar binder to help maintain the dough’s structure.
Are these cookies suitable for gifting?
Definitely! Their lovely heart shape and colorful jam centers make them a thoughtful and beautiful homemade gift. Pack them in decorative tins or boxes lined with parchment paper for an extra special touch.
Final Thoughts
If you’re looking to brighten your day with a little baking magic, this Thumbprint Heart Cookies Recipe is guaranteed to bring a smile. It’s simple, fun to make, and results in charming, tasty cookies that everyone will adore. I can’t wait for you to try them and share the joy of baking and gifting these sweet little delights with your friends and family!
Print
Thumbprint Heart Cookies Recipe
- Prep Time: 10 minutes
- Cook Time: 12 minutes
- Total Time: 27 minutes
- Yield: 24 cookies
- Category: Dessert Cookies
- Method: Baking
- Cuisine: American
Description
These delightful Thumbprint Heart Cookies are buttery, tender shortbread-style cookies filled with your favorite fruit jam, making them perfect for any occasion. With a soft, melt-in-your-mouth texture and a sweet jam center, these cookies are simple to make and ideal for sharing with family and friends.
Ingredients
Cookie Dough
- 1 egg
- 3/4 cup butter (about 170 g), softened
- 1/2 cup light brown sugar, lightly packed
- 1 1/2 cups all-purpose flour
- 1/4 teaspoon salt
- 1/2 teaspoon vanilla extract
Filling
- ~1/4 cup jam of your choice (raspberry, strawberry, cherry, etc.)
Instructions
- Preheat the oven: Preheat your oven to 175 °C (350 °F). Prepare your baking sheet by lining it with parchment paper or a silicone baking mat to prevent sticking.
- Cream butter and sugar: In a large mixing bowl, combine the softened butter and light brown sugar. Using a hand or stand mixer, cream them together until the mixture is light, fluffy, and well aerated to ensure tender cookies.
- Add egg and vanilla: Crack the egg into the bowl and add the vanilla extract. Mix thoroughly until all ingredients blend into a smooth, uniform dough base.
- Incorporate dry ingredients: In a separate bowl, whisk together the all-purpose flour and salt. Gradually add this to the wet mixture, folding gently with a spatula until just combined. Avoid overmixing to keep the cookies tender.
- Shape the dough balls: Use a cookie scoop or tablespoon to portion out the dough into balls approximately one tablespoon in size. Place them spaced evenly on the prepared baking sheet.
- Create thumbprints: Using your finger or the back of a spoon, gently press down in the center of each dough ball to form an indentation for the jam filling.
- Add the jam filling: Spoon a small amount of your chosen jam into each indentation, being careful not to overfill to avoid spillage during baking.
- Bake the cookies: Place the baking sheet in the preheated oven and bake for 10-12 minutes until the cookie edges are lightly golden and the jam looks softly bubbled.
- Cool the cookies: Remove from oven and allow the cookies to cool on the baking sheet for a few minutes before transferring them to a wire rack to cool completely. This helps set the cookies and enhances their texture and flavor.
Notes
- Use softened butter at room temperature to ensure smooth creaming with sugar.
- Do not overmix the dough once the flour is added to keep the cookies tender.
- Choose a thick jam to prevent excessive spreading or leaking during baking.
- You can substitute light brown sugar with white granulated sugar, but the flavor and texture will slightly differ.
- Store the cookies in an airtight container at room temperature for up to 5 days.


