

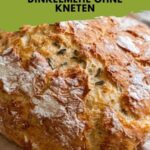
There is nothing quite like the aroma of freshly baked bread, especially when it carries the wild, garlicky hint of fresh bärlauch. This Bärlauchbrot aus dem Topf mit Dinkelmehl ohne Kneten Recipe delivers a wonderfully rustic loaf that is moist, flavorful, and surprisingly simple to prepare. Without the fuss of kneading, this bread brings together the nutty undertones of spelt flour and the fresh, green punch of bärlauch, making it a perfect centerpiece for any meal or snack. Trust me, once you try this recipe, it will become your go-to when craving something hearty, homemade, and deeply satisfying.
Ingredients You’ll Need
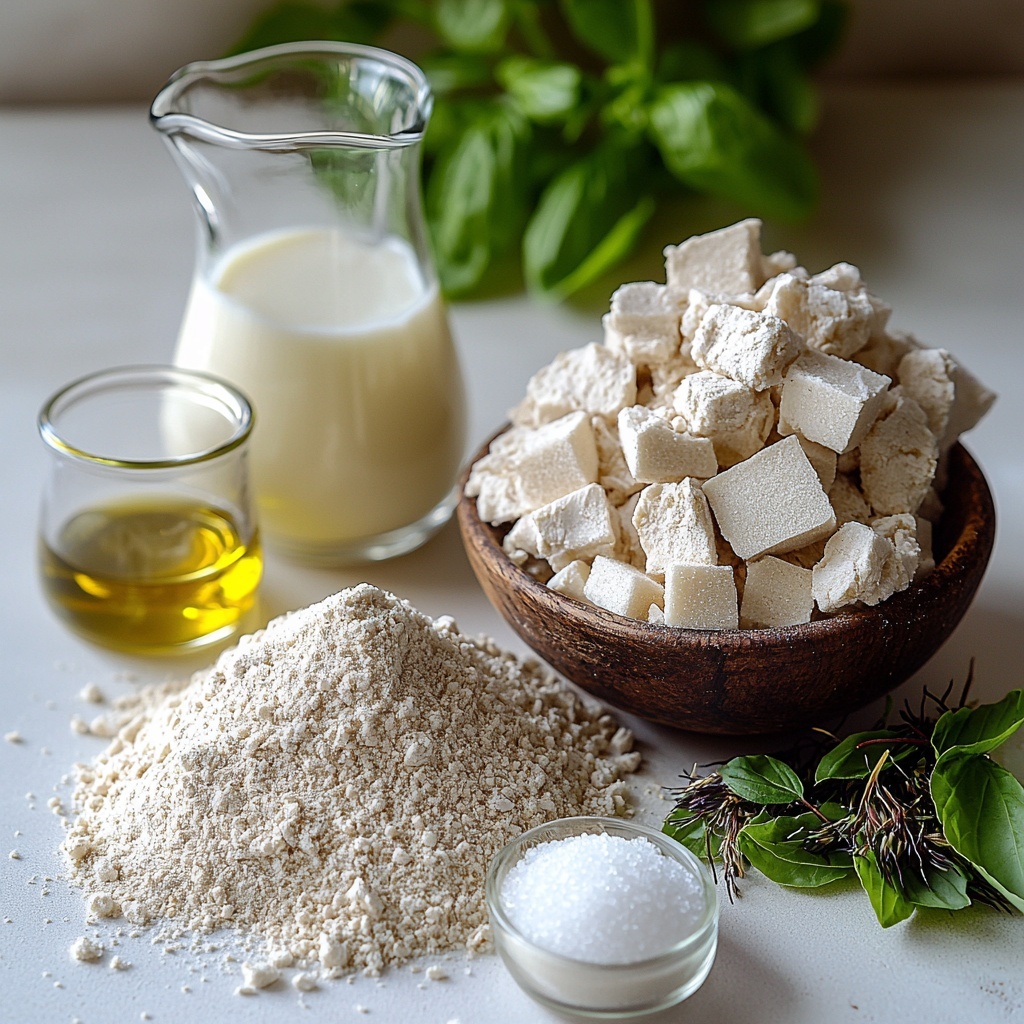
Getting started with this Bärlauchbrot aus dem Topf mit Dinkelmehl ohne Kneten Recipe is delightfully straightforward. Each ingredient plays a key role in crafting the perfect bread texture and flavor, from the tangy buttermilk to the vibrant bärlauch leaves. Keep these essentials ready for a hassle-free baking experience that guarantees warm, fresh bread every time.
- 375 g Buttermilch: Provides moisture and a pleasant tang that activates the yeast and tenderizes the crumb.
- 8 g frische Hefe: Fresh yeast is essential for that natural rise, with options for a quicker or slow overnight fermentation.
- 1.5 TL Zucker: Feeds the yeast gently to get the fermentation started and adds a subtle sweetness.
- 320 g Dinkelmehl 630: Spelt flour adds a nutty, wholesome flavor with a hearty texture.
- 230 g Weizenmehl 550: Wheat flour contributes strength and helps the bread develop a perfect crust.
- 30 g Olivenöl: Adds richness and a lovely soft crumb with a gentle fruity note.
- 2.5 TL Salz oder Bärlauchsalz: Balances the flavors and enhances the bärlauch’s garlicky aroma.
- 20–25 Blätter Bärlauch, kleingehackt: The star ingredient – fresh ramsons bring signature herbaceous freshness and color.
How to Make Bärlauchbrot aus dem Topf mit Dinkelmehl ohne Kneten Recipe
Step 1: Activate the Yeast
Begin by mixing the buttermilk, fresh yeast, and sugar in your mixing bowl. Set this mixture aside and give the yeast a little time to awaken and dissolve fully. You’ll see it start to foam lightly, which is your first sign that the magic is happening.
Step 2: Combine and Knead the Dough
Next, add all your remaining ingredients — the spelt and wheat flours, olive oil, salt, and the finely chopped bärlauch leaves. Knead everything together for about four minutes. This recipe is wonderfully forgiving thanks to the spelt flour and the oil, which keep the dough soft and easy to work with, even without intense kneading.
Step 3: Let the Dough Rise
Transfer the dough to a generously oiled bowl. Now comes the patience part: you can let it rise for an hour at room temperature if you’re short on time, or opt for the slow, cold overnight fermentation in the fridge. The latter really intensifies the flavors and gives the crumb an exceptional texture.
Step 4: Fold and Shape the Dough
Once your dough has risen, wet your hands and gently fold it ten times right in the bowl. This folding technique helps to build strength and shape without formal kneading. Then, form the dough into a round loaf and place it into a proofing basket for its final proof. Meanwhile, preheat your oven with a heavy cast iron pot and its lid inside to get it scorching hot.
Step 5: Bake the Bread in the Pot
Carefully take the proofed dough out of the basket by flipping it onto a sheet of baking parchment. Using the parchment, lift and drop it straight into the preheated pot. This method preserves the loaf’s airy structure and creates a steamy environment ideal for a crispy crust.
Step 6: Baking Times and Temperatures
Bake the bread covered at 240 degrees Celsius (Ober-/Unterhitze) for 30 minutes. Then remove the lid and bake uncovered for another 10 minutes at 200 degrees to develop that delicious golden-brown crust. Keep an eye on it so it doesn’t darken too much.
Step 7: Ready to Enjoy
Once out of the oven, allow the bread to cool slightly until just warm. This Bärlauchbrot aus dem Topf mit Dinkelmehl ohne Kneten Recipe is best enjoyed when it’s still a little warm, so slice and dive in for a taste of freshly baked goodness.
How to Serve Bärlauchbrot aus dem Topf mit Dinkelmehl ohne Kneten Recipe
Garnishes
This bread shines on its own but can also be elevated with simple garnishes like softened butter, a brush of herb-infused olive oil, or a sprinkle of coarse sea salt to highlight the bärlauch’s vibrant flavor.
Side Dishes
Pair this bärlauchbrot with fresh soups, creamy cheeses, or charcuterie to create a nourishing and sophisticated meal. Its herbal notes and hearty texture complement light salads or roasted vegetables beautifully.
Creative Ways to Present
For an inviting presentation, slice the bread thickly and toast it slightly to amplify its aroma. Top with smashed avocado or your favorite spreads for a quick, flavorful snack. You can even cut it into cubes for a rustic bread salad or serve as a base for canapés at a gathering.
Make Ahead and Storage
Storing Leftovers
Wrap any leftover bread tightly in a clean kitchen towel or place it in a bread box to keep it fresh for a couple of days. The sturdy crust and moist crumb make it resistant to drying out quickly.
Freezing
This bread freezes exceptionally well. Slice it first for convenience, then wrap tightly in plastic wrap or freezer bags to preserve its aroma and prevent freezer burn. When you want to enjoy it again, simply thaw at room temperature.
Reheating
To revive that just-baked freshness, warm slices of the bread in a toaster or oven at 180 degrees Celsius for about 5–7 minutes. This reawakens the crust’s crispness and the bärlauch’s fragrant notes.
FAQs
Can I use dried yeast instead of fresh yeast for this recipe?
Yes, you can substitute fresh yeast with dried yeast; just use about one-third of the amount. Dissolve it in the buttermilk as usual and proceed with the recipe. The rise times might vary slightly, so keep an eye on the dough.
Is there a vegan option for the buttermilk in this recipe?
Definitely! Use plant-based milk like almond or oat milk mixed with a tablespoon of lemon juice or apple cider vinegar to mimic the acidity of buttermilk. Let it sit for 5-10 minutes before using.
What if I don’t have a cast iron pot for baking?
You can use any heavy oven-safe pot with a lid, such as a Dutch oven. If that’s not available, bake the loaf on a preheated baking stone or tray and place a tray of water in the oven to create steam.
Can I add other herbs or ingredients to this bread?
Absolutely! While bärlauch is the star here, feel free to experiment with rosemary, thyme, or even sun-dried tomatoes for a different twist. Just adjust quantities to keep the dough balanced.
How long can I let the dough rise overnight?
The dough can ferment slowly in the fridge for about 12 to 14 hours, which enhances the flavor and texture. Avoid going much longer to prevent over-fermentation, which can affect the rise.
Final Thoughts
This Bärlauchbrot aus dem Topf mit Dinkelmehl ohne Kneten Recipe is a joyous way to bring homemade bread into your kitchen without the usual fuss. Its fresh, herbal notes paired with the wholesome goodness of spelt flour are sure to impress family and guests alike. Give it a try, and you might find yourself baking this delightful loaf again and again, discovering new ways to enjoy each fragrant slice.
Print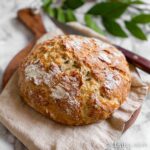
Bärlauchbrot aus dem Topf mit Dinkelmehl ohne Kneten Recipe
- Prep Time: 15 Minutes
- Cook Time: 40 Minutes
- Total Time: 1 Hour 15 Minutes (ohne Übernachtgare) bis zu 14 Stunden inkl. Übernachtgare
- Yield: 12 Scheiben
- Category: Brot
- Method: Baking
- Cuisine: Deutsch
Description
Dieses Bärlauchbrot aus dem Topf ist ein einfach zubereitetes, aromatisches Dinkelbrot ohne Kneten, das mit frischem Bärlauch verfeinert wird. Es besticht durch seine lockere Krume und die feine Würze, ideal für herzhafte Brotliebhaber und perfekt geeignet für eine unkomplizierte Zubereitung mit langer Gehzeit im Kühlschrank.
Ingredients
Flüssige Zutaten
- 375 g Buttermilch (vegane Alternative – siehe Notizen unten)
- 30 g Olivenöl
Trockenstoffe
- 320 g Dinkelmehl 630
- 230 g Weizenmehl 550
- 2,5 TL Salz oder Bärlauchsalz
- 1,5 TL Zucker
Hefe
- 8 g frische Hefe (für Übernachtgare) ODER 25 g für 1 Stunde Gehzeit
Frische Kräuter
- 20–25 Blätter Bärlauch (fein gehackt)
Instructions
- Hefe vorbereiten: Buttermilch, Hefe und Zucker in eine Schüssel oder den Mixtopf geben und gut vermischen. Danach stehen lassen, bis sich die Hefe vollständig aufgelöst hat und aktiviert ist.
- Teig kneten: Alle restlichen Zutaten, inklusive Mehl, Öl, Salz und Bärlauch, zur Hefemischung geben. Den Teig für etwa 4 Minuten kneten, bis eine homogene, leicht feuchte Masse entsteht.
- Teig gehen lassen: Den Teig in eine geölte Schüssel umfüllen. Je nach Hefe-Menge entweder 1 Stunde bei Raumtemperatur gehen lassen (bei 25 g Hefe) oder über Nacht (ca. 12-14 Stunden) im Kühlschrank fermentieren (bei 8 g Hefe). Die Kühlschrankgare fördert die Aromaentwicklung.
- Teig falten und formen: Nach der Gehzeit den Teig in der Schüssel mit feuchten Händen 10 Mal falten, um die Struktur zu verbessern. Anschließend zu einem Laib formen und in ein Gärkörbchen legen. Gleichzeitig den Ofen auf 240 Grad Ober-/Unterhitze vorheizen und den gusseisernen Topf mit Deckel im Ofen mitaufheizen.
- Teig in den Topf geben: Den Laib vorsichtig aus dem Gärkörbchen auf ein Stück Backpapier stürzen. Dieses zusammen mit dem Teig in den vorgeheizten gusseisernen Topf geben und sofort den Deckel auflegen, um die Feuchtigkeit zu bewahren.
- Brot backen: Das Brot bei 240 Grad Ober-/Unterhitze ca. 30 Minuten backen. Danach den Deckel entfernen und das Brot weitere 10 Minuten bei 200 Grad backen, damit die Kruste schön knusprig und goldbraun wird. Dabei das Brot beobachten, damit es nicht zu dunkel wird.
- Brot abkühlen lassen und servieren: Das fertige Bärlauchbrot aus dem Topf etwas lauwarm abkühlen lassen und anschließend genießen. Perfekt zu Butter oder herzhaften Belägen.
Notes
- Für eine vegane Alternative kann die Buttermilch durch pflanzliche Joghurt- oder Milchalternativen mit etwas Zitronensaft ersetzt werden, um die Säure zu simulieren.
- Die längere Gehzeit über Nacht im Kühlschrank verbessert das Aroma und die Textur des Brotes.
- Das Falten des Teigs ersetzt das klassische Kneten und unterstützt die Glutenentwicklung.
- Der gusseiserne Topf sorgt während des Backens für ein dampfendes Umfeld, das zu einer knusprigen Kruste führt.