
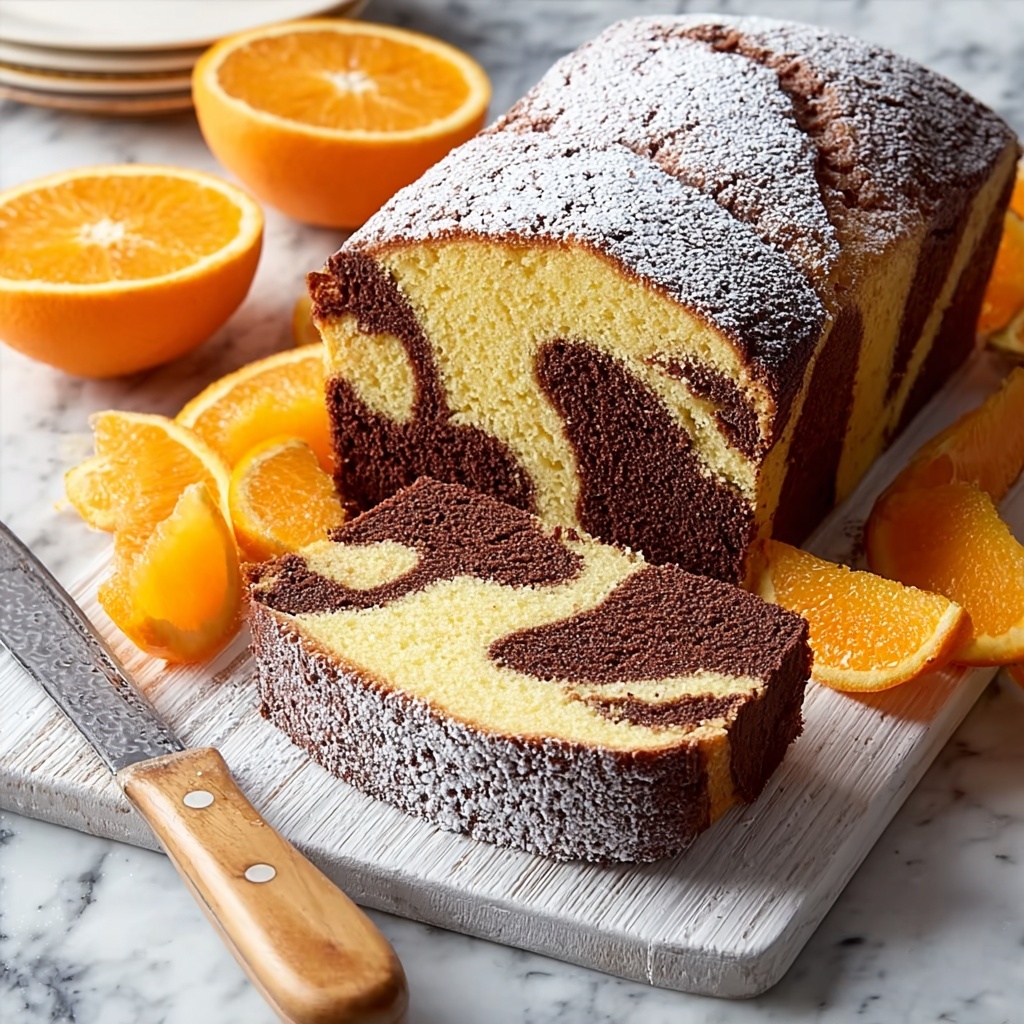
If you love the cozy comfort of a homemade cake with a zesty twist, this Chocolate Orange Marble Cake Recipe is a total game-changer. Imagine the rich, velvety chocolate swirling seamlessly with bright, citrusy orange notes—each bite is a perfect harmony of flavors that feels both indulgent and refreshingly vibrant. Not only does this cake look stunning with its marbled pattern, but its moist texture and balanced sweetness make it a favorite for any occasion, from casual get-togethers to special celebrations.

Ingredients You’ll Need
Gathering simple, quality ingredients is the secret to this recipe’s success, ensuring every element shines through. Each component plays a crucial role, whether it’s adding moisture, structure, or that burst of citrusy brightness that makes this cake unforgettable.
- 1 3/4 cups all-purpose flour: This forms the sturdy yet tender base of the cake, providing the perfect crumb.
- 2 teaspoons baking powder: Helps the cake rise beautifully without making it too dense.
- 1/2 teaspoon baking soda: Works alongside baking powder to achieve an airy texture.
- 1/4 teaspoon salt: Enhances all the other flavors and balances sweetness.
- 1/2 cup unsalted butter: Softened to bring richness and moisture that melts in your mouth.
- 1 cup granulated sugar: Sweetens the cake evenly and contributes to the golden crust.
- 3 large eggs: Bind everything together while adding depth and structure.
- 1 teaspoon vanilla extract: Adds warmth and rounds out the flavor profile.
- 1/2 cup whole milk: Keeps the batter moist and tender for that melt-away texture.
- 1 tablespoon orange zest: Packs a fragrant citrus punch that’s key to this cake’s character.
- 1/2 cup unsweetened cocoa powder: Infuses the chocolate portion with deep, rich flavor.
- 1/4 cup boiling water: Enhances the cocoa’s intensity and helps it blend smoothly.
- 1 cup powdered sugar (for glaze, optional): Brings a sweet finishing touch with a delicate texture.
- 2-3 tablespoons fresh orange juice (for glaze, optional): Imbues the glaze with fresh, bright citrus notes.
- 1 teaspoon orange zest (for glaze, optional): Adds extra zing and eye-catching texture to the drizzle.
How to Make Chocolate Orange Marble Cake Recipe
Step 1: Preheat and Prepare Your Pan
Start by preheating your oven to 350°F (175°C). Prepare your baking pan—be it a loaf or bundt pan—by greasing and flouring it gently. This step ensures your cake releases easily and keeps that beautiful shape intact.
Step 2: Whisk Together Dry Ingredients
In a medium bowl, whisk the all-purpose flour, baking powder, baking soda, and salt. This blend acts as the backbone of your cake, so mixing them well ensures an even rise and texture throughout the batter.
Step 3: Cream Butter and Sugar
In a large bowl, beat your softened butter and granulated sugar together on medium speed until light and fluffy—about 3 to 4 minutes. This aeration creates a tender crumb and gives the cake its lift.
Step 4: Incorporate Eggs, Vanilla, and Orange Zest
Add eggs one at a time, mixing after each addition to keep the batter smooth. Then, blend in vanilla extract and that essential tablespoon of orange zest, infusing your cake with its signature fragrant citrus warmth.
Step 5: Combine Wet and Dry Ingredients
Alternately fold in the flour mixture and whole milk, starting and ending with the dry. Be careful not to overmix here; you want just enough integration to keep the cake tender and light.
Step 6: Create the Chocolate Mixture
Mix cocoa powder with boiling water until smooth in a small bowl. This step unlocks the cocoa’s fullest flavor and ensures the chocolate portion of your marble cake is deeply rich and luscious.
Step 7: Divide and Mix Batters
Take half of your vanilla batter and blend it gently with the chocolate mixture. This division is key to creating those tempting swirls of chocolate and orange in your cake.
Step 8: Layer the Batters in the Pan
Carefully spoon half of the vanilla batter into the pan, then layer half of the chocolate batter on top. Repeat with the remaining batters to build your layers of flavor and color.
Step 9: Swirl for the Perfect Marble
Use a knife or skewer to swirl the batters gently, creating that beautiful marbled effect that’s as pleasing to the eye as it is delicious. The secret is to swirl just enough—you don’t want the batters to blend completely.
Step 10: Bake to Perfection
Bake the cake for 30 to 35 minutes, or until a toothpick inserted into the center comes out clean. The aroma of chocolate and orange filling your kitchen is a sure sign your cake is almost ready.
Step 11: Cool the Cake
Let the cake cool in the pan for about 20 minutes, then carefully transfer it to a wire rack to cool fully. This cooling time sets the texture and makes slicing easier.
Step 12: (Optional) Make the Orange Glaze
Whisk powdered sugar, fresh orange juice, and orange zest until smooth in a bowl. The glaze adds a zingy sweetness and a lovely sheen, elevating the cake’s presentation and flavor.
Step 13: Glaze and Finish
Once the cake is completely cool, drizzle the glaze over the top. This final touch creates a mouthwatering finish that ties together the chocolate and orange flavors beautifully.
Step 14: Slice and Enjoy
Cut into slices and share your delicious creation. Each bite offers a delightful blend of bright citrus and rich cocoa that will have everyone asking for seconds!
How to Serve Chocolate Orange Marble Cake Recipe
Garnishes
Enhance your cake with simple garnishes like a dusting of powdered sugar, some extra orange zest, or even a few candied orange peel slices. These add texture and visual appeal while amplifying the orange notes.
Side Dishes
This cake pairs perfectly with a scoop of vanilla ice cream, a dollop of whipped cream, or even a fresh berry compote. The creamy coolness balances the cake’s rich chocolate and tangy orange flavors like a dream.
Creative Ways to Present
Serve your Chocolate Orange Marble Cake Recipe on a rustic wooden board with fresh orange slices or alongside a pot of hot tea or coffee for an inviting and elegant dessert display that impresses without fuss.
Make Ahead and Storage
Storing Leftovers
Keep your leftover cake fresh by storing it in an airtight container at room temperature for up to three days. This helps maintain its moist texture and vibrant flavors.
Freezing
You can freeze the cake for up to three months. Wrap it tightly in plastic wrap and then place it in a freezer-safe container to prevent freezer burn. Thaw overnight in the fridge before serving.
Reheating
Warm slices gently in the microwave for about 10 seconds or in a low oven for a few minutes to restore that freshly baked charm. Pair with warm beverages for a cozy treat.
FAQs
Can I use orange extract instead of orange zest in the Chocolate Orange Marble Cake Recipe?
Orange zest provides natural oils that give a fresh, vibrant flavor that orange extract can’t quite replicate. However, if you’re short on zest, a small amount of extract can work in a pinch—just use it sparingly to avoid overpowering the cake.
What kind of cocoa powder is best for this recipe?
Unsweetened natural cocoa powder is ideal because it delivers rich chocolate flavor without added sweetness, allowing you to balance the cake’s sweet and citrus notes perfectly.
Can I make this cake dairy-free or vegan?
With some ingredient swaps like plant-based milk, vegan butter, and flax or chia seeds instead of eggs, you can adapt the Chocolate Orange Marble Cake Recipe to suit dietary preferences while keeping the delicious flavor intact.
Is the orange glaze necessary?
The orange glaze is optional but highly recommended! It adds an extra layer of brightness and sweetness that complements the cake beautifully, elevating both taste and presentation.
How can I tell when the cake is fully baked?
Use a toothpick or cake tester inserted into the center of the cake; if it comes out clean or with just a few moist crumbs, your cake is ready. Keep an eye on the edges to ensure they aren’t overbrowning.
Final Thoughts
This Chocolate Orange Marble Cake Recipe has quickly become one of my go-to crowd-pleasers because it brings together two classic flavors in the most delightful way. Whether you’re baking for friends, family, or a special treat just for yourself, this cake never disappoints. I wholeheartedly encourage you to give it a try—you’ll love how the citrusy spark and chocolate richness dance in every bite!
Print
Chocolate Orange Marble Cake Recipe
- Prep Time: 20 minutes
- Cook Time: 35 minutes
- Total Time: 55 minutes
- Yield: 1 9×5-inch loaf cake (about 8-10 servings)
- Category: Dessert, Cake
- Method: Baking
- Cuisine: American
Description
This Chocolate Orange Marble Cake offers a perfect blend of rich chocolate and zesty orange flavors swirled into a moist, tender cake. Combining a classic vanilla batter with a luscious cocoa mix, this cake is finished with an optional fresh orange glaze that enhances its citrusy notes, making it a flavorful delight ideal for any occasion.
Ingredients
For the Cake:
- 1 3/4 cups all-purpose flour
- 2 teaspoons baking powder
- 1/2 teaspoon baking soda
- 1/4 teaspoon salt
- 1/2 cup unsalted butter, softened
- 1 cup granulated sugar
- 3 large eggs
- 1 teaspoon vanilla extract
- 1/2 cup whole milk
- 1 tablespoon orange zest
- 1/2 cup unsweetened cocoa powder
- 1/4 cup boiling water
For the Orange Glaze (optional):
- 1 cup powdered sugar
- 2–3 tablespoons fresh orange juice
- 1 teaspoon orange zest
Instructions
- Preheat Oven: Preheat your oven to 350°F (175°C). Grease and flour a 9×5-inch loaf pan or a bundt pan to prepare it for baking.
- Mix Dry Ingredients: In a medium bowl, whisk together the all-purpose flour, baking powder, baking soda, and salt. Set this dry mixture aside.
- Cream Butter and Sugar: In a large mixing bowl, beat the softened butter and granulated sugar on medium speed until the mixture is light and fluffy, approximately 3-4 minutes.
- Add Eggs and Vanilla: Add the eggs one at a time to the butter mixture, mixing well after each addition. Then stir in vanilla extract and orange zest until fully incorporated.
- Combine Wet and Dry Ingredients: Gradually add the dry ingredients to the butter mixture, alternating with whole milk, mixing just until combined to ensure a tender crumb.
- Make Chocolate Mixture: In a small bowl, blend the unsweetened cocoa powder with boiling water until smooth to enhance the chocolate flavor.
- Divide the Batter: Take half of the prepared vanilla batter and mix it thoroughly with the chocolate mixture to create the chocolate portion of the cake batter.
- Layer the Batter: Spoon half of the vanilla batter into the prepared pan, then add half of the chocolate batter on top. Repeat with remaining batters to form layers.
- Create the Marble Effect: Gently swirl the batters together using a knife or skewer to mimic a marbled pattern without overmixing to keep distinct layers.
- Bake: Place the pan in the preheated oven and bake for 30-35 minutes, or until a toothpick inserted in the center comes out clean, signifying doneness.
- Cool: Let the cake cool in the pan for about 20 minutes before transferring it to a wire rack to cool completely.
- Make the Glaze: In a medium bowl, whisk together the powdered sugar, fresh orange juice, and orange zest until smooth. Adjust consistency as needed by adding more juice or sugar.
- Glaze the Cake: Once fully cooled, drizzle the orange glaze evenly over the top of the cake for a sweet citrus finish.
- Slice and Enjoy: Cut the cake into slices and serve to enjoy the delightful blend of chocolate and orange flavors.
Notes
- Ensure butter is softened to room temperature for easier creaming and better texture.
- Use fresh orange zest and juice for maximum flavor impact.
- Do not overmix batter once dry ingredients are added to prevent a dense cake.
- The glaze is optional but highly recommended for added zest and moisture.
- Test cake doneness with a toothpick to avoid undercooking or overbaking.
- Store leftovers in an airtight container at room temperature for up to 3 days.


