Description
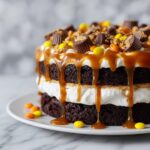
This decadent Chocolate Peanut Butter Poke cake combines a rich Devil’s Food chocolate cake with a luscious peanut butter and vanilla pudding filling, topped with a creamy whipped cream cheese frosting and festive Reese’s candy garnishes. The poke technique allows the peanut butter filling to seep deep into the cake, making each bite irresistibly moist and flavorful. Perfect for parties, celebrations, or any peanut butter and chocolate craving.
Ingredients
Scale
Chocolate Cake
- 432 g box Devil’s Food chocolate cake mix (plus eggs, oil, water as specified on package)
Peanut Butter Filling
- 360 ml creamy peanut butter, melted
- 1 x 397 g can sweetened condensed milk
- 96 g box instant vanilla pudding mix
- 415 ml whole milk, room temperature
Whipped Cream Cheese Topping
- 170 g cream cheese, softened
- 60 g powdered sugar, plus more to taste
- 360 ml heavy whipping cream
- 5 ml vanilla extract
Garnishes
- 60 ml creamy peanut butter, melted (for garnish)
- 4–5 Reese’s Cups, chopped
- Reese’s Pieces, as desired
Instructions
- Preheat and Bake Cake: Preheat your oven to 175°C. Prepare the chocolate cake batter according to the package instructions, incorporating the required eggs, oil, and water. Pour the batter into a 23×33 cm baking dish and bake for the time directed on the package. Once done, remove from the oven and let cool for 10 minutes.
- Poke Holes in Cake: Using the handle of a wooden spoon, gently poke holes roughly 2 cm apart across the entire surface of the warm cake. Let the cake cool further while you prepare the filling.
- Prepare Peanut Butter Mixture: Microwave the 360 ml peanut butter in a microwave-safe bowl in 15-second intervals, stirring between each, until fully melted and smooth. Stir in the can of sweetened condensed milk until completely combined.
- Make Peanut Butter Filling: In a large bowl, whisk together the instant vanilla pudding mix and room temperature whole milk until just smooth but not thickened. Quickly whisk in the melted peanut butter and condensed milk mixture until well blended.
- Fill Cake with Peanut Butter Mixture: Transfer half of the peanut butter filling into a piping bag or a ziplock bag with a corner snipped off. Generously pipe the filling into each hole in the cake. Spread the remaining filling evenly over the top of the cake. Refrigerate the cake for at least 2 hours until the filling sets.
- Make Whipped Cream Cheese Frosting: Beat the softened cream cheese and vanilla extract for 1 minute until smooth. Add the powdered sugar and one-third of the heavy cream; beat on low speed to combine. Gradually add the remaining cream and increase the speed to medium-high. Whip until stiff peaks form.
- Frost the Cake: Spread the whipped cream cheese topping evenly over the chilled cake, smoothing out the surface carefully.
- Garnish: Melt the remaining 60 ml peanut butter and drizzle it over the frosted cake. Use a skewer to swirl the drizzle for a marbled effect. Sprinkle the chopped Reese’s Cups and Reese’s Pieces over the top as desired.
- Store: Cover and store the cake in the refrigerator until ready to serve.
Notes
- Ensure cake is warm but not hot before poking holes to prevent cracking.
- The filling needs time to set, so don’t skip the refrigeration step for best texture.
- If you prefer a less sweet filling, reduce the sweetened condensed milk slightly.
- Use full-fat cream cheese and heavy cream for best stability in whipped topping.
- Peanut butter drizzle can be warmed gently to avoid burning or separation.
- Store leftovers refrigerated and consume within 3–4 days for optimal freshness.