
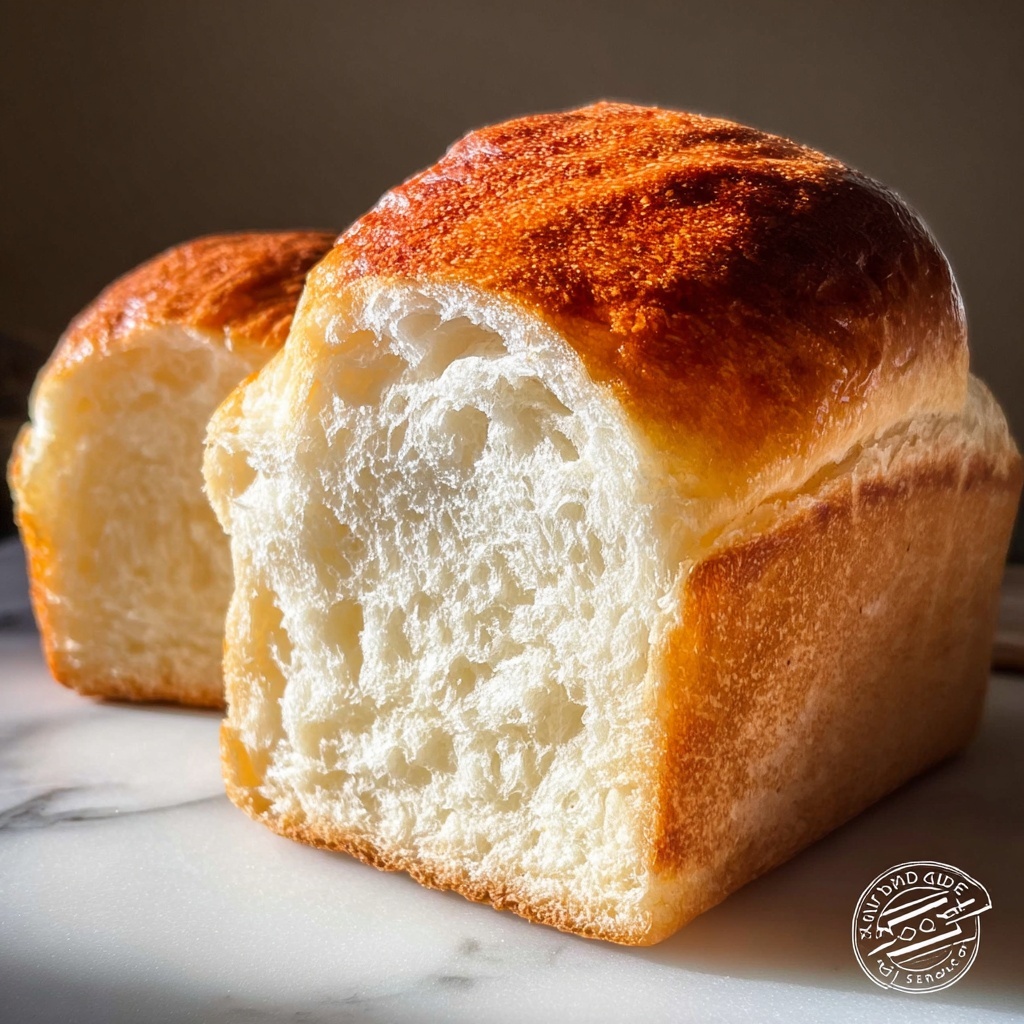
If you’ve ever wished for a soft, fluffy, and utterly reliable loaf without the gluten, you are going to fall head over heels for this Classic White Gluten-Free Sandwich Bread Recipe. It’s simple, delicious, and perfect for anyone who craves that classic sandwich bread experience without compromise. Each slice boasts a tender crumb and just the right hint of sweetness, all wrapped up in a comforting, golden crust that’s as inviting as a warm hug. Whether you are new to gluten-free baking or a seasoned pro looking for a dependable go-to recipe, this bread will quickly become a kitchen favorite you’ll want to bake again and again.

Ingredients You’ll Need
This Classic White Gluten-Free Sandwich Bread Recipe keeps things straightforward with pantry staples that come together to create wonderful texture and flavor. Each ingredient plays an important role, from building structure to adding moisture and a touch of richness.
- 2 cups gluten-free all-purpose flour: The fundamental base providing structure—make sure it includes xanthan gum or a similar binder for the best results.
- 1 tablespoon sugar: Adds a subtle sweetness and helps activate the yeast for a perfect rise.
- 1 teaspoon salt: Enhances all the flavors and keeps the sweetness in check.
- 1 tablespoon active dry yeast: The magical ingredient that makes the bread rise beautifully.
- 1 cup warm water: Hydrates the flour and activates the yeast—warm, but not hot!
- 2 tablespoons olive oil: Gives the bread a tender crumb and a slight richness.
- 2 eggs: Bind the dough together and bring structure and moisture to each slice.
How to Make Classic White Gluten-Free Sandwich Bread Recipe
Step 1: Prepare Your Pan and Oven
Start by preheating your oven to 375°F (190°C) and greasing a loaf pan generously. This step ensures your bread doesn’t stick and helps develop that golden crust we all love. Having your oven ready upfront means you can move through the process smoothly without any delays.
Step 2: Combine Dry Ingredients
In a large mixing bowl, whisk together the gluten-free flour, sugar, salt, and active dry yeast. Mixing the dry ingredients first helps distribute the yeast and seasoning evenly throughout the dough, setting you up for a lovely rise and balanced flavor.
Step 3: Add Wet Ingredients and Form Dough
Add the warm water, olive oil, and eggs to your dry mix. Then stir everything together until you get a smooth, slightly sticky dough. Don’t worry if it looks softer than traditional wheat dough; gluten-free doughs generally have a different texture that produces a moist and tender loaf.
Step 4: Transfer Dough to Loaf Pan
Spoon the dough into your prepared pan and smooth out the top with a spatula. Even out the surface to give the bread a beautiful shape once baked. This little step makes a big difference in presentation, especially when you slice into it later.
Step 5: Bake Until Golden and Hollow
Bake for 40 minutes, or until the loaf turns a golden brown and sounds hollow when you gently tap the bottom. This reliable test ensures your bread is baked through and has developed that inviting crust that’s crisp but not hard.
Step 6: Cool Completely
Let the bread cool in the pan for 10 minutes before transferring it onto a wire rack. Cooling is key to setting the crumb and making slicing easier without squishing the bread. Patience here really pays off with perfect texture every time.
How to Serve Classic White Gluten-Free Sandwich Bread Recipe
Garnishes
This bread’s clean, classic flavor makes it an excellent canvas for all kinds of garnishes. A smear of creamy butter, your favorite fruit preserves, or a sprinkle of herbs and olive oil can elevate a simple slice into a snack or light meal. Toast it lightly to bring out the aroma and add a subtle crunch.
Side Dishes
Pair your sandwich bread with everything from soups and fresh salads to hearty stews. It’s especially delightful alongside a bowl of warm tomato basil soup or crispy fried chicken. The bread’s tender crumb soaks up sauces beautifully, making every bite deeply satisfying.
Creative Ways to Present
Think beyond plain slices: try assembling open-faced sandwiches loaded with avocado, smoked salmon, or roasted vegetables. You can also cube the bread for gluten-free stuffing or use it as a base for homemade croutons. Its versatility truly shines in both simple and elevated dishes.
Make Ahead and Storage
Storing Leftovers
Store leftover bread in an airtight container or plastic bag at room temperature for 3-4 days. Keeping it sealed well prevents it from drying out while preserving that soft texture you love. For best taste, slice as needed rather than pre-slicing the entire loaf.
Freezing
This Classic White Gluten-Free Sandwich Bread freezes wonderfully. Wrap the whole loaf tightly in plastic wrap and then in foil or place inside a freezer bag. Freeze for up to 2 months. When you’re ready to enjoy, thaw overnight in the refrigerator for even texture and flavor.
Reheating
To refresh your bread after storage or freezing, toast slices lightly or warm the whole loaf in a 350°F oven for 10-15 minutes. This brings back that freshly baked aroma, soft crumb, and crisp exterior without drying it out.
FAQs
Can I use a different type of gluten-free flour?
While this recipe works best with a gluten-free all-purpose blend that contains xanthan gum, you can experiment with one that suits your taste—just make sure it includes a binder for the best structure and rise.
Do I need to proof the yeast separately?
The warm water and sugar in the recipe allow the yeast to activate directly when mixed with the dry ingredients, so there’s no need for a separate proofing step, making this recipe quick and straightforward.
Why does the bread sometimes turn out dense?
Density can result from using water that is too hot, killing the yeast, or from not measuring ingredients accurately. Make sure to keep your water warm (not hot) and measure flour carefully to get a light, airy loaf.
Can I make this bread dairy-free?
Yes! This recipe is naturally dairy-free since it uses olive oil and eggs instead of butter or milk products, making it perfect for dairy-sensitive diets too.
How can I achieve a crispier crust?
For a crisper crust, bake the bread in a preheated oven and consider placing a small oven-safe dish with water on the lower rack during baking to create steam. This helps develop a lovely crunchy crust while keeping the inside soft.
Final Thoughts
Baking bread without gluten doesn’t mean you have to sacrifice taste or texture, and this Classic White Gluten-Free Sandwich Bread Recipe proves just that. It’s approachable, yields beautiful results, and is wonderfully adaptable to many meals and occasions. I encourage you to give it a try—you might just discover your new favorite loaf that feels both comforting and special every single time.
Print
Classic White Gluten-Free Sandwich Bread Recipe
- Prep Time: 10 minutes
- Cook Time: 40 minutes
- Total Time: 55 minutes
- Yield: 1 loaf (about 8 slices)
- Category: Bread
- Method: Baking
- Cuisine: American
- Diet: Gluten Free
Description
This Classic White Sandwich Bread is a delicious gluten-free option perfect for sandwiches or toast. Made with gluten-free all-purpose flour, yeast, and enriched with eggs and olive oil, this bread offers a soft texture and golden crust baked to perfection in just under an hour.
Ingredients
Dry Ingredients
- 2 cups gluten-free all-purpose flour
- 1 tablespoon sugar
- 1 teaspoon salt
- 1 tablespoon active dry yeast
Wet Ingredients
- 1 cup warm water
- 2 tablespoons olive oil
- 2 eggs
Instructions
- Preheat Oven and Prepare Pan: Preheat your oven to 375°F (190°C) and grease a loaf pan to ensure the bread doesn’t stick during baking.
- Combine Dry Ingredients: In a mixing bowl, thoroughly blend the gluten-free all-purpose flour, sugar, salt, and active dry yeast to evenly distribute all dry ingredients.
- Add Wet Ingredients and Mix: To the dry mixture, add the warm water, olive oil, and eggs. Mix all the ingredients until a smooth dough forms, ensuring the consistency is even without lumps.
- Transfer Dough to Pan: Pour the dough into the prepared loaf pan and smooth the top with a spatula for an even surface.
- Bake the Bread: Bake the dough in the preheated oven for approximately 40 minutes, or until the bread is golden brown and sounds hollow when tapped, indicating it is cooked through.
- Cool the Bread: Allow the baked bread to cool in the loaf pan for 10 minutes; then transfer it onto a wire rack to cool completely before slicing and serving.
Notes
- The warm water should be about 110°F (43°C) to activate the yeast effectively without killing it.
- Use gluten-free all-purpose flour blend that includes xanthan gum or add it separately if your blend does not contain it for better texture.
- Make sure the bread cools completely before slicing to avoid a gummy texture.
- This bread is best stored in an airtight container at room temperature and consumed within 2 days for maximum freshness.
- To extend shelf life, slice and freeze leftover bread and toast as needed.


