

“`html
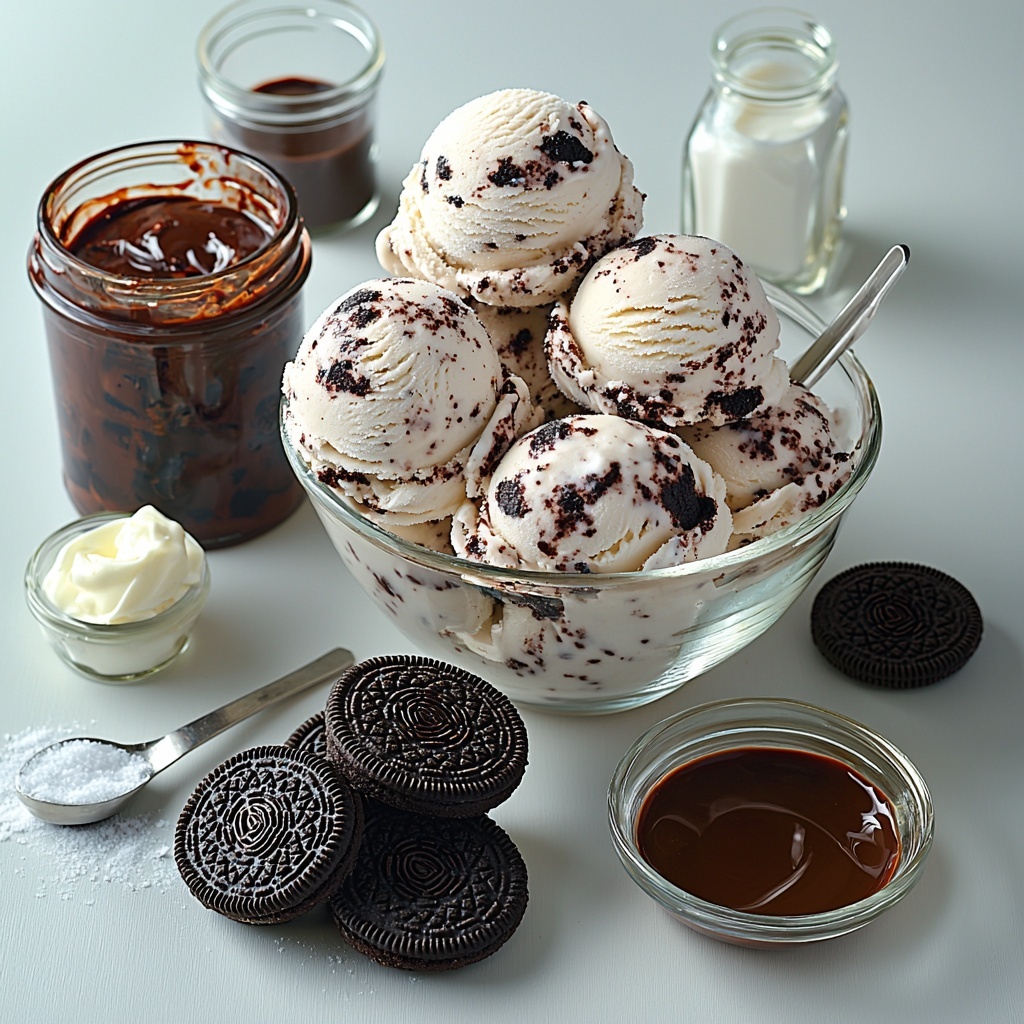
If you have a serious sweet tooth and a soft spot for nostalgic treats, the Dairy Queen Copycat Oreo Cookie Ice Cream Cake Recipe will become your new go-to dessert. This layered masterpiece combines rich chocolate and cookies and cream ice cream, luscious hot fudge, and crunchy Oreo cookie bits all wrapped up in a cloud of fluffy whipped cream frosting. It’s the perfect way to impress friends, celebrate milestones, or simply indulge in a delightful homemade delight that tastes just like your favorite Dairy Queen classic.
Ingredients You’ll Need
Don’t let the list intimidate you—each ingredient plays a starring role in making this cake irresistibly delicious, from creaminess and crunch to sweetness and depth of flavor.
- ½ quart chocolate ice cream: The rich chocolate base gives this cake its decadent foundation.
- ½ quart cookies and cream ice cream: Adds creaminess with delightful Oreo cookie chunks throughout.
- 11.75 ounces container hot fudge sundae topping: This gooey layer brings decadent chocolate indulgence in every bite.
- 513 grams (or 1 lb 2.12 oz) Oreo cookies with filling: The star cookies, both crushed for crunch and chopped for texture.
- ½ cup salted sweet cream butter (melted and cooled): Binds the crushed Oreos for a perfect cookie crumb layer.
- 2½ cups cold heavy cream: Whipped into a light fluffy frosting that crowns the cake.
- 1½ cups powdered sugar: Sweetens the whipped cream just right without overpowering.
- 2 teaspoon clear vanilla flavoring: Enhances the whipped frosting with a smooth vanilla flavor.
- Chocolate syrup (optional drizzle): For an extra chocolatey, shiny finishing touch.
How to Make Dairy Queen Copycat Oreo Cookie Ice Cream Cake Recipe
Step 1: Prepare the Cookie Crumb Base
Start by lining a 9-inch springform pan with plastic wrap and pop it into the freezer—you’ll thank yourself later. Crushed Oreos get coated in melted butter, then baked on a parchment-lined sheet until just toasted. Once cool, break them into bite-sized pieces for that delicious crunch that enjoys a cozy bed beneath the ice cream layers.
Step 2: Form the Chocolate Ice Cream Layer
Gently thaw half a quart of chocolate ice cream until it’s spreadable but not melted. This part is key to creating smooth, even layers. Press it into the springform pan’s bottom and sides, then freeze it firmly for at least 30 minutes to set the stage for your hot fudge topping.
Step 3: Add the Hot Fudge and Cookie Crumbs
Warm up the hot fudge just enough to spread easily over the frozen chocolate ice cream. Then scatter your baked cookie crumbs evenly on top, adding texture and bursts of flavor. Pop the pan back in the freezer to let everything settle for about an hour.
Step 4: Mix and Spread Cookies and Cream Ice Cream Layer
While that’s chilling, slightly soften the cookies and cream ice cream and fold in chopped Oreos for extra cookie goodness. Spread this mixture evenly over the cookie layer once it’s chilled, then freeze for 4-6 hours or overnight. Patience here means perfectly firm, sliceable layers every time.
Step 5: Whip Up the Frosting
chill your mixing bowl to help the heavy cream whip to stiff peaks quickly. Combine the cream with powdered sugar and vanilla flavoring, beating until light and fluffy. Reserve one cup of this sweet, cloud-like frosting for piping decorations later.
Step 6: Assemble and Frost the Cake
Carefully release the springform pan and lift out your frozen masterpiece. Quickly frost the sides and top with the whipped cream, working fast to avoid melting. Pipe pretty swirls or shell patterns around the edges, then sprinkle chopped Oreos on top for final flair. For that extra chocolate finish, drizzle some chocolate syrup over the cake before freezing again.
How to Serve Dairy Queen Copycat Oreo Cookie Ice Cream Cake Recipe
Garnishes
Elevate your presentation with a scattering of crushed Oreo crumbs or a few whole cookies perched on top. A drizzle of chocolate syrup not only adds visual appeal but also enhances each bite’s richness.
Side Dishes
This ice cream cake shines on its own, but pairing it with seasonal berries or a simple cup of brewed coffee can balance the sweetness and add a fresh or warm contrast that guests will appreciate.
Creative Ways to Present
For parties, serve slices on individual dessert plates topped with a dollop of whipped cream and a sprinkle of cookie crumbs. Or get festive with themed sprinkles or edible glitter on top of the frosting for birthdays and celebrations.
Make Ahead and Storage
Storing Leftovers
Keep any leftover cake tightly wrapped and stored in the freezer where it will stay fresh and delicious for 3-4 days. This ensures that every slice tastes just as perfect as the first.
Freezing
The Dairy Queen Copycat Oreo Cookie Ice Cream Cake Recipe freezes wonderfully. Just wrap it securely in plastic wrap and aluminum foil to prevent freezer burn and maintain that creamy texture. When ready, thaw in the fridge for about 30 minutes before serving.
Reheating
Since this is an ice cream cake, reheating is not recommended! Instead, allow it to sit at room temperature for a short while if you want slightly softer slices, but keep it chilled for best texture and flavor.
FAQs
Can I use different ice cream flavors?
Absolutely! While this recipe shines with chocolate and cookies and cream, feel free to experiment with your favorite flavors for a fun twist on this classic dessert.
Do I need a springform pan to make this cake?
Yes, a springform pan is ideal because it helps you easily release the cake without ruining its shape, especially with the delicate ice cream layers inside.
How long should I thaw the ice cream before spreading?
Typically 15-20 minutes at room temperature is enough to soften the ice cream just enough to spread without melting it, but keep an eye on it since thaw times vary.
Can I make this recipe dairy-free?
While it’s designed with dairy ingredients, you could try dairy-free ice creams and substitutes, but keep in mind the texture and flavor might differ from the classic Dairy Queen Copycat Oreo Cookie Ice Cream Cake Recipe.
What’s the best way to slice the cake?
Using a sharp knife warmed by dipping in hot water makes slicing easier and cleaner. Wipe the knife between cuts for the most polished slices.
Final Thoughts
This Dairy Queen Copycat Oreo Cookie Ice Cream Cake Recipe is truly a magical treat that brings together all the best flavors and textures loved in the original. Whether for a special celebration or simply a sunny day craving, this cake is guaranteed to bring smiles and requests for seconds. Gather your ingredients, roll up your sleeves, and treat yourself to a homemade version of this timeless classic that’s just as delightful as the one from Dairy Queen.
“`
Print
Dairy Queen Copycat Oreo Cookie Ice Cream Cake Recipe
- Prep Time: 1 hour
- Cook Time: 8 minutes
- Total Time: 8 hours 30 minutes
- Yield: 12 servings
- Category: Dessert
- Method: No-Cook
- Cuisine: American
Description
This Dairy Queen Copycat Oreo Cookie Ice Cream Cake is a decadent layered dessert combining rich chocolate ice cream, cookies and cream ice cream mixed with Oreo chunks, a hot fudge layer, crunchy baked Oreo crumbs, and a smooth whipped cream frosting. Perfect for an indulgent treat, this no-bake freezer cake mirrors the famous ice cream cake with a homemade touch.
Ingredients
Ice Cream Layers
- ½ quart chocolate ice cream (Great Value brand recommended)
- ½ quart cookies and cream ice cream (Great Value brand recommended)
- 10 Oreo cookies, chopped (for mixing into cookies and cream ice cream)
- 10 Oreo cookies, chopped (for garnish)
Cookie Crust Layer
- 25 Oreo cookies with filling (approximately 420 grams), crushed
- ½ cup salted sweet cream butter, melted and cooled
Fudge Layer
- 11.75 ounces hot fudge sundae topping (Smucker’s brand recommended)
Whipped Cream Frosting
- 2½ cups cold heavy cream
- 1½ cups powdered sugar
- 2 teaspoons clear vanilla flavoring
Optional
- Chocolate syrup for drizzling
Instructions
- Prepare Pan: Line a 9-inch springform pan with plastic wrap and place it in the freezer to chill while preparing other layers.
- Bake Cookie Crust: Preheat oven to 350°F and line a baking sheet with parchment paper. Combine 25 crushed Oreo cookies with melted butter in a bowl until fully coated. Spread evenly on the parchment-lined baking sheet and bake for 7-8 minutes. Cool completely, then break into bite-sized pieces.
- Soften Chocolate Ice Cream: Remove chocolate ice cream from the freezer and let thaw about 15-20 minutes to soften for easier spreading.
- Form Chocolate Ice Cream Layer: Spread half a quart of chocolate ice cream evenly into the bottom and up the sides of the chilled springform pan. Freeze this layer for 30 minutes to 1 hour until firm.
- Warm Hot Fudge: Microwave hot fudge topping for 20-25 seconds to soften, making it easier to spread.
- Spread Hot Fudge Layer: Evenly distribute the softened hot fudge over the chocolate ice cream layer.
- Add Cookie Crumbs: Sprinkle the baked cookie crumb pieces evenly over the hot fudge layer. Freeze for 1 hour.
- Soften Cookies and Cream Ice Cream: Remove cookies and cream ice cream from the freezer about 15-20 minutes before use to soften.
- Mix Oreo Chunks: Stir 10 chopped Oreo cookies into the softened cookies and cream ice cream to add extra texture.
- Form Cookies and Cream Ice Cream Layer: Spread the mixture evenly over the cookie crumb layer in the springform pan. Freeze for 4-6 hours or overnight to solidify the entire cake.
- Chill Mixing Bowl: Thirty minutes before frosting, chill your mixing bowl in the freezer to facilitate making whipped cream.
- Make Whipped Cream Frosting: In the chilled bowl, beat heavy cream, powdered sugar, and vanilla flavoring on medium speed just until sugar incorporates, then beat on high until stiff peaks form, about 3-4 minutes.
- Prepare Piping Bag: Set aside 1 cup of whipped cream in a piping bag fitted with a star tip for decoration.
- Unmold Cake: Remove the ice cream cake from the freezer. Release springform pan edges, lift out cake using a cake lifter or sturdy spatula, and place onto a serving plate or cake board.
- Frost Cake: Quickly spread the remaining whipped cream evenly on the sides and top of the cake. Freeze in 30-minute intervals if warming occurs during frosting.
- Pipe Decorations: Using the piping bag, pipe a shell or swirl pattern around the top edge of the cake with even pressure, holding the bag about a half-inch above the cake edge.
- Garnish: Sprinkle remaining chopped Oreo cookies over the top of the cake and drizzle with chocolate syrup if desired.
- Freeze Cake: Return the cake to the freezer until ready to slice and serve.
Notes
- Allow ice cream layers to soften slightly before spreading to make layering easier and achieve a smooth finish.
- Freeze times are approximate and may vary depending on your freezer’s efficiency.
- Using a springform pan lined with plastic wrap aids in easy cake removal and clean presentation.
- Chilling your mixing bowl is important for making stable whipped cream frosting.
- If kitchen temperature is warm, work quickly and freeze in intervals to prevent melting while decorating.
- Chocolate syrup drizzle is optional but adds extra flavor and visual appeal.


