

If you’ve been on the hunt for a tangy, sweet treat that’s completely safe for anyone avoiding gluten, you’ve just found your new go-to. The Gluten-Free Lemon Bars: An Amazing Ultimate Recipe delivers a perfect balance of zesty lemon brightness and a tender, crumbly crust that will have you reaching for seconds (and maybe thirds). This recipe is not just about flavor; it’s a celebration of how gluten-free baking can be effortless and absolutely delicious, turning simple ingredients into a showstopper dessert that feels like sunshine on a plate.
Ingredients You’ll Need
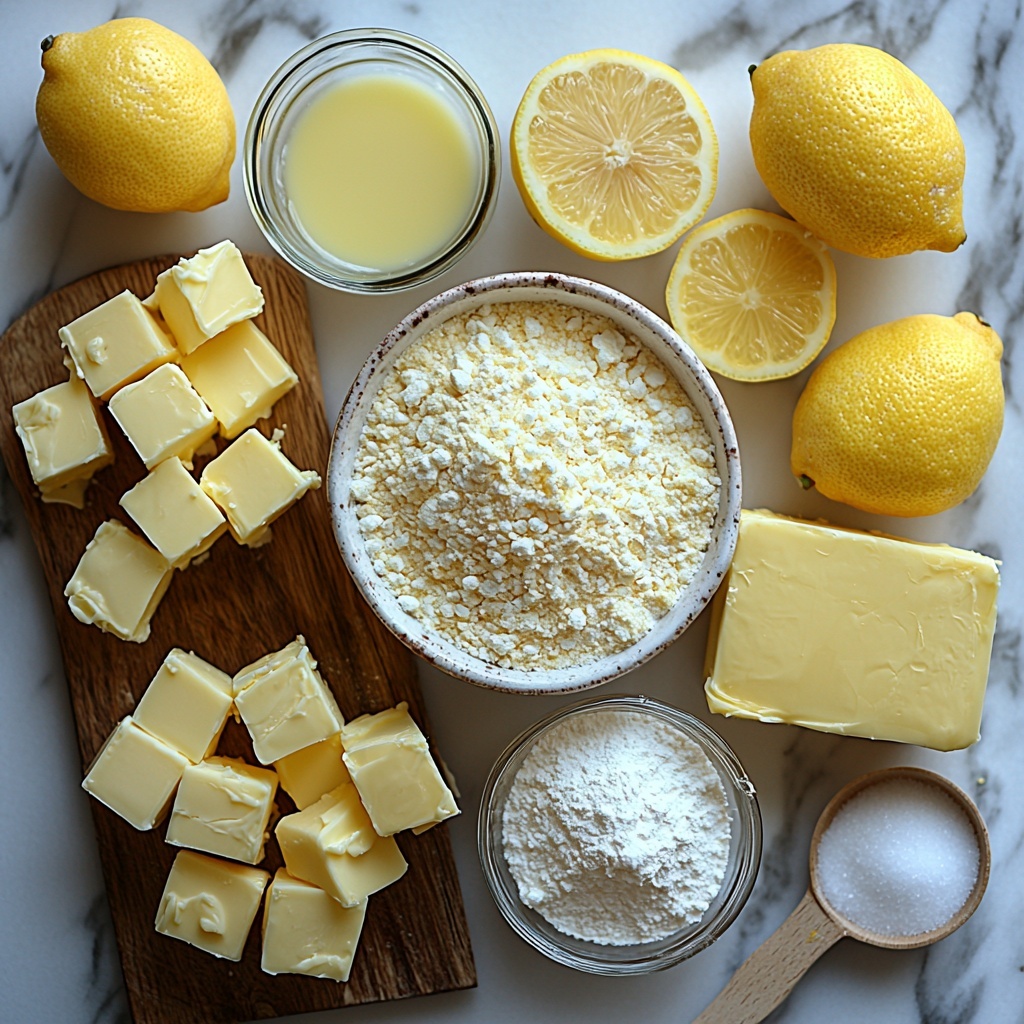
Every ingredient in this recipe plays an important role, making the bars burst with fresh lemon flavor and a sturdy but delightful crust. The magic lies in the simplicity and quality of each item, ensuring that every bite is perfectly balanced and blissfully satisfying.
- 1 cup gluten-free all-purpose flour: This is the base that keeps the crust tender and crumbly without compromising on texture.
- 1/2 cup granulated sugar: Provides just enough sweetness to balance the lemon’s tartness in the crust.
- 1/4 cup powdered sugar: Adds a soft finish and helps create that delicate crumb on top of the crust.
- 1/2 cup unsalted butter, softened: Gives richness and helps bind everything together, making the crust buttery and flaky.
- 2 large eggs: These eggs create the luscious lemon filling that’s velvety and smooth.
- 1 cup granulated sugar (for the filling): Sweetens the lemon layer perfectly without overpowering the citrus zing.
- Zest of 1 lemon: Adds concentrated lemon flavor with a lovely fragrant punch.
- 1/2 cup freshly squeezed lemon juice (about 2-3 lemons): The star ingredient, delivering a bright, refreshing tartness that defines the bars.
- 1 teaspoon baking powder: Helps the filling set just right with a light texture.
- 1/4 teaspoon salt: Enhances all the flavors and balances the sweetness beautifully.
- Powdered sugar, for dusting (optional): A pretty finishing touch that adds a hint of extra sweetness and charm.
How to Make Gluten-Free Lemon Bars: An Amazing Ultimate Recipe
Step 1: Prepare the Crust
Begin by preheating your oven to 350°F (175°C). In a mixing bowl, combine the gluten-free all-purpose flour, granulated sugar, powdered sugar, and salt. Add the softened unsalted butter and work it in using your fingers or a pastry blender until the mixture resembles coarse crumbs. Press this mixture evenly into the bottom of a greased 8×8 inch baking pan. Pop it into the oven for about 15-18 minutes or until the crust is just starting to turn golden. This forms a buttery, sturdy base for your luscious lemon filling.
Step 2: Mix the Lemon Filling
While the crust cools slightly, whisk together the eggs, granulated sugar, baking powder, lemon zest, and freshly squeezed lemon juice in a separate bowl until smooth and fully combined. The eggs will give the filling a creamy consistency, while the lemon juice and zest burst with fresh citrus goodness.
Step 3: Bake the Full Bars
Pour the lemon filling over the warm crust, spreading it out evenly. Return the pan to the oven and bake for another 20-25 minutes, or until the filling is set but still slightly wobbly in the center. This step is crucial for getting that classic lemon bar texture: firm yet tender.
Step 4: Cool and Dust
Once baked, remove the bars from the oven and let them cool completely to room temperature. Refrigerate for an hour or more to help the bars fully set. Just before serving, dust the top generously with powdered sugar for an elegant touch that sweetens each bite subtly and makes the bars look irresistible.
How to Serve Gluten-Free Lemon Bars: An Amazing Ultimate Recipe
Garnishes
Adding a garnish is a delightful way to elevate presentation and flavor. Sprinkle some extra lemon zest on top for a fresh pop of color and aroma. A few thin slices of fresh lemon or edible flowers can add a whimsical, pretty finish that’s perfect for special occasions.
Side Dishes
Gluten-Free Lemon Bars go wonderfully with a cup of hot tea or coffee, making them ideal for afternoon tea time or a light dessert after dinner. Pairing them with fresh berries or a dollop of whipped cream also creates a refreshing combination that balances tart, sweet, and creamy textures.
Creative Ways to Present
Try cutting the lemon bars into mini squares for bite-sized party treats, or serve them chilled with a drizzle of homemade berry coulis for a juicy twist. You can even layer lemon bars between parchment paper and stack them in a pretty box – a perfect homemade gift idea filled with sunshine and love.
Make Ahead and Storage
Storing Leftovers
Keep your gluten-free lemon bars fresh by storing them in an airtight container in the refrigerator. They will stay moist and flavorful for up to 4 days, making it easy to enjoy whenever a sweet citrus craving strikes.
Freezing
If you want to prepare in advance, freezing is a fantastic option. Wrap individual bars tightly in plastic wrap and place them in a freezer-safe bag or container. Frozen lemon bars can be stored for up to 2 months without losing their bright flavor or tender texture.
Reheating
When ready to enjoy, thaw frozen lemon bars in the refrigerator overnight. If you prefer them slightly warm, a brief 10-15 second zap in the microwave is enough to soften the edges while keeping the filling intact. Just be careful not to overheat to maintain that perfect lemony balance.
FAQs
Can I use a different type of flour for the crust?
While gluten-free all-purpose flour is designed to give the best texture, you can experiment with almond flour or oat flour. Just remember these will slightly change the flavor and crumb, so adjustments may be needed.
How tart are these lemon bars?
These bars strike a perfect balance of sweet and tart. The fresh lemon juice and zest give a bright citrus punch without being overwhelmingly sour, making them approachable for all palates.
Is it necessary to refrigerate the lemon bars?
Yes, refrigeration helps the filling set properly and enhances the texture. It also extends the freshness and flavor, so I highly recommend chilling them before serving.
Can I make this recipe vegan?
To make it vegan, you’ll need to substitute the butter with a vegan alternative and replace the eggs with a suitable egg replacer like flax eggs. Note that it may alter the texture, but it’s definitely doable with some tweaks.
What if I don’t have fresh lemons?
Fresh lemon juice and zest are key to the bright, authentic flavor of these bars. Bottled lemon juice can be used in a pinch, but the flavor won’t be quite as vibrant or fresh.
Final Thoughts
I genuinely believe that once you try this Gluten-Free Lemon Bars: An Amazing Ultimate Recipe, you’ll wonder why you ever hesitated with gluten-free desserts. It’s bright, tender, and sweet in all the right ways, delivering happiness in every bite. Perfect for sharing with friends, gifting, or indulging yourself, this recipe is sure to become a beloved staple in your kitchen rotation. Go ahead and make a batch today—you won’t regret it!
Print
Gluten-Free Lemon Bars: An Amazing Ultimate Recipe
- Prep Time: 15 minutes
- Cook Time: 40 minutes
- Total Time: 55 minutes plus 2 hours chilling
- Yield: 9-12 servings
- Category: Dessert
- Method: Baking
- Cuisine: American
- Diet: Gluten Free
Description
These Gluten-Free Lemon Bars feature a crisp, buttery crust and a tangy lemon filling that is both refreshing and satisfying. Perfectly balanced between sweet and tart, they make an ideal dessert or snack for anyone following a gluten-free diet or simply craving a bright citrus treat.
Ingredients
Crust
- 1 cup gluten-free all-purpose flour
- 1/2 cup granulated sugar
- 1/4 cup powdered sugar
- 1/2 cup unsalted butter, softened
- 1/4 teaspoon salt
Filling
- 2 large eggs
- 1 cup granulated sugar
- Zest of 1 lemon
- 1/2 cup freshly squeezed lemon juice (about 2–3 lemons)
- 1 teaspoon baking powder
For Dusting
- Powdered sugar (optional)
Instructions
- Prepare the oven and pan. Preheat your oven to 350°F (175°C). Line an 8×8-inch baking pan with parchment paper, leaving some overhang for easy removal of the bars.
- Make the crust. In a medium mixing bowl, combine the gluten-free flour, 1/2 cup granulated sugar, powdered sugar, and salt. Add the softened unsalted butter and mix with a pastry cutter or your hands until the mixture resembles coarse crumbs. Press the mixture evenly into the bottom of the prepared pan to form the crust.
- Bake the crust. Place the crust in the preheated oven and bake for about 15-18 minutes, or until the edges turn lightly golden. Remove from the oven and let it cool slightly.
- Prepare the filling. In a separate bowl, whisk together the eggs, 1 cup granulated sugar, lemon zest, lemon juice, and baking powder until smooth and well combined.
- Pour the filling over the crust. Carefully pour the lemon mixture over the slightly cooled crust, spreading it evenly.
- Bake the bars. Return the pan to the oven and bake for an additional 20-25 minutes, or until the filling is set and does not jiggle when the pan is gently shaken.
- Cool and chill. Remove the lemon bars from the oven and allow them to cool to room temperature. Then refrigerate for at least 2 hours to firm up for easier slicing.
- Slice and serve. Use the parchment overhang to lift the bars from the pan. Slice into squares and dust with powdered sugar if desired before serving.
Notes
- For best results, use a gluten-free all-purpose flour blend that includes xanthan gum or guar gum to help bind the crust.
- If fresh lemons are not available, use bottled lemon juice but fresh zest for best flavor.
- Bars can be stored in an airtight container in the refrigerator up to 4 days.
- Letting the bars chill completely before cutting prevents the filling from cracking or crumbling.


