

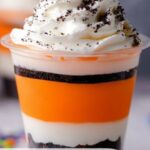
If you’re looking for a fun, festive, and oh-so-delicious way to celebrate the spooky season, this No-Bake Halloween Cheesecake Cups Recipe is your new go-to dessert! These individual treats combine the perfect crunch of crushed Oreos with a creamy, dreamy orange cheesecake layer, all topped with fluffy Cool Whip and festive Halloween sprinkles. Best of all, they require no oven time, making them simple and quick to pull together for any Halloween party or cozy night in.
Ingredients You’ll Need
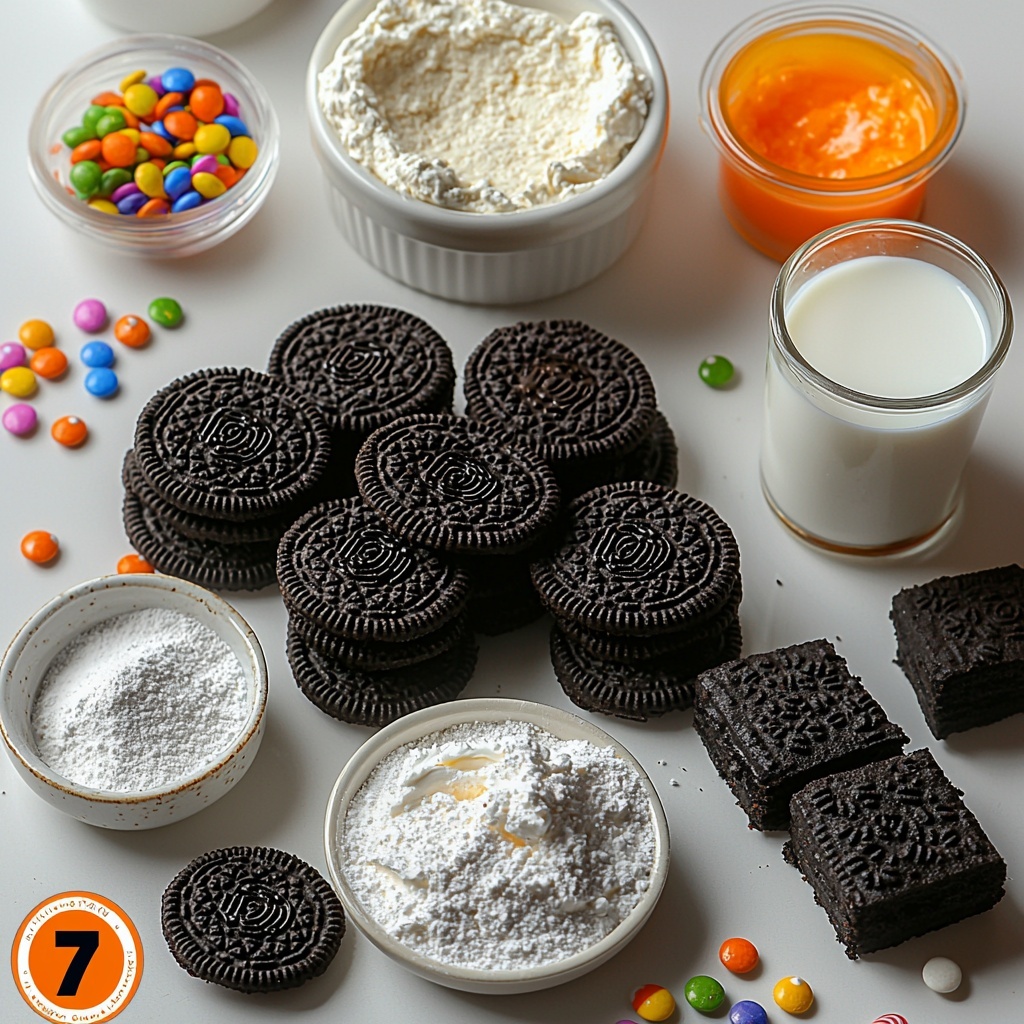
Gathering the right ingredients for this No-Bake Halloween Cheesecake Cups Recipe is straightforward but essential. Each item plays a special role, from creating that rich cheesecake texture to delivering the signature Halloween orange color and irresistible crunch.
- Oreos (18 cookies, divided): These provide both a crunchy base and a delicious crumb layer that contrasts with the creamy filling.
- Cream Cheese (2 packages, 8 ounces each, softened): The creamy foundation of the cheesecake cups, lending richness and tang.
- Powdered Sugar (1 ½ cups): Sweetens the filling with a smooth consistency that’s perfect for no-bake desserts.
- Milk (2 tablespoons): Helps to loosen the cheesecake mixture for easy folding and layering.
- Vanilla Extract (1 ½ tablespoons): Adds warmth and depth to the flavor profile.
- Cool Whip (1 container, 8 ounces, thawed and divided): Provides a fluffy, light texture that balances the dense cream cheese.
- Orange Gel Food Coloring: Perfect for that vibrant Halloween orange hue without changing the texture.
- Halloween Sprinkles and Candy (for topping): Adds festive charm and extra sweetness to finish off your desserts.
How to Make No-Bake Halloween Cheesecake Cups Recipe
Step 1: Create the Oreo Crust Base
Start by crushing 9 of the Oreo cookies into fine crumbs. These crumbs will form the crunchy base of each cheesecake cup. Distribute the crumbs evenly among seven 8-ounce clear cups, giving you a perfect foundation that adds texture and chocolatey flavor.
Step 2: Prepare the Creamy Cheesecake Filling
In a large mixing bowl, beat the softened cream cheese with powdered sugar, milk, and vanilla extract until the mixture is smooth and creamy. This step is crucial for avoiding lumps and ensuring the filling is luscious. Then, gently fold in 2 cups of the thawed Cool Whip, which lightens up the mixture beautifully.
Step 3: Add the Halloween Orange Color
Split the cheesecake mixture evenly into two bowls. In one bowl, add orange gel food coloring, mixing just enough to achieve a bright, festive orange shade. The other bowl remains white, providing a nice contrast when layered.
Step 4: Layer the First White Cheesecake Filling
Using a spoon or piping bag, add 3 tablespoons of the white cheesecake mixture over the Oreo crumb layer in each cup. Spread it gently into an even layer, pressing softly to create a stable base for the next crunchy layer.
Step 5: Add the Second Oreo Crumb Layer
Crush the remaining 9 Oreo cookies and sprinkle about a ¼ cup of crumbs evenly over the white cheesecake layer in each cup. This extra cookie layer brings a delightful crunch right in the middle, making every bite exciting.
Step 6: Top with the Orange Cheesecake Layer
Add 3 tablespoons of the orange cheesecake mixture on top of the Oreo crumb layer. Press this gently to an even layer, then cover the cups and chill them in the fridge for at least 2 hours. This chilling step allows the flavors to meld and the layers to firm up perfectly.
Step 7: Finish with Fluffy Cool Whip and Decorations
Just before serving, add a generous dollop of the remaining Cool Whip on top of each cup. Decorate with more crushed Oreos, Halloween sprinkles, and candy to make these treats truly festive and fun.
How to Serve No-Bake Halloween Cheesecake Cups Recipe
Garnishes
These cheesecake cups are begging for some playful, eye-catching garnishes! Think mini candy corn, spooky sprinkles, or chocolate spiders (if you can find them). The contrast between the smooth Cool Whip and crunchy toppings keeps every bite enticing and perfectly themed.
Side Dishes
Serve these cups alongside some light, palate-cleansing options such as fresh fruit slices (like oranges or berries), or simple pumpkin-flavored cookies if you want to keep the Halloween vibe going. Since the cups are rich and creamy, light sides work best.
Creative Ways to Present
These cheesecake cups look fantastic in clear glasses or glass jars, so the beautiful layers are on full display. You could elevate the presentation by arranging them on a Halloween-themed tray or platter surrounded by faux spider webs, mini pumpkins, or candlelight for that perfect party atmosphere.
Make Ahead and Storage
Storing Leftovers
If you have any leftovers (though they usually disappear fast!), store the cheesecake cups tightly covered in the refrigerator. They keep perfectly for up to 4 days, maintaining their texture and flavor so you’re never short on a sweet treat.
Freezing
While this No-Bake Halloween Cheesecake Cups Recipe is best enjoyed fresh, you can freeze the cups without the whipped topping or garnishes. Seal tightly and freeze for up to 1 month. To enjoy, thaw overnight in the fridge and add fresh Cool Whip and toppings just before serving.
Reheating
No reheating needed here! These cups are best served chilled. Simply grab them from the fridge, add your finishing touches, and enjoy immediately.
FAQs
Can I use regular whipped cream instead of Cool Whip?
Yes! Freshly whipped cream works beautifully as a substitute for Cool Whip, giving you a natural flavor and texture. Just be sure to whip it until stiff peaks form to maintain stability in the layers.
Is it possible to make this recipe dairy-free?
With some adjustments, yes. You can use dairy-free cream cheese and a dairy-free whipped topping alternative. Just keep in mind the texture and flavor may vary slightly but will still be delicious.
Can I make this dessert ahead of time for a party?
Absolutely! This is one of the best make-ahead desserts since it needs to chill for at least 2 hours. You can prepare it up to 4 days in advance, making your Halloween party prep a breeze.
Why do I need to split the cheesecake mixture into two colors?
The split allows you to create that iconic orange-and-white Halloween look that makes these cheesecake cups visually festive and fun. It also adds a nice flavor contrast and makes the layers pop!
Can I substitute Oreos with another cookie?
Sure! Chocolate sandwich cookies are ideal, but you could experiment with graham crackers or even ginger snaps for a different twist. Just keep in mind that Oreos provide a distinct chocolate flavor that complements the cheesecake perfectly.
Final Thoughts
There’s something truly magical about layering crunchy Oreos with creamy cheesecake and fluffy Cool Whip in these No-Bake Halloween Cheesecake Cups Recipe treats. They’re easy to make, need no oven time, and bring delightful festive spirit to any gathering. I can’t wait for you to try this recipe and see how it steals the show at your next Halloween celebration—because sharing dessert should always be this fun and fuss-free!
Print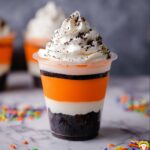
No-Bake Halloween Cheesecake Cups Recipe
- Prep Time: 15 minutes
- Cook Time: 0 minutes
- Total Time: 2 hours 15 minutes
- Yield: 7 cheesecake cups
- Category: Dessert
- Method: No-Cook
- Cuisine: American
- Diet: Vegetarian
Description
These No-Bake Halloween Cheesecake Cups are a festive and easy dessert perfect for spooky celebrations. Layers of crushed Oreo cookies, creamy orange and white cheesecake filling, and fluffy Cool Whip come together in individual cups without any baking required. The colorful layers are finished with Halloween-themed sprinkles and candy for a fun party treat.
Ingredients
Base Layer
- 9 Oreo cookies, crushed
Cheesecake Filling
- 2 packages (8 ounces each) cream cheese, softened
- 1 ½ cups powdered sugar
- 2 Tablespoons milk
- 1 ½ Tablespoons vanilla extract
- 1 container (8 ounces) Cool Whip, thawed and divided
- Orange gel food coloring
Toppings
- 9 Oreo cookies, crushed
- Halloween sprinkles and candy, for decorating
Instructions
- Prepare the base layer: Crush 9 Oreo cookies into fine crumbs and evenly distribute them among seven 8-ounce clear cups, creating the crust layer at the bottom of each cup.
- Make the cheesecake mixture: In a large mixing bowl, beat together the softened cream cheese, powdered sugar, milk, and vanilla extract until the mixture is smooth and creamy. Gently fold in 2 cups of the thawed Cool Whip to incorporate airiness.
- Divide and color filling: Split the cheesecake mixture evenly into two separate bowls. Add orange gel food coloring to one bowl to create a vibrant orange cheesecake filling, leaving the other bowl white.
- Layer the white cheesecake: Pipe or spoon 3 tablespoons of the white cheesecake mixture onto the Oreo crumbs in each cup. Using a spoon, gently press it into an even layer to create the first creamy layer.
- Add second cookie crumb layer: Crush the remaining 9 Oreo cookies and sprinkle about 1/4 cup of crumbs evenly over the white cheesecake layer in each cup to add crunch and texture.
- Layer the orange cheesecake: Pipe or spoon 3 tablespoons of the orange cheesecake mixture on top of the second Oreo crumb layer in each cup. Press gently into an even layer with a spoon to finish the second creamy layer.
- Chill the cups: Cover the completed cups and refrigerate for at least 2 hours to allow the cheesecake layers to set and flavors to meld. The cups can be stored refrigerated for up to 4 days.
- Decorate before serving: Just before serving, top each cheesecake cup with a dollop of the remaining Cool Whip. Garnish with additional crushed Oreos, Halloween sprinkles, and candy to suit your festive theme. Enjoy immediately!
Notes
- Use clear cups to showcase the colorful layers for a festive Halloween presentation.
- Gel food coloring provides vibrant color without thinning the filling.
- For a firmer texture, chill the cups longer or overnight.
- These cups can be prepared a day ahead for convenience.
- Feel free to substitute Cool Whip with homemade whipped cream or dairy-free alternative.

