
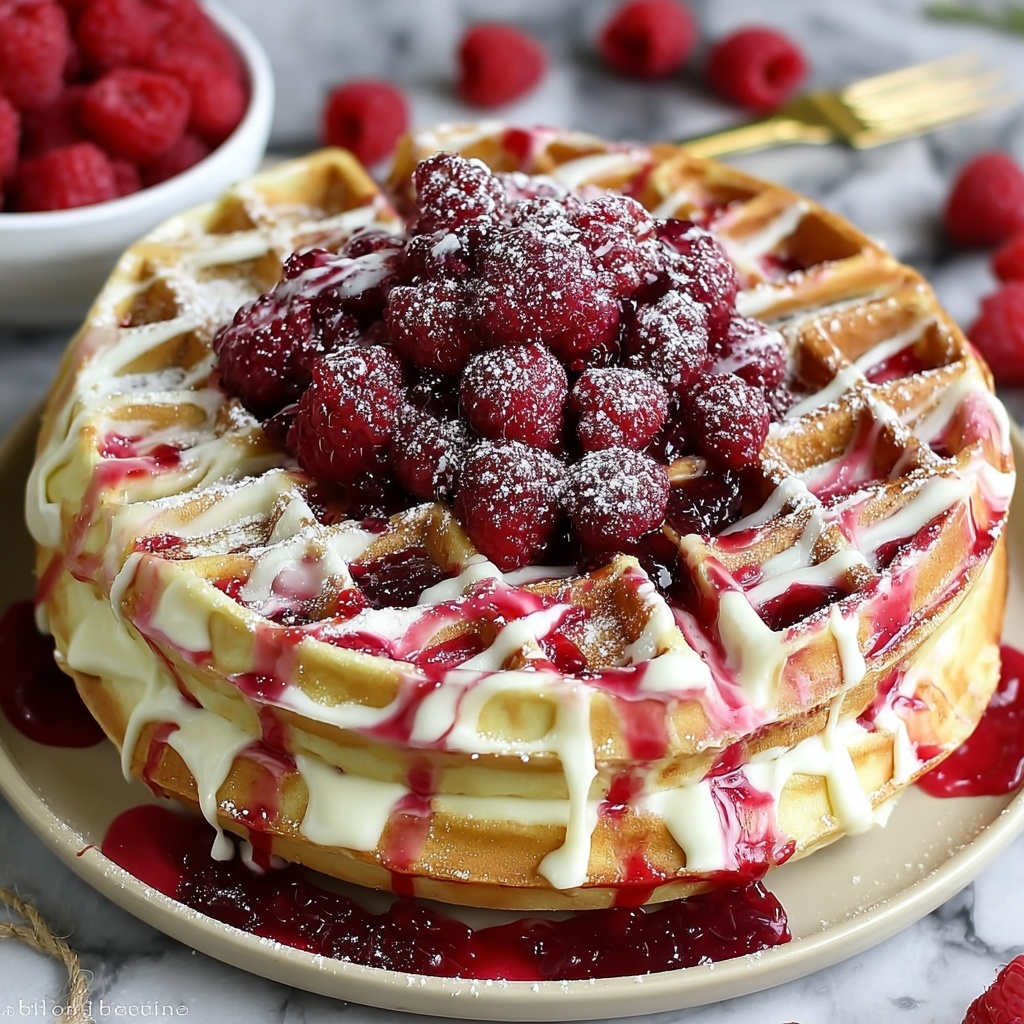
If you are looking to brighten up your breakfast or dessert table with something truly irresistible, the Red Velvet Marble Waffles Recipe is your new best friend. Imagine fluffy, vibrant red waffles swirled with a rich cocoa batter, creating a visually stunning marbled effect that tastes just as delightful as it looks. This recipe balances the classic flavors of red velvet cake with the light crispness of waffles, resulting in a treat that’s perfect for cozy weekend mornings or special occasions. You’ll love how easy it is to make and the joyful reactions it inspires around the table!
Ingredients You’ll Need
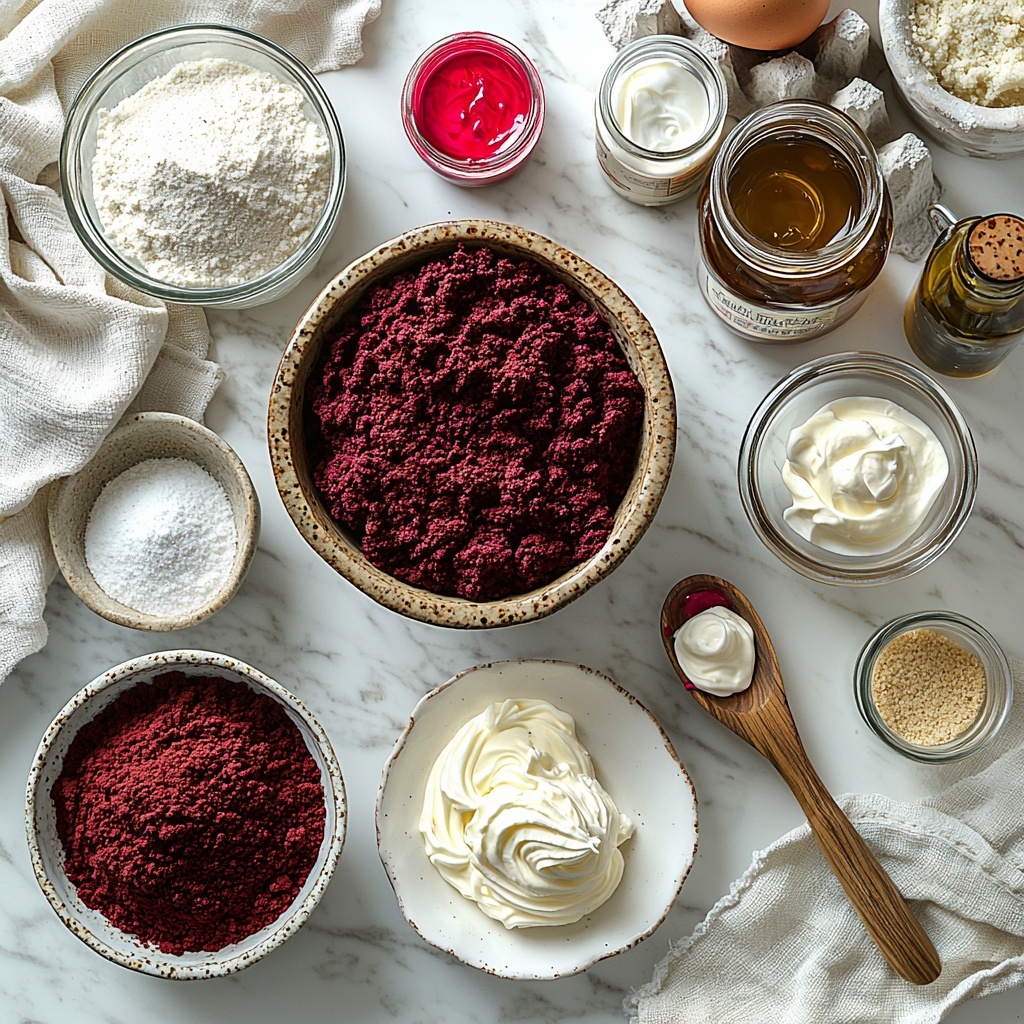
Gathering the right ingredients is the first step to nailing this recipe. Each component plays a crucial role: the flour provides structure, cocoa powder introduces a deep chocolatey layer, and the red food coloring gives the waffles their signature look and charm.
- 2 cups all-purpose flour: The foundation that holds your batter together with just the right tenderness.
- 1 cup granulated sugar: Sweetness that balances the cocoa and enhances flavor.
- 2 tablespoons unsweetened cocoa powder: Gives that rich, chocolaty taste essential to any red velvet dessert.
- 1 tablespoon baking powder: The leavening agent that helps your waffles rise and stay fluffy.
- ½ teaspoon baking soda: Works alongside the baking powder to create lightness and texture.
- 1 teaspoon salt: Enhances all the other flavors in the batter.
- 2 large eggs: They bind everything together while contributing moisture and richness.
- 1 cup buttermilk: Adds tanginess and helps achieve tender, moist waffles.
- ½ cup vegetable oil: Keeps the waffles soft and tender while helping with even cooking.
- 1 teaspoon vanilla extract: Adds warmth and depth to complement the red velvet flavor.
- 2 tablespoons red food coloring: The magic behind that gorgeous vibrant red swirl.
- ½ cup cream cheese (optional): Perfect for making a luscious topping that’ll enhance the red velvet vibe.
- Whipped cream (optional): Adds lightness and makes the serving even more decadent.
How to Make Red Velvet Marble Waffles Recipe
Step 1: Preheat Your Waffle Maker
Warming up your waffle maker first ensures your batter hits the griddle at the perfect temperature. This step helps your waffles develop a golden exterior and soft interior, locking in all those delicious flavors.
Step 2: Mix the Dry Ingredients
In a large bowl, whisk together the flour, sugar, cocoa powder, baking powder, baking soda, and salt until everything is evenly combined. This mixture forms the base that balances sweetness, chocolate, and fluffiness.
Step 3: Combine the Wet Ingredients
In a separate bowl, beat the eggs then add buttermilk, vegetable oil, vanilla extract, and the all-important red food coloring. This colorful wet mixture brings moisture and vibrancy to the batter.
Step 4: Blend the Mixtures
Slowly add the wet ingredients to your dry mix. Stir carefully until just combined — a few lumps are perfectly fine as overmixing can make the waffles tough. This ensures a tender bite with a lovely crumb.
Step 5: Prepare the Waffle Maker
Lightly grease the waffle maker using cooking spray or a brush of oil. This prevents sticking and helps each waffle come out perfectly intact and crisp.
Step 6: Create the Beautiful Marble Effect
Pour a ladle of the red batter into the center of the waffle maker. Add a spoonful of the plain batter on top, then use a toothpick or skewer to swirl the two batters together gently. This step is where the magic happens, creating eye-catching red velvet marble waffles.
Step 7: Cook to Perfection
Close the waffle maker and let your waffles cook for about 5 to 7 minutes, or until they turn golden brown and crisp at the edges. The aroma that fills your kitchen will have you eager to dig right in.
Step 8: Repeat Until Batter is Gone
Continue the process with the remaining batter, greasing the waffle maker as needed. It’s a fun little ritual that builds anticipation for each plate you serve.
Step 9: Serve Warm
Once cooked, remove the waffles with care so they stay whole. Serving them warm enhances their flavor and texture, making every bite a comforting experience.
Step 10: Add Your Favorite Toppings
Drizzle with cream cheese frosting or top with whipped cream for that lovely, creamy touch. These toppings amplify the red velvet experience, making your waffles feel extra indulgent.
How to Serve Red Velvet Marble Waffles Recipe
Garnishes
A simple dusting of powdered sugar or a handful of fresh berries adds a fresh and sweet complement to the rich flavors of the Red Velvet Marble Waffles Recipe. Cream cheese drizzle or whipped cream provides a silky finish that makes every bite heavenly.
Side Dishes
Pair these waffles with crispy bacon or fresh fruit salad to balance sweet and savory notes. A cup of freshly brewed coffee or a glass of cold milk also makes the perfect companion during breakfast or brunch.
Creative Ways to Present
Stack waffles for a towering breakfast masterpiece or cut them into fun shapes using cookie cutters for kids’ lunches or parties. Even layering waffles with cream cheese frosting and berries turns them into a show-stopping dessert.
Make Ahead and Storage
Storing Leftovers
Leftover waffles can be kept in an airtight container in the refrigerator for up to two days. This way, you can enjoy your Red Velvet Marble Waffles Recipe for another meal without losing any flavor or texture.
Freezing
To freeze, place waffles in a single layer on a baking sheet until firm, then transfer them to a freezer bag. They freeze wonderfully for up to a month, so you can grab your favorite red velvet treat whenever the craving hits.
Reheating
Reheat frozen waffles in a toaster or oven at medium heat to restore their crispness. Avoid microwaving as it can leave them soft. Proper reheating keeps your Red Velvet Marble Waffles Recipe tasting freshly made and delicious.
FAQs
Can I use regular milk instead of buttermilk?
While buttermilk adds a subtle tang and tenderness, you can substitute it with regular milk mixed with a teaspoon of lemon juice or vinegar to mimic the acidity, achieving similar results.
Is it necessary to use red food coloring?
Red food coloring gives the waffles their signature vibrant look. If you prefer, you can omit it and make chocolate marble waffles, but you’ll miss out on that classic red velvet charm.
Can I make these waffles gluten-free?
Yes! Try swapping the all-purpose flour for a gluten-free flour blend designed for baking. Keep in mind texture might vary slightly, but the flavors will still shine through beautifully.
How do I get the perfect marble swirl?
Pour the red and plain batters side by side then use a toothpick to gently swirl them together. Be careful not to overmix; the goal is distinct webs of color rather than a single uniform shade.
What toppings work best with Red Velvet Marble Waffles Recipe?
Classic cream cheese frosting, whipped cream, fresh berries, or a drizzle of chocolate syrup are fantastic choices. Feel free to get creative and add nuts or fruit compotes for extra texture and flavor.
Final Thoughts
There is something truly special about the Red Velvet Marble Waffles Recipe that transforms an ordinary meal into a delightful celebration. It’s fun to make, pleasing to the eye, and simply delicious. Whether you’re treating yourself or impressing guests, this recipe is sure to become a beloved favorite. So grab your waffle maker and get ready to enjoy a warm, comforting, and vibrant breakfast that feels like a hug on a plate!
Print
Red Velvet Marble Waffles Recipe
- Prep Time: 15 minutes
- Cook Time: 10 minutes per batch
- Total Time: 30-40 minutes
- Yield: 8-10 waffles depending on size
- Category: Breakfast
- Method: Baking
- Cuisine: American
Description
These Red Velvet Marble Waffles combine the rich flavors of classic red velvet cake with the fluffy texture of homemade waffles. Featuring a beautiful marbled design and topped with optional cream cheese or whipped cream, they make a perfect indulgent breakfast or dessert treat.
Ingredients
Dry Ingredients
- 2 cups all-purpose flour
- 1 cup granulated sugar
- 2 tablespoons unsweetened cocoa powder
- 1 tablespoon baking powder
- ½ teaspoon baking soda
- 1 teaspoon salt
Wet Ingredients
- 2 large eggs
- 1 cup buttermilk
- ½ cup vegetable oil
- 1 teaspoon vanilla extract
- 2 tablespoons red food coloring
Toppings (Optional)
- ½ cup cream cheese (for topping)
- Whipped cream (for serving)
Instructions
- Preheat the Waffle Maker: Begin by preheating your waffle maker according to the manufacturer’s instructions to ensure it reaches the optimal cooking temperature.
- Mix Dry Ingredients: In a large bowl, whisk together the all-purpose flour, granulated sugar, cocoa powder, baking powder, baking soda, and salt until everything is evenly combined.
- Combine Wet Ingredients: In a separate bowl, beat the eggs thoroughly, then add the buttermilk, vegetable oil, vanilla extract, and red food coloring. Mix these wet ingredients until smooth and well blended.
- Combine Mixtures: Gradually add the wet mixture into the dry ingredients, stirring gently until just combined. Avoid overmixing; a few lumps in the batter are perfectly fine and keep the waffles tender.
- Prepare the Waffle Maker: Lightly grease the waffle maker with cooking spray or a brush of oil to prevent sticking and ensure easy waffle removal.
- Create the Marble Effect: Pour a ladleful of the red velvet batter onto the preheated waffle maker. Next, add a spoonful of plain batter on top. Use a toothpick or skewer to swirl the two batters slightly, creating an attractive marbled pattern.
- Cook the Waffles: Close the waffle maker and cook for about 5-7 minutes, or until the waffles turn golden brown and crisp, following your waffle maker’s specific instructions.
- Repeat: Continue the process with the remaining batter, greasing the waffle maker as needed to maintain non-stick performance.
- Serve Warm: Carefully remove cooked waffles and serve immediately while warm for the best taste and texture.
- Top as Desired: Enhance your waffles by drizzling cream cheese frosting or topping with whipped cream for an extra decadent touch.
Notes
- Do not overmix the batter to keep waffles light and fluffy.
- You can substitute buttermilk with regular milk mixed with 1 tablespoon lemon juice or vinegar if needed.
- Adjust red food coloring quantity to achieve your preferred vibrant color.
- For crispier waffles, cook a little longer but be careful not to burn.
- These waffles can be frozen and reheated in a toaster.
- Use a toothpick or skewer gently to swirl batters to avoid mixing them too much.

