
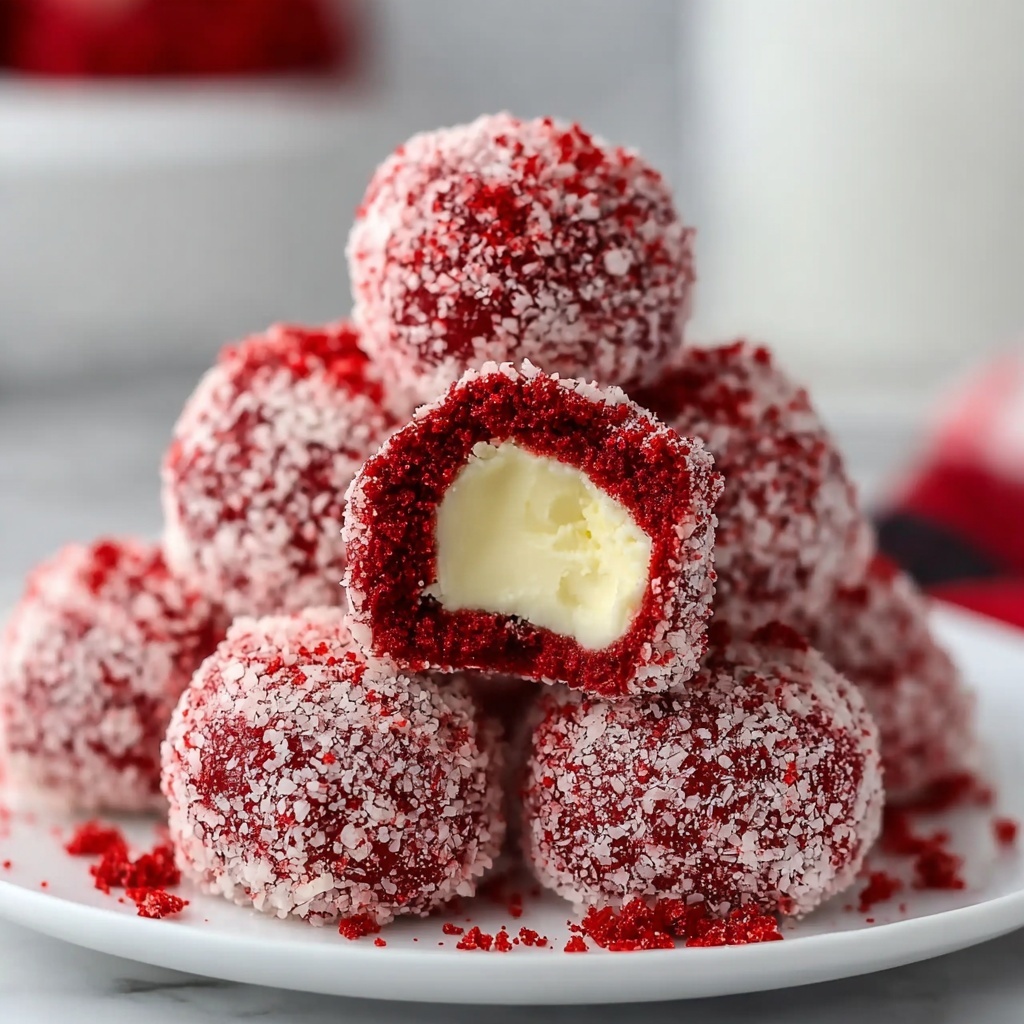
If you are on the hunt for a charming, festive treat that melts in your mouth and brings smiles all around, then you absolutely must try this Red Velvet Snowballs Recipe. These delightful little red velvet cookies, dusted generously with powdered sugar, capture the spirit of celebration with every bite. Their vibrant color and tender texture make them perfect for parties, teatime, or whenever you need a sweet pick-me-up. They’re tender, buttery, and just the right touch of cocoa with that iconic red velvet charm. I guarantee once you try this Red Velvet Snowballs Recipe, it will become a beloved staple in your baking repertoire.
Ingredients You’ll Need
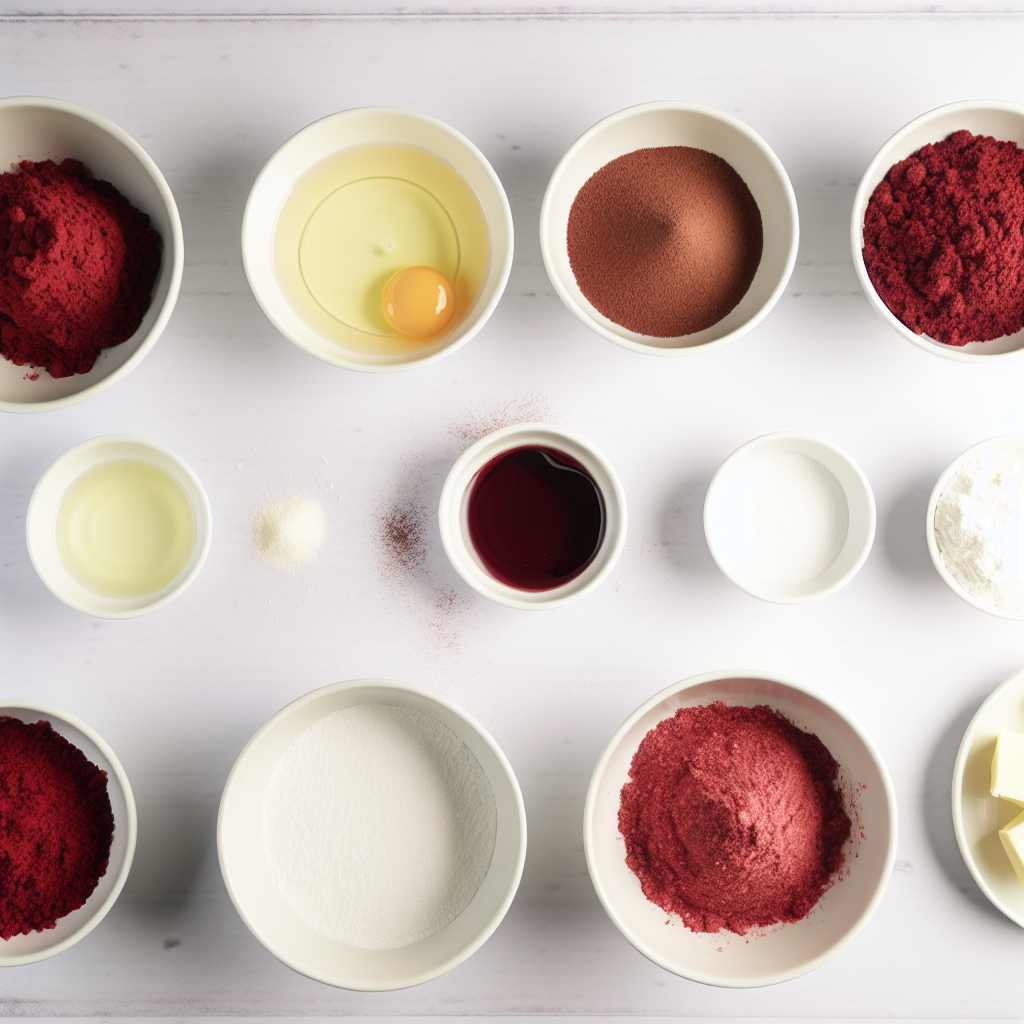
The beauty of this recipe lies in its simplicity. Each ingredient has a special role, whether it’s bringing richness, moisture, or that signature red hue that makes these snowballs pop. Using common pantry staples with a splash of color and a dusting of sweetness means you don’t need anything fancy to make something extraordinary.
- 1 1/2 cups all-purpose flour: The base that holds everything together and gives the cookies structure.
- 1/2 cup cocoa powder: Adds that subtle chocolate depth, balancing the sweetness perfectly.
- 1 teaspoon baking powder: Helps the cookies rise just right for a tender crumb.
- 1/4 teaspoon salt: Enhances all the flavors and balances the sweetness.
- 1/2 cup unsalted butter, softened: Makes the cookies rich and moist; be sure it’s softened to blend smoothly.
- 1 cup granulated sugar: Sweetens the dough and helps create a soft crumb.
- 1 large egg: Binds everything together and adds moisture.
- 1 teaspoon vanilla extract: Brings warmth and depth to the flavor profile.
- 1 tablespoon red food coloring: The secret for that eye-catching, festive red color.
- 1 cup powdered sugar (for coating): This is what transforms these cookies into snowy spheres of sweetness right after baking.
How to Make Red Velvet Snowballs Recipe
Step 1: Prepare Your Dry Ingredients
Start by preheating your oven to 350°F (175°C) and lining a baking sheet with parchment paper to prevent sticking. In a medium bowl, whisk together the all-purpose flour, cocoa powder, baking powder, and salt thoroughly. This ensures even distribution of leavening and flavor for perfectly textured cookies.
Step 2: Cream the Butter and Sugar
In a separate bowl, beat the softened butter with granulated sugar until light and creamy. This step is key because it introduces air into the dough, giving your Red Velvet Snowballs a tender and fluffy texture you’ll love.
Step 3: Add the Wet Ingredients
Mix in the egg, vanilla extract, and red food coloring to the butter mixture. The egg helps bind the dough while the vanilla enhances flavor. That red food coloring is what makes these cookies truly festive and vibrant.
Step 4: Combine Dry and Wet Ingredients
Gradually blend the whisked dry ingredients into the wet mixture, stirring until just combined. Be careful not to overmix; you want a soft dough that holds together but stays tender after baking.
Step 5: Shape and Bake
Use a tablespoon or small cookie scoop to portion the dough into balls, then gently roll them in your hands for smooth, round shapes. Arrange them evenly spaced on your prepared baking sheet. Bake for about 10 to 12 minutes until the cookies have puffed slightly and are set but still soft in the center.
Step 6: Coat While Warm
As soon as the cookies come out of the oven, let them cool just enough to handle, then roll each one in powdered sugar. This warm coating creates that classic “snowball” look—like little winter gems dusted in snow. Once coated, place them on a wire rack to cool completely.
How to Serve Red Velvet Snowballs Recipe
Garnishes
While these snowballs don’t need much to shine, you can get playful by adding a sprinkling of festive colored sugars or edible glitter on top of the powdered sugar coating for extra sparkle. A light drizzle of white chocolate can add a delicious touch as well, perfect for special occasions.
Side Dishes
These Red Velvet Snowballs pair wonderfully with a warm cup of coffee or a creamy glass of milk, balancing their richness. For an afternoon treat, serve alongside a pot of tea or even a scoop of vanilla ice cream to amplify the indulgence.
Creative Ways to Present
Presentation can turn your cookies into an enchanting centerpiece. Try arranging the snowballs in a decorative bowl, stacking them pyramid-style, or placing them in mini cupcake liners for an elegant dessert table. Gift-wrapping a batch in a clear box with a festive ribbon also makes a wonderful homemade gift.
Make Ahead and Storage
Storing Leftovers
If you have any cookies left after the party (and that might be hard!), store them in an airtight container at room temperature. They stay fresh for about a week, maintaining their soft texture and lovely flavor. Just keep them away from direct sunlight or heat to prevent drying out.
Freezing
Want to enjoy these delightful Red Velvet Snowballs anytime? Freeze the baked and cooled cookies in a sealed container or freezer bag for up to three months. When you want a treat, thaw at room temperature and then roll in powdered sugar if needed to refresh their snowy coating.
Reheating
To bring frozen or leftover cookies back to life, you can warm them gently in a preheated oven at 300°F for 5 to 7 minutes. This will soften the cookie and enhance the fresh-baked aroma. Avoid microwaving as it might make them too soft or chewy.
FAQs
Can I use a natural food coloring instead of red food coloring?
Absolutely! Beet juice or powder is a popular natural alternative that provides a lovely red hue. Just keep in mind it might make the dough a little more moist, so adjust dry ingredients slightly if needed.
How do I make sure my Red Velvet Snowballs turn out soft and not dry?
Softness comes from not overbaking and ensuring you beat the butter and sugar well for a fluffy base. Also, rolling the warm cookies immediately in powdered sugar helps lock in moisture.
Can I make these cookies gluten-free?
Yes! Substitute the all-purpose flour with a 1-to-1 gluten-free baking flour blend. Make sure it includes xanthan gum for structure, and you may need to slightly adjust the baking time.
Why do some of my cookies spread too much while baking?
This can happen if the butter is too melted or the dough is too warm. Use softened butter, not melted, and chill the dough briefly before baking if your kitchen is very warm to maintain shape.
Are these cookies suitable for holiday gifting?
Definitely! Their festive red color and snowy coating make them perfect for gift boxes or tins. They also travel well and taste delicious days after baking.
Final Thoughts
I’m so excited for you to try this Red Velvet Snowballs Recipe because it truly combines simplicity and magic in every bite. Whether you’re baking for a special occasion or simply because you love a good cookie, these snowballs are guaranteed to spread joy. Once you whip up a batch, you’ll see why this recipe quickly becomes a must-have in your holiday or anytime baking collection. Happy baking and even happier eating!
Print
Red Velvet Snowballs Recipe
- Prep Time: 20 minutes
- Cook Time: 12 minutes
- Total Time: 32 minutes
- Yield: 24 cookies
- Category: Dessert
- Method: Baking
- Cuisine: American
Description
Red Velvet Snowballs are delightful petite cookies featuring a rich red velvet flavor coated in a sweet powdered sugar dusting. Perfect as a charming treat for parties, afternoon tea, or just a cozy snack with coffee or milk. These soft, buttery cookies offer a vibrant red color and a melt-in-your-mouth texture that will impress both kids and adults alike.
Ingredients
Dry Ingredients
- 1 1/2 cups all-purpose flour
- 1/2 cup cocoa powder
- 1 teaspoon baking powder
- 1/4 teaspoon salt
Wet Ingredients
- 1/2 cup unsalted butter, softened
- 1 cup granulated sugar
- 1 large egg
- 1 teaspoon vanilla extract
- 1 tablespoon red food coloring
For Coating
- 1 cup powdered sugar
Instructions
- Preparation: Preheat your oven to 350°F (175°C) and line a baking sheet with parchment paper to prevent sticking and ensure even baking.
- Mix Dry Ingredients: In a medium bowl, whisk together the all-purpose flour, cocoa powder, baking powder, and salt to evenly combine the dry components.
- Cream Butter and Sugar: In a separate large bowl, beat the softened unsalted butter and granulated sugar using a hand mixer or stand mixer until the mixture is light, fluffy, and creamy, which usually takes about 2-3 minutes.
- Add Wet Ingredients: To the creamed butter mixture, add the egg, vanilla extract, and red food coloring. Mix thoroughly to achieve a consistent, bright red batter.
- Combine Dry and Wet: Gradually add the dry ingredients to the wet ingredients, mixing gently until fully incorporated and forming a smooth dough.
- Shape Dough Balls: Using a tablespoon or small cookie scoop, portion out the dough and roll each portion into a ball with your hands for uniform size.
- Bake Cookies: Place the dough balls spaced evenly on the prepared baking sheet. Bake in the preheated oven for 10 to 12 minutes until the cookies are just set but still soft.
- Coat with Powdered Sugar: Remove the cookies from the oven and let them cool for a few minutes until warm but manageable. Roll each cookie in powdered sugar to create a snowy coating.
- Cool Completely: Transfer the coated cookies to a wire rack and allow them to cool completely before serving to let the coating set and the texture stabilize.
Notes
- These cookies pair wonderfully with coffee or a glass of milk for a delightful snack experience.
- Store baked cookies in an airtight container at room temperature to keep them fresh for up to one week.
- For longer storage, freeze the cookies in a sealed container for up to three months; thaw at room temperature before serving.

